Chickpea NOodle Soup
Whether you’re sick with a fever or a broken heart, this soup is the answer. We replaced the chicken in this classic comfort food with chickpeas to give you the protein you need to help recover when you’re feeling sick, and the broth filled with fresh thyme and garlic will smell so good your sinuses will want to clear up all on their own! If you’re still heartbroken, a little ice cream probably wouldn’t hurt, either! This recipe is straight from my new cookbook, The Ultimate Vegan Cookbook! (Which, by the way, is 45% OFF today for Cyber Monday! 🙌) It made a sneak appearance in my last cookbook too - it's THAT good, guys. This soup is single-handedly the most requested sick-day recipe in our home, and it's the one dish I always make for friends and family when they need a little pick-me-up, too.
It whips up easily and tastes so much like the real thing - with no chicken at all! Still packed with protein from the chickpeas and tons of flavor from all the fresh herbs, this soup is a serious crowd-pleaser. Scroll down and let's eat!
INGREDIENTS
2 tablespoons (30 ml) olive oil 4 cloves garlic, minced 2 medium onions, chopped 4 medium carrots, thinly sliced 4 celery ribs, thinly sliced 6 - 8 sprigs fresh thyme 1 bay leaf 2 quarts (1892 ml) vegetable broth 8 ounces (227 g) whole wheat rotini noodles 1 cup (240 g) cooked chickpeas salt + pepper to taste chopped fresh parsley, garnish crackers or bread, garnish DIRECTIONS In a cast-iron dutch oven or large soup pot, heat the coconut oil over medium heat until melted. Add onions, carrots, celery, garlic, fresh thyme & bay leaf and sauté until veggies are softened, but not browned. Add vegetable broth and bring to a boil. Once the soup is boiling, add the noodles and chickpeas and cook about 8 minutes, until the noodles are almost completely cooked (don’t worry, they’ll continue cooking in the water). Add salt and pepper to taste. Remove from heat and serve with freshly chopped parsley and salty crackers or bread! TIPS Serves 6. Leftover soup can be refrigerated up to a week or frozen indefinitely and reheated as needed. You can sub gluten-free noodles here, if you prefer!
2 Comments
Easy Pickled Onions
When I stayed in Jackson Hole for Thanksgiving this year, I had a hard time finding meals that were vegan-friendly. While I was there I ate a lot of salad, french fries, and avocado toast from room service. The avocado toast was a tiny, beautiful portion covered in baby radishes and pink pickled onions. I'd need like four of said portions to actually fill me up, but the onions were just SO good on top - I knew I'd have to recreate them at home. After that, I sort of forgot about them for awhile. Lately, I've gotten back into my avocado toast obsession and craved a little extra snap on top, so I decided it was time I make my own.
Their flavor is so much lighter and sweeter than a typical onion, but these pickled onions still have a great crunch. They're perfect on burgers, tacos, sandwiches, salads, or - you guessed it - avocado toast! If you follow us on instagram, you might've seen the recent picture (shown below) featuring them. I'm totally addicted! I even like them straight from the jar. The best part? They really couldn't be easier to make. A little chop and pour is really all you need to do! They last about a couple weeks in the fridge, and they're so easy to whip up this'll become one of your new favorite 'condiments'. I promise. Let's eat!
INGREDIENTS
1 medium red onion, thinly sliced 1 medium clove garlic, quartered (optional) 3/4 cup apple cider OR rice vinegar 3/4 cup warm water 1 teaspoon sugar 1 teaspoon salt DIRECTIONS Place the sliced onion and garlic, if using, in a jar capable of holding at least 20 ounces. We used a round weck jar, but any kind that closes will do. Whisk together the vinegar, water, sugar, and salt in a medium-sized bowl until the sugar and salt are fully dissolved. Pour the mixture over the onions and garlic and let sit at room temperature for at least 1-4 hours. Cover the jar with a lid and place it in the refrigerator for at least 1 day to pickle. The longer it pickles, the sweeter and softer the onions will be. Use the pickles on whatever you like! Pickled onions will last for a few weeks stored in their jar in the refrigerator. Potato Leek Gratin
If you've hung around here for awhile you probably know that I'm a big potato eater, having grown up in the great state of Maine. I like 'em cooked every which way and eat them way more than I probably should. But screw balance, because potatoes are the star of this dish and they are so, soooo worth it here. We started by slicing up our potatoes really thin, adding leeks cooked in garlic and rosemary, and covering the whole thing in a super cheezy sauce and homemade parmesan. It gets nice and bubbly when it cooks up and packs a ton of flavor. Its an easy dish to whip up and would make a great main or side dish at any meal. I used to love when my Mom would make gratin with dinner, so I'm happy I finally recreated the dish - but with a lot more flavor and a LOT less fat and salt than normal. It's cheezy, oozy-gooey, full of rich, savory flavor and something you're gonna wanna shovel into your mouth as soon as you pull it out of the oven - even Grandma will be impressed. Let's eat!
Looking for more with potatoes? Try our super popular Potato Leek Soup, Celeriac Mashed Potatoes, or Classic Backyard Potato Salad!
INGREDIENTS
2 lbs. gold potatoes, thinly sliced 2 tablespoons coconut oil 4 large leeks, trimmed and thinly sliced 4 cloves garlic, minced 3 sprigs fresh rosemary 1 teaspoon salt 1/2 teaspoon pepper 1 cup unsweetened almond milk 1 - 14 oz. can full-fat coconut milk 1/2 cup nutritional yeast 3 tablespoons corn starch 2 tablespoons fresh rosemary, chopped 1/2 teaspoon salt 1/4 teaspoon pepper 1/4 cup homemade parmesan cheeze, to garnish the top DIRECTIONS Preheat oven to 375 degrees. Thinly slice potatoes and layer them into a greased 9x13 inch baking dish. Heat the coconut oil in a large cast iron pan over medium heat. When melted, sauté the leeks, garlic, and fresh rosemary over medium heat. Season with the salt and pepper and cook until softened and fragrant, about 5 minutes. [Take care NOT to burn the garlic + leeks- they don't taste good.] Remove the pan from heat, toss the rosemary stems, and pour the garlic leek mixture over the sliced potatoes in the casserole dish. In the same pan you used to cook the leeks and garlic, whisk together the almond + coconut milks, nutritional yeast, corn starch, fresh chopped rosemary, salt and pepper. Cook over medium heat, stirring occasionally, until the mixture thickens - about 5 minutes. Pour this mixture over the leek and potatoes in the casserole dish and use a spoon to gently smooth it over the top, letting it fill the crevices between the veggies. Sprinkle parmesan cheeze over the top and bake for 30-35 minutes, until the mixture is golden and bubbling. Serve + enjoy! NOTES Serves 8. Leftovers save well in an airtight container in the fridge up to a week. 
Savory Stuffed Mushrooms
Until a few years ago at a holiday party, I thought I hated stuffed mushrooms. I'd never actually tried them before that but I wasn't a huge fan of mushrooms and it seemed to me like no matter what you stuffed them with, they could't possibly taste that great. I was very, very wrong. The older I get, the more I like mushrooms - they're still not my favorite on their own, but the earthy, rich, almost meaty flavor they lend to dishes is both impressive and delicious, as far as I'm concerned.
Anyway, a friend brought some stuffed mushrooms to that holiday party a few years ago, I tried them, and before I knew it I was popping button mushrooms in my mouth like they were going out of style. I was hooked! But that was over two years ago, and this is the first time I've made a stuffed mushroom recipe since that is just so out of this world I had to share it with you guys. I know there are tons of recipes for this dish online, but I promise this one is really good. And pretty easy, too! It's packed with flavor, the filling has great texture, and the homemade parmesan cheese on top adds some fanciness and helps keep the filling moist. The whole things comes together in your mouth like WOAH. This is a recipe worthy of sharing at your next Holiday party - it's a serious crowd-pleaser! Let's get cookin'.
INGREDIENTS
Stuffed Mushrooms: 24 ounces cremini mushrooms, stems removed 2 tablespoons coconut oil 4 cloves garlic, minced 2 shallots, chopped 4 cups fresh spinach 1 cup wild rice, cooked 1/2 cup roasted red peppers, chopped 1/2 cup walnuts, finely chopped 1/2 cup bread crumbs 1/2 cup fresh parsley, chopped 1 tablespoon + 2 teaspoons balsamic vinegar 1 teaspoon salt 1/2 teaspoon pepper fresh chopped parsley, for garnish Parmesan Cheeze: 1 cup cashews 1/4 cup nutritional yeast 3/4 teaspoon salt 1/4 teaspoon garlic powder DIRECTIONS Preheat oven to 375 degrees. Gently wash the mushrooms and remove the stems. Place them cap down onto a lined baking sheet and set aside. In a large cast iron pan, melt the coconut oil over medium heat. Sauté the garlic and shallots until soft and fragrant, about 5 minutes. Add the spinach, stirring continuously until it has wilted. Remove the pan from heat and pour the cooked veggies into a large mixing bowl. Stir in the wild rice, roasted red peppers, walnuts, bread crumbs, parsley, balsamic vinegar, salt and pepper. Toss the mixture together and set it aside to cool for a few minutes. While the mixture cools, you can prepare the parmesan cheeze by placing all of the ingredients into a food processor and pulsing until the mixture becomes a fine meal. Save some (about 1/4-1/2 cup) to sprinkle over the mushrooms and save the rest in an airtight container in the fridge up to 2 weeks. When the mixture has cooled enough to handle, use a spoon, ice cream scoop, or your fingers to scoop the mixture into the cap of each mushroom. The amount you use will vary depending on the size of the mushroom cap. Once all the caps are filled, sprinkle the reserved parmesan cheeze over the top. Bake the stuffed mushrooms for 20-25 minutes, until tender. Remove from the oven, let cool slightly, and serve immediately! NOTES It was hard to come up with just how many people this serves since it really depends on how big the shrooms are, how many people are around, and how many each person eats BUT this recipe gave me 1 packed baking sheet full of stuffed mushrooms. Leftovers can be saved in the fridge up to 3 days. They are best reheated in a microwave or in an oven at about 350 degrees for 10-15 minutes, though they may get slightly softer after reheating.
Ginger Garlic Roasted Carrots
I love this recipe because it's easy, full of flavor, and will make your dinner guests think you went to a lot of trouble - when all you had to do was sprinkle some herbs and bake. Okay, so there is slightly more to it than that, but you get the gist: it's easy! Carrots are usually drowned in sugar at the Holiday table, stuffed into brown sugar syrups and caramelized, even though they're pretty sweet on their own. Our take on these gorgeous heirlooms is rather to add a little flavor and spice and let the carrot flavor shine through, 'cause cooked carrots are delicious and don't deserve to be smothered by sugar! The combination of fresh ginger and garlic adds a ton of savory, salty flavor and the fresh thyme just accents the combo. These would be perfect as a side dish at your Holiday gathering or as a quick addition to a normal Monday night meal - everyone will love them! Let's get cookin'.
INGREDIENTS
1.5 lbs heirloom rainbow carrots (regular orange carrots work great, too!) 1-2 tablespoons olive OR coconut oil 6 cloves garlic, minced 2 teaspoons fresh ginger, grated 1/2 teaspoon salt 1/4 teaspoon ground pepper fresh thyme, for garnish DIRECTIONS Preheat oven to 425 degrees. Wash the carrots and remove any green tops. Chop the larger carrots in half lengthwise, and lay the carrots on a lined baking sheet. Drizzle with the oil and sprinkle the garlic, ginger, salt and pepper over the top. Use your fingers to gently flip the carrots, covering them as evenly as possible in the oil and spices. Bake for about 30 minutes, flipping about halfway through. Carrots are done when they are fork tender and beginning to brown. Remove from oven, sprinkle with fresh thyme, and serve immediately! NOTES Serves 4. Leftovers can be reheated in a low-heat oven or a microwave, but are best enjoyed fresh. They will last, covered in the fridge, about a week.
Roasted Butternut Squash + Apple Soup
We're in the full swing of autumn and I'm taking every chance I get to make and eat soup. I love soups of all kinds, shapes, and sizes and will put just about anything into a pot with some vegetable broth. One of my favorite cozy fall soups right now is this super easy Roasted Butternut Squash + Apple Soup. It packs a ton of flavor into a ridiculously easy recipe, and is such a great way to throw some beta carotene-rich butternut squash into your diet! We like to use tart green apples, but you can use whatever apples you have on hand. We also like to blend the soup to an ultra velvety texture in our blender, but keeping some chunks in it is great if that's your style, too. It tastes great paired with naan or crusty bread and a sprinkle of toasted pepitas and nutmeg. Make a batch for dinner tonight or pour it into a thermos and take it for lunch at work all week long. Let's get cooking!

INGREDIENTS
1 teaspoon coconut oil 1 - 3 lb. butternut squash, peeled, deseeded and cut into 1 inch cubes 1 tablespoon coconut oil 2 small yellow onions, chopped 2 cloves garlic, minced 2 medium carrots, sliced 2 celery stalks, sliced 2 tart green apples (any apples work though), cored and chopped 4 cups vegetable broth or water 1 teaspoon salt 1/2 teaspoon pepper pinch of nutmeg toasted pepitas, garnish (optional) sprinkle of nutmeg, garnish (optional) DIRECTIONS Preheat oven to 400 degrees. Peel and cut butternut squash into 1 inch cubes and place on the parchment paper-lined baking sheet. Drizzle with 1 teaspoon coconut oil and a sprinkle of salt + pepper and bake for about 30 minutes, flipping halfway through. Set aside to cool. While squash roasts, heat 1 tablespoon of coconut oil over medium heat in a large pot or dutch oven. Sauté onions and garlic about 5 minutes, until they because fragrant and softened. Toss in carrots and celery and sauté together with the garlic and onions another 2-3 minutes. Toss in apples, vegetable broth and spices and bring to a boil. Reduce heat, cover, and simmer for 30 minutes. Remove from heat, toss in roasted squash, and blend using an immersion blender or (for extra creamy soup) a high-speed blender. Blend in batches, if needed. Pour blended soup back into the pot and serve immediately with toasted pepitas and a sprinkle of nutmeg for garnish. Saves well in the fridge for about a week, and freezes indefinitely. Enjoy! NOTES Don't have butternut squash? Substitute any type of squash you like, or use sweet potatoes!

Parsley Pesto
Here in Southern California, the growing season starts earlier than most places. Thanks to our high temps and sunny days, our garden started growing back in March and hasn't stopped since. In other words, our parsley plant is bigger than most peoples large dog. We have SO MUCH parsely- we're overrun! And there's only so much garnishing you can do with parsley before you're sick of it. A better way to use up mass amounts of fresh, fragrant parsley? This simple Parsley Pesto recipe! It whips up quickly and taste great spread on everything! I'm loving pairing it with sweet cherry tomatoes on crackers and crusty bread and mixing it into pasta dishes like this Caprese Pasta Salad. I was hesitant when I started messing around with this stuff- what if I didn't like it as much as my traditional Hemp Seed Basil Pesto? What if it just didn't taste right? Well, SURPRISE! It tastes AMAZING! Adding the green onions and extra garlic give it a ton of flavor and take away from the bitterness of having too much parsley, and the nuts keep it smooth and mellow. It's green gold! And it saves well in the fridge for up to a week, so you can enjoy fresh, flavorful pesto all week long. Lets eat!
INGREDIENTS:
3 packed cups fresh parsley, stems removed 1 cup almonds or cashews 1/2 cup olive oil 1/2 cup green onion, chopped 3 tablespoons lemon juice 4 cloves garlic 1/2 teaspoon salt 1/2 teaspoon pepper DIRECTIONS: In a high speed blender (we used our Vitamix) or a food processor, combine all ingredients. Blend until smooth, or until your desired texture- you can leave it chunkier if you like! [If you don't have a great blender to work with, try soaking your nuts in warm water for at least an hour before blending them, it'll help break them down much more easily.] Spread it on everything from bread and crackers to pizza dough and rice cakes. Saves well in an airtight container for about a week, or until pesto begins to brown. Enjoy!
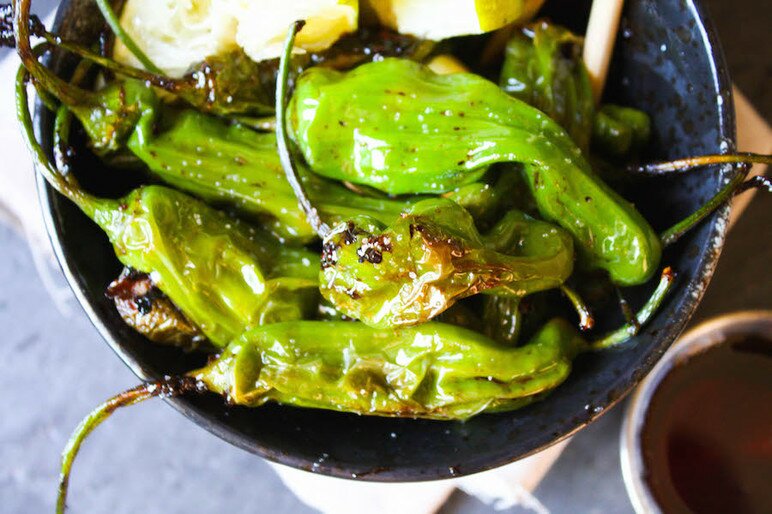
Sesame Ginger Blistered Shoshito Peppers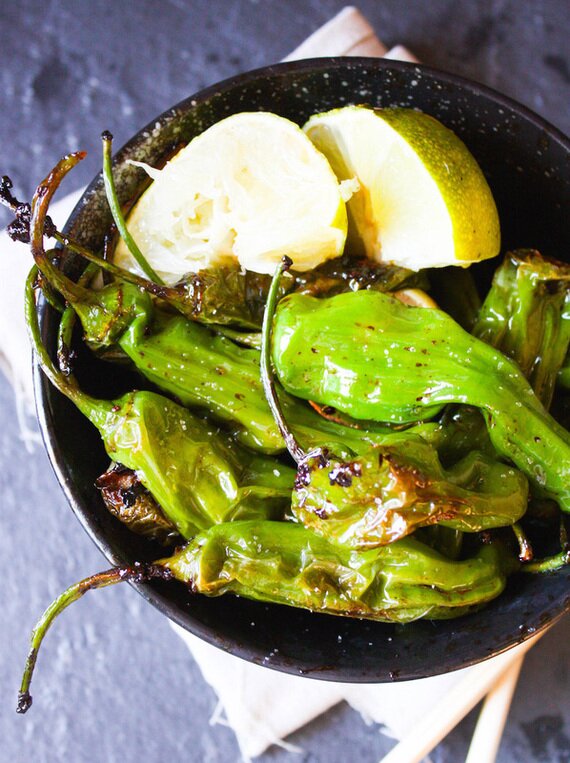
INGREDIENTS
6 ounces Shoshito Peppers, washed 1 tablespoon coconut oil 1 tablespoon soy sauce or tamari 1 tablespoon toasted sesame oil 1 tablespoon fresh lime juice 1 teaspoon maple syrup 1 teaspoon fresh ginger, minced 1 clove garlic, minced 1/4 teaspoon of chili oil (optional) pinch of salt DIRECTIONS Wash the peppers and heat the coconut oil in a large skillet over medium-high heat. While the oil heats, combine soy sauce, sesame oil, lime juice, maple syrup, ginger and garlic in a small bowl. Toss the peppers into the skillet, then pour in the sauce. Sauté for 5-8 minutes, stirring frequently to coat the peppers in sauce. Continue stirring until peppers become evenly blistered (lightly browned and covered in small air pockets). Remove from heat, and serve immediately with a squeeze of fresh lime and soy sauce or spicy Chinese mustard. Enjoy!
This was a super quick + easy lunch I was inspired to make after first trying shoshitos at sushi place in Seal Beach a while back. They were salty, a bit crunchy, and had just a touch of spiciness. So good! I wanted to do a little spin of my own and included fresh ginger and garlic- 'cause they're my favorite. The sesame ginger sauce was AMAZING and a perfect pair with these sweet peppers! My only addition would be sprinkle of sesame seeds for texture. (I was in a bit of a time crunch, so excuse the not-as-fancy iPhone photos on this one.) They're great as a snack or alongside a dinner with rice and kung pao cauliflower. We found our shoshito peppers at Trader Joe's, but you should be able to find them at any nicer grocery stores or Asian markets. You're gonna love 'em- especially since they're just about 10 minutes, start to finish. Let's eat!

Chick'n Tortilla Soup
One of the first recipes I ever made when I decided to try being a vegan was a tortilla soup from 'How It All Vegan'. Its a super simple combo of canned tomatoes, veggie broth, onions, spices and a hearty sprinkle of tortilla chips- very user friendly for a new vegan. Alex loved it. It may just have been the thing that convinced him that this whole 'no meat' thing wasn't so bad after all- he jumped on the vegan train just a few months after I did. And having a vegan partner makes life in our house very harmonious and very delicious. Especially when you get to sit down and enjoy a meal like this with your ridiculously good looking boyfriend after!
This soup is a step-up from the stuff I was making way back then for sure, and takes less than an hour from start to finish. I added lots of onions, bell peppers, and fresh lime juice, plus the new Chick Seitan from Upton's Naturals. This stuff is amazing! It looks like chicken, it tastes like chicken (I mean I think- I haven't eaten chicken in years), and the texture would be great fried up and served with mashed potatoes or baked into pot pies- but also in this tortilla soup! It adds a great meaty texture and flavor to the soup and really makes it a meal. It's delicious! You can find the Upton's Chick Seitan anywhere their products are sold or you can order it online. But if you're avoiding gluten, ditch the faux meat and just enjoy a delicious, veggie-loaded tortilla soup. Let's do this!
INGREDIENTS:
1 tablespoon oil 4 cloves garlic, minced 1 large onion, diced 1 large bell pepper, diced 2 medium tomatoes, diced 4 cups vegetable broth 2 limes, freshly juiced (about 1/3 cup juice) 1 bay leaf 1 teaspoon chili powder 1 teaspoon cumin 1 teaspoon salt 1/2 teaspoon cayenne 1/2 teaspoon smoked paprika 1/2 package (4 ounces) of Upton's Chick Seitan tortilla chips + cilantro, for garnish DIRECTIONS: In a large pot heat oil over medium heat. Sauté garlic, onion, and peppers until softened. Add in tomatoes, veggie broth, lime juice, bay leaf, spices, and Chick Seitan and simmer, stirring occasionally, for 30-40 minutes. When ready, serve with tortilla chips and freshly chopped cilantro. Makes 4-6 servings, and keeps about a week in the fridge. Enjoy!
Roasted Romanesco Cauliflower
As sexy as Jamie Oliver is (that accent- and he cooks!), I don't follow his Instagram for the selfies. His feed is regularly updated (by I'm sure not him) with delicious food photos and recipe inspiration, and often times he posts vegetarian & vegan recipes. I had seen his Whole Roasted Cauliflower recipe as an meat-free alternative to a roast around the holidays and was totally intrigued. I already love cauliflower, and after I tried it- I fell in love. A whole head of cauliflower is rarely more than $2, and the rest of the ingredients I had on hand. Plus, its a pretty guilt-free, set-it-and-forget-it meal...which is what I'm all about. And while Jamie's recipe was delicious, mine is better.
I mean it! Okay, maybe I'm biased, but I think that using romanesco here steps the whole dish up a notch. Not only is it the most gorgeous and mathematically-pleasing vegetable, but it has such a great buttery flavor all on its own that it really adds depth and flavor to a pretty simple dish. We love smoked paprika, and I think the lemon and sherry round out the spicy, smoky flavors nicely. Its an easy dish to make on a busy night as a main dish or side, and is super customizable. Don't have smoked paprika? Try cumin & cayenne or curry & turmeric! Either way, run down to the farmers market and get a head of this gorgeous cauliflower while its still in season- you won't regret it.
INGREDIENTS
1 large head romanesco cauliflower 1/4 cup liquid coconut or olive oil 1/2 cup diced red onion 6 cloves garlic, minced juice of 1 whole lemon (about 1/4 cup) 1 teaspoon smoked paprika 1/2 teaspoon chili powder 1/2 teaspoon each salt & pepper 1/2 cup dry sherry fresh chopped cilantro, for garnish DIRECTIONS Preheat the oven to 400 degrees. Trim the washed cauliflower leaves and cut the stem, if necessary, so that cauliflower stands upright in a dutch oven or heavy cast-iron pan (with a lid). Place the cauliflower in the pan, and use a sharp knife to carve a 1 in. deep X into the top of the cauliflower. In a small bowl, combine oil with diced onions, minced garlic, lemon juice, spices, salt & pepper. Pour over the cauliflower, slightly pulling the X apart so the oil can seep into the middle. Try to evenly coat the cauliflower (no need to flip it over). Pour sherry lightly over the whole thing, then cover the pan. Bake for 40 minutes, or until cauliflower is fork-tender, then remove the lid and cook for another 10-15 minutes. Remove from the oven and serve with an extra squeeze of lemon juice and a sprinkle of fresh cilantro or parsley. Serves 4, leftovers can be refrigerated and reheated for up to a week. Enjoy!
<
|
tagsAll  RSS Feed RSS Feed
|