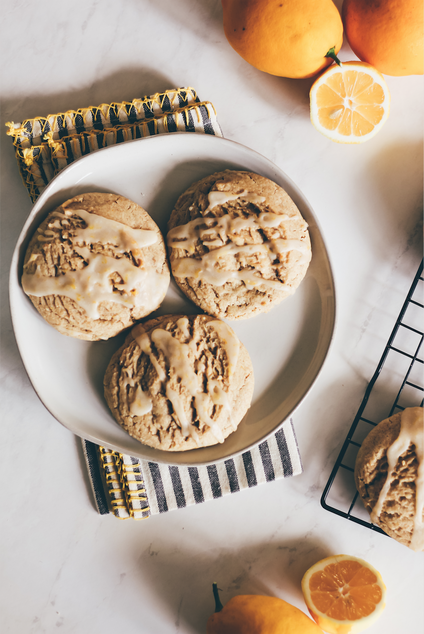
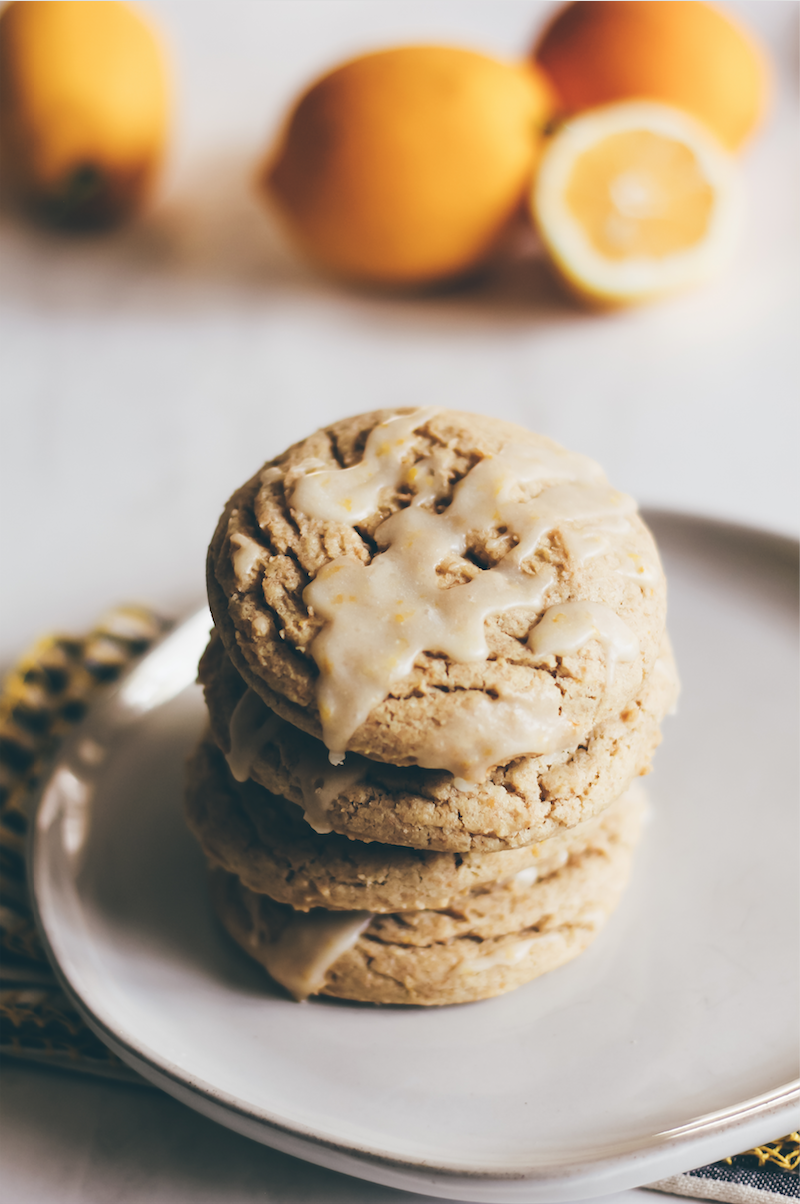
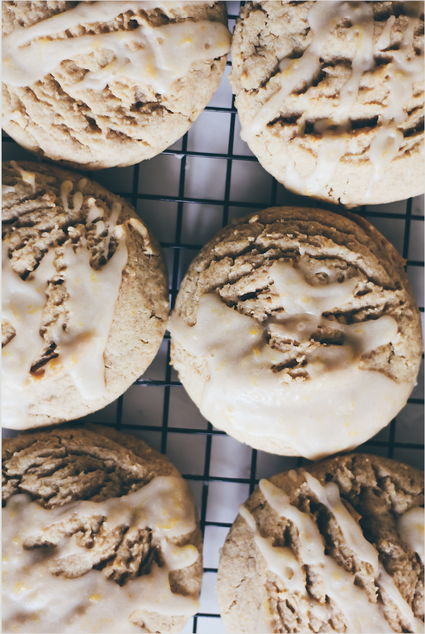
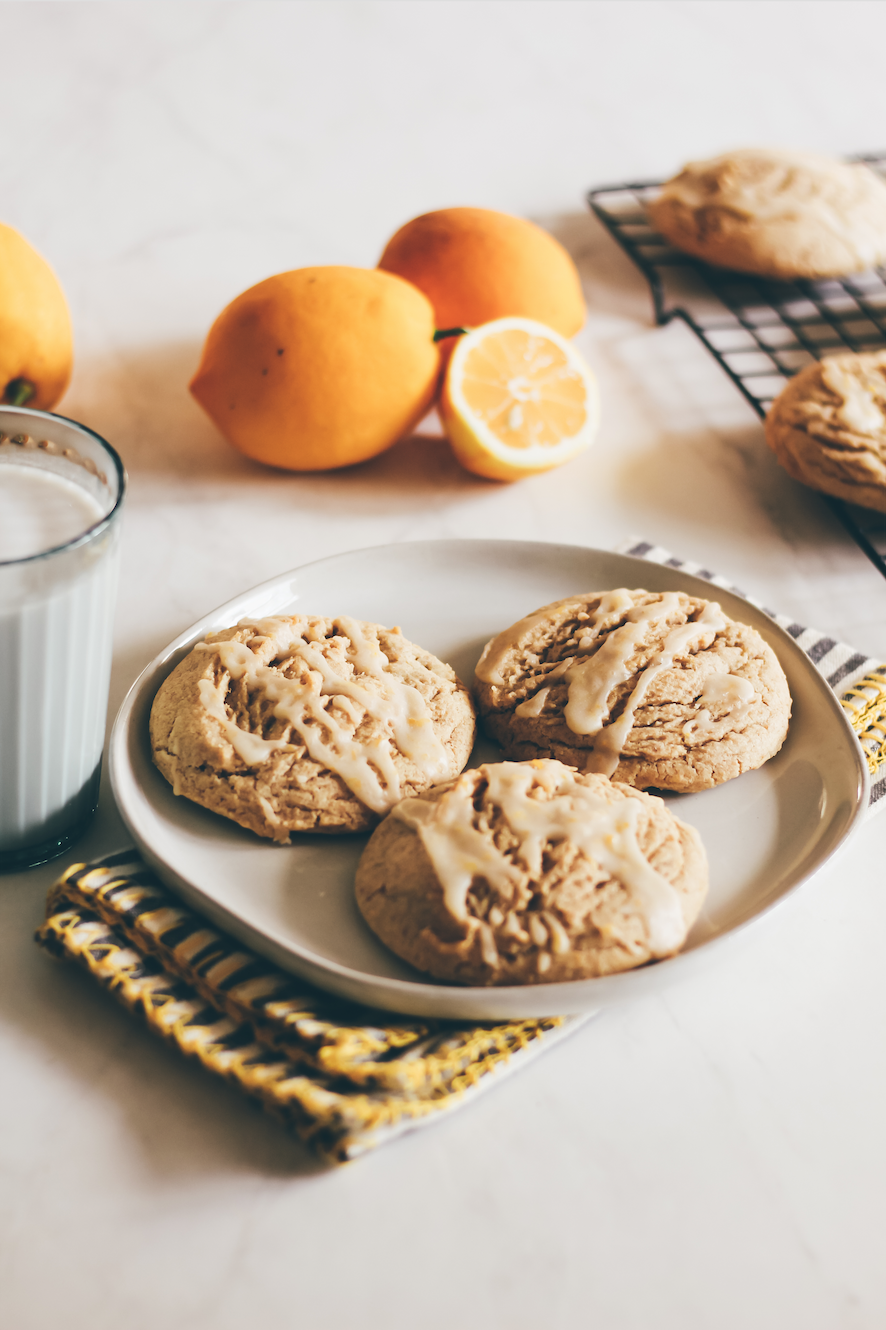
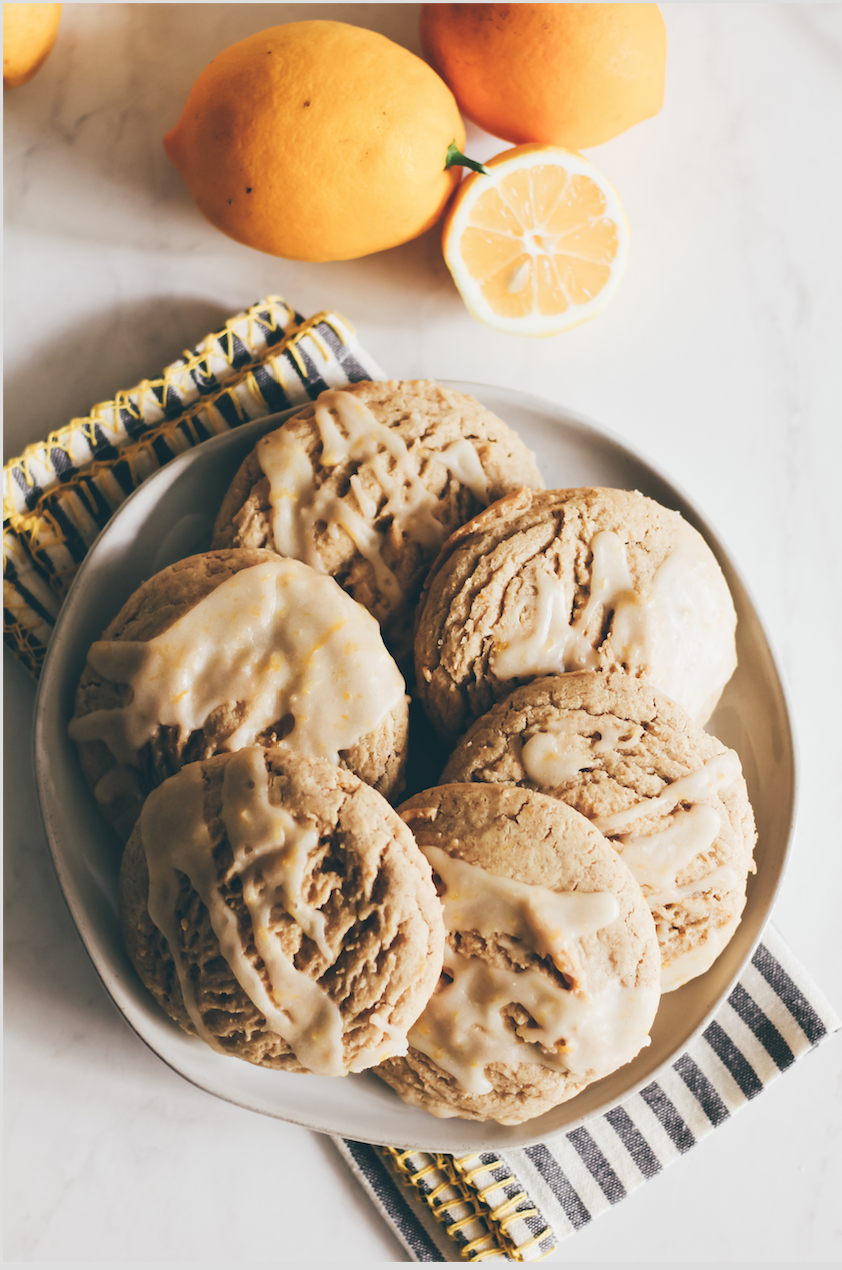
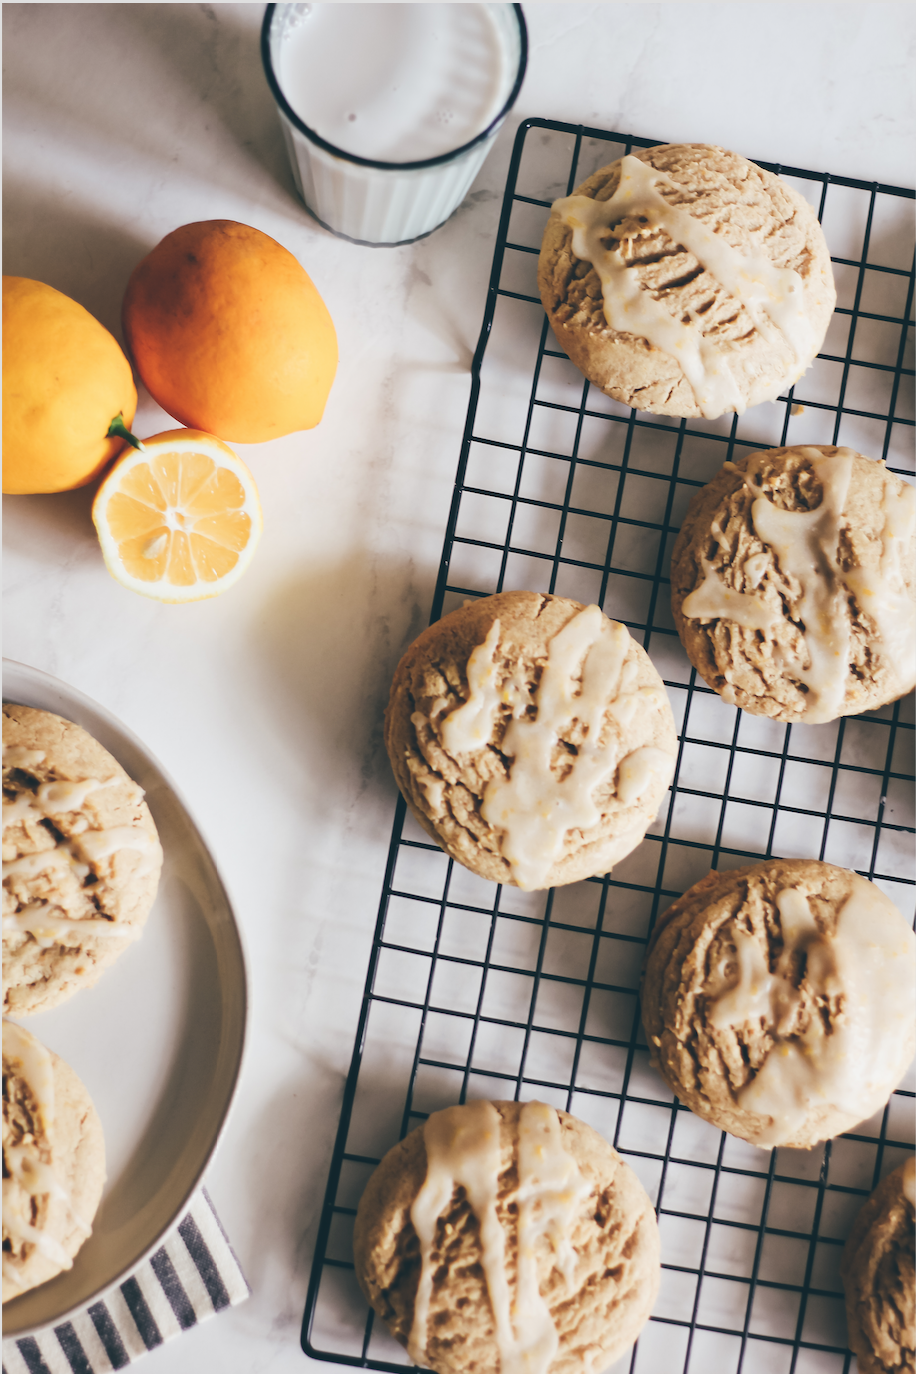
EASIEST LEMON SUGAR COOKIES (NO FRIDGE REQUIRED!)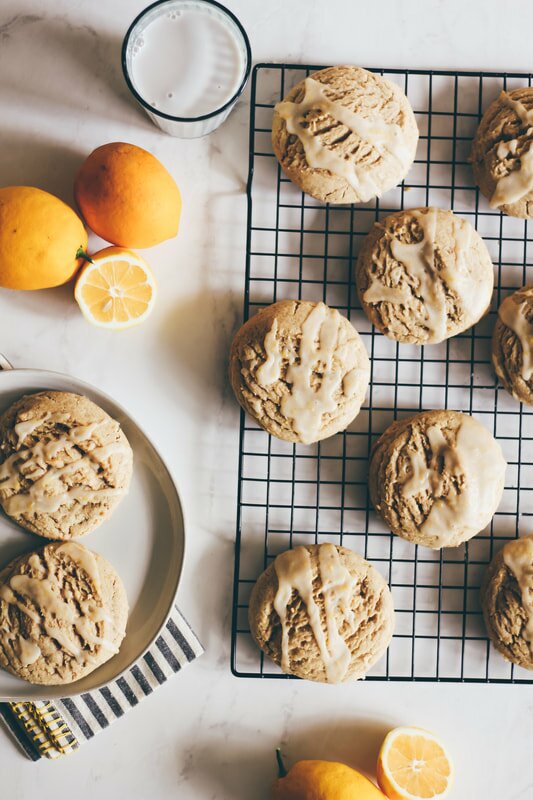
I was never much of a lemon cookie fas as a kid - but who was? With chocolate chip, peanut butter, and the pervasive M&M sprinkled cookies of the 90s, it really was no competition. But as an adult, I've grown a real appreciation for the flavor of fresh meyer lemon! Its a little sweeter and more full-bodied than the flavor of a traditional lemon, but I'd even take a regular old lemon here. Because lemon is GOOD. these are like the cookies you WISH you'd been eating in the 90s! These cookies are:
fluffy chewy soft perfectly sweetened drizzled in fresh lemon glaze and SUPER lemon-y! You're going to love them as much as I do. Especially when you realize that they are like the sugar cookies younger, cooler, hipper cousin. They whip up in minutes and require NO REFRIGERATION. Yup, you read that right! Most sugar cookie recipes call for at least 1-3 hours in the fridge both batter making to ensure a proper shape and texture as the cookies cook; otherwise, they'd melt all over the pan into a sheet-pan sized cookies that's not actually appetizing at all. So here's the thing - these babies, they go from prep bowl straight to sheet pan straight to oven - it literally couldn't get any easier than that. So let's put on over our day sweatpants and get to baking - you'll have fresh, warm cookies in an hour!
INGREDIENTS:
COOKIES 1 and 3/4 cups flour 1/2 teaspoon baking soda 1/2 teaspoon salt 1 tablespoon lemon zest (about 1 medium lemon) 1/2 cup unsalted ghee (or butter, room temp) 1 cup granulated sugar 1 egg 1 teaspoon vanilla 2 tablespoons lemon juice GLAZE 2 cups powdered sugar 2 tablespoons lemon zest 1/3 cup lemon juice DIRECTIONS: Preheat oven to 350 degrees. Prepare a baking sheet with a non-stick spray or parchment paper, and set aside. In a medium bowl whisk the flour, baking soda, salt. In a separate large mixing bowl beat the butter for a few seconds, add the sugar and mix until light and fluffy. Add in the egg, vanilla, lemon zest and lemon juice. Beat or whisk until fully combined. Add in the dry ingredients, and continue mixing until a fluffy batter forms. Drop cookie dough by the spoonful, or using a 1-2 inch cookie scoop, onto the prepared cookie sheet. We used a two inch scoop for big, bakery-sized cookies! Bake until light golden on edges, approximately 12- 14 minutes. Remove from oven, let cool on the cookie sheet about 5 minutes and then remove to continue cooling on a wire rack. While cooling, prepare the glaze by whisking the powdered sugar, lemon juice, and lemon zest together until well combined. Drizzle over the top of the cookies. Allow to sit and dry, glaze will harden after about 10-20 minutes. Leftovers can be stored in airtight container at room temperature for 3-4 days. Enjoy! 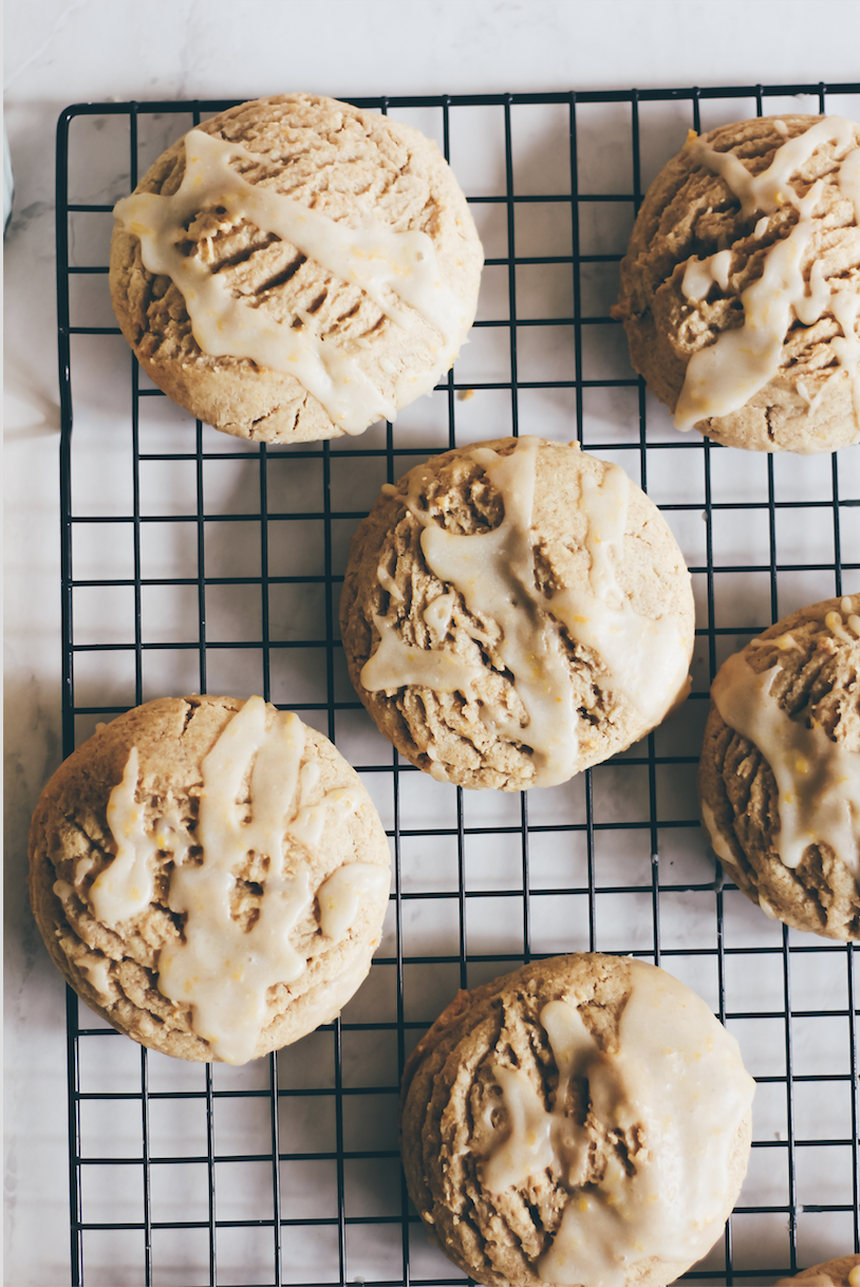
0 Comments
Coconut Sugar Sweetened
|

|
|
|
|
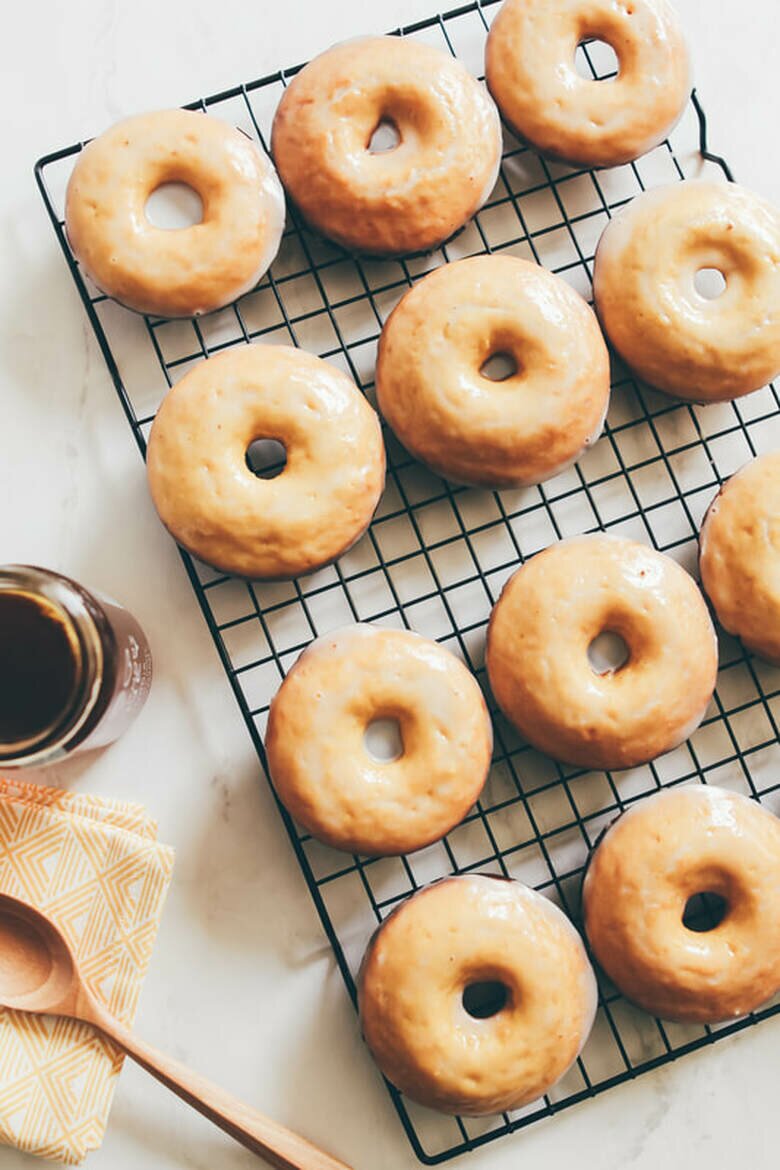
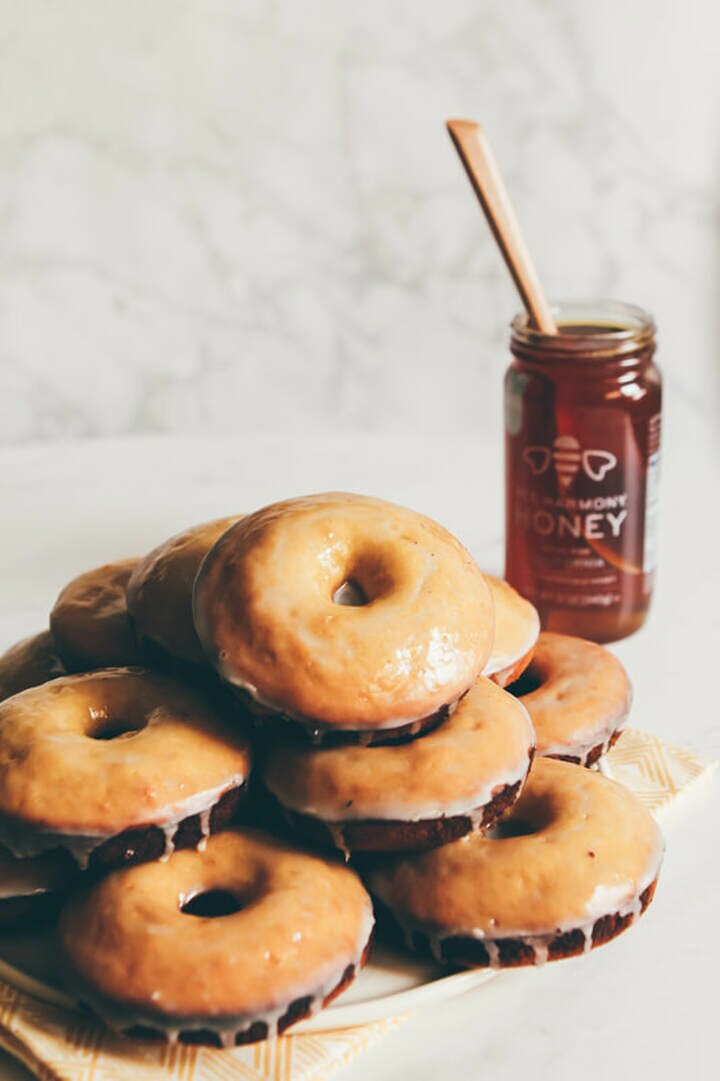
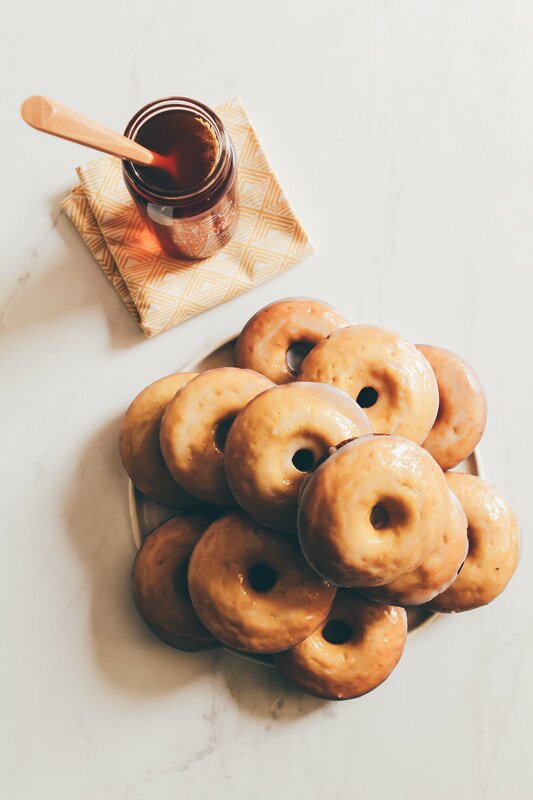
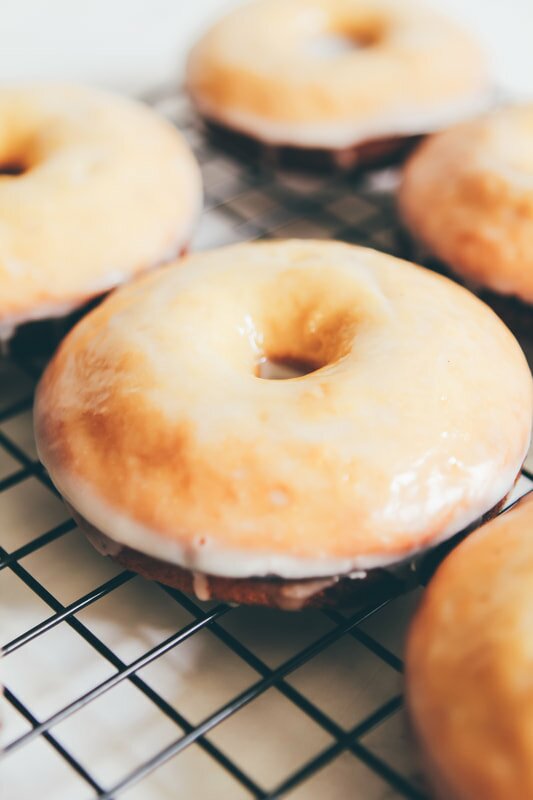
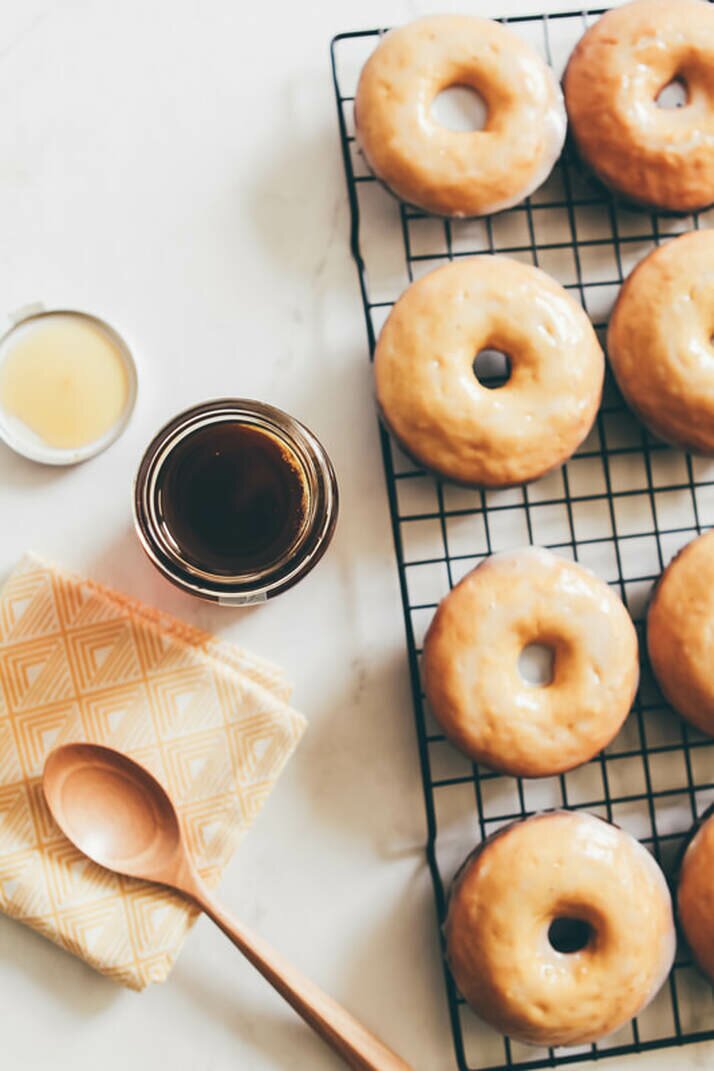
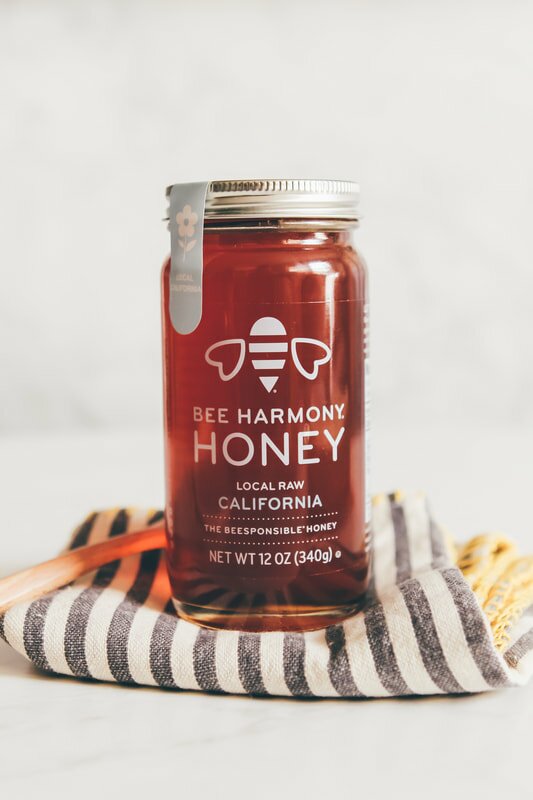
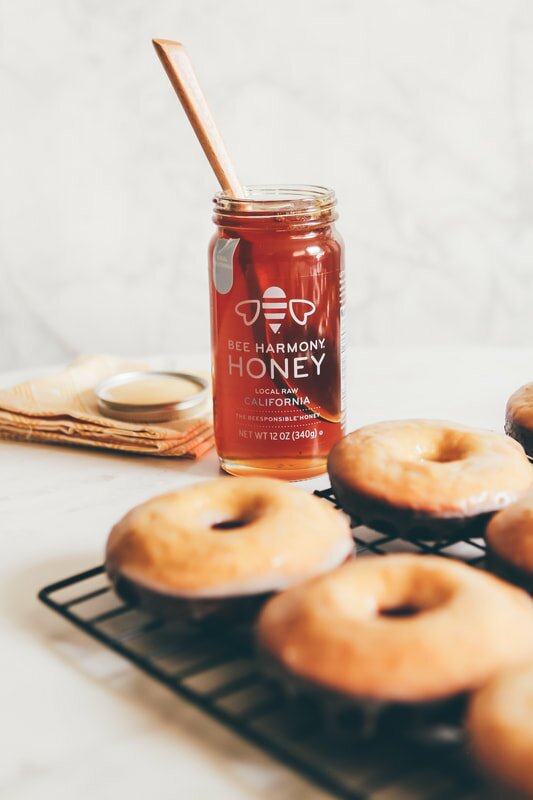
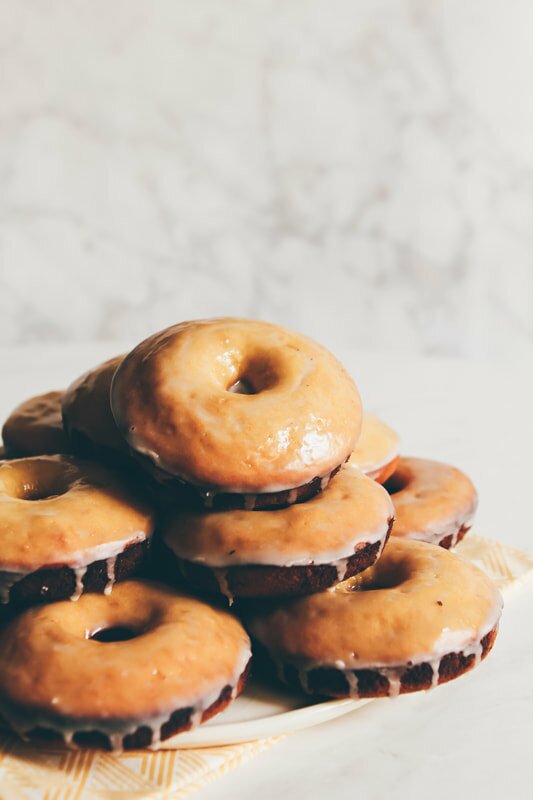
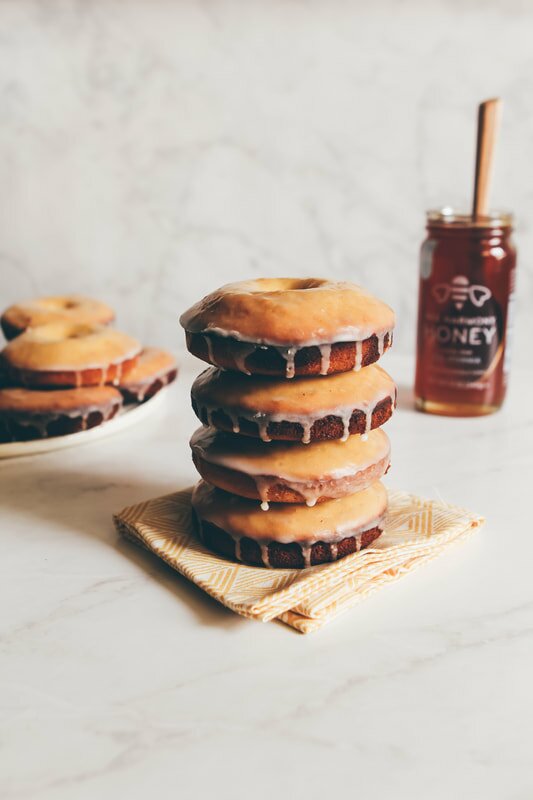
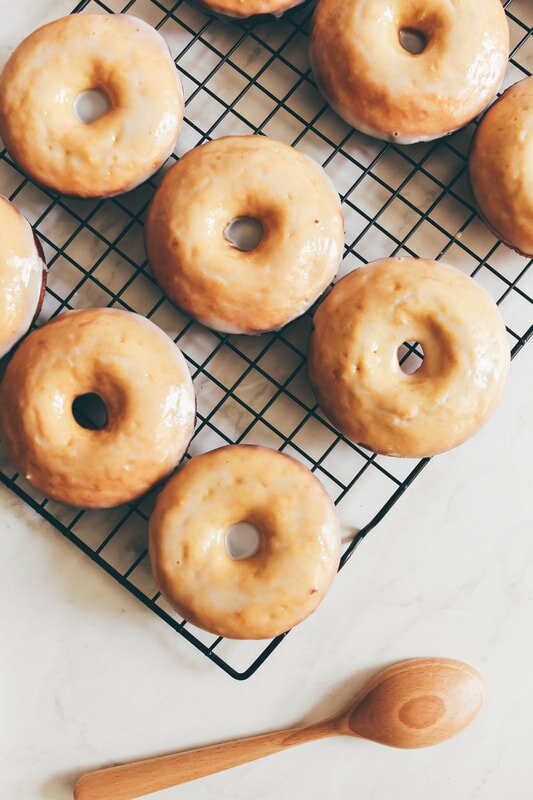
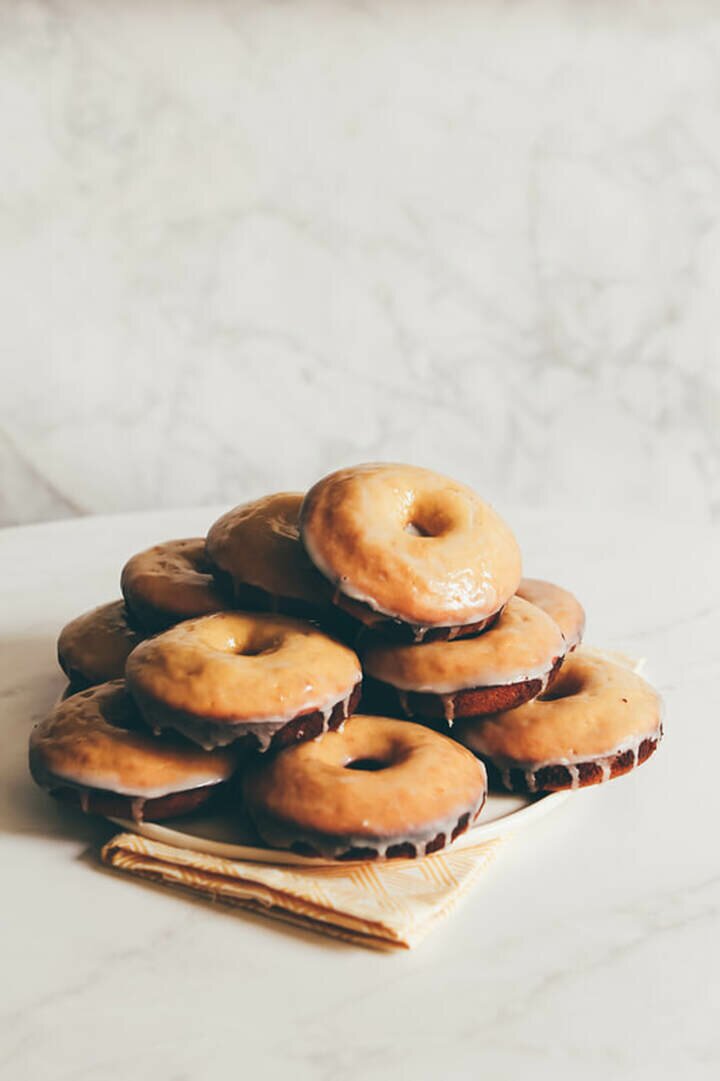
I'm a huge fan of supporting companies that are working to better our planet, so today I'm teaming up with Bee Harmony Honey to share one of my favorite honey-sweetened recipes: Honey Dipped Donuts! The base is simple, sweet, and satisfying every time. The glaze adds a layer of sweet, sticky goodness that goes far beyond your typical donut glaze. Rich, a little buttery, and hard to share so you might want to make extra - these donuts are a serious crowd pleaser! Recipe is below. Enjoy!
|
|
|
|
|
|
HONEY DONUTS
1 cup all purpose flour
1 tablespoon baking powder
1/4 teaspoon salt
1/4 cup macadamia nut milk (almond + coconut work great here, too!)
1 tablespoon apple cider vinegar
2 eggs OR 1/3 cup aquafaba
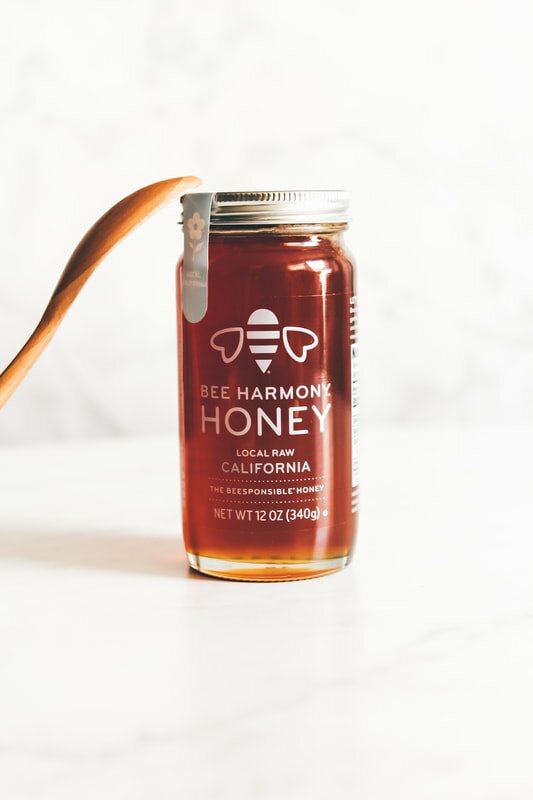
1/2 cup Bee Harmony Honey (I used Local Raw California)
2 tablespoons coconut oil
1 teaspoon vanilla
HONEY GLAZE
2 cups powdered sugar
2 tablespoons macadamia (or your choice of non-dairy) milk
2 tablespoons Bee Harmony Honey (I used Local Raw California)
DIRECTIONS:
Preheat oven to 350 degrees F.
In a large mixing bowl mix together the flour, baking powder, and salt. Set aside.
In a small bowl whisk together the milk and apple cider vinegar and allow to curdle, about 5 minutes.
In a separate, larger mixing bowl beat together the eggs or aqaufaba and honey. Add in the coconut oil and vanilla and beat again until fluffy. Pour the milk mixture into the wet ingredients, stirring to combine. Pour the wet mixture into the dry and mix until just combined. Some small lumps in the batter are okay!
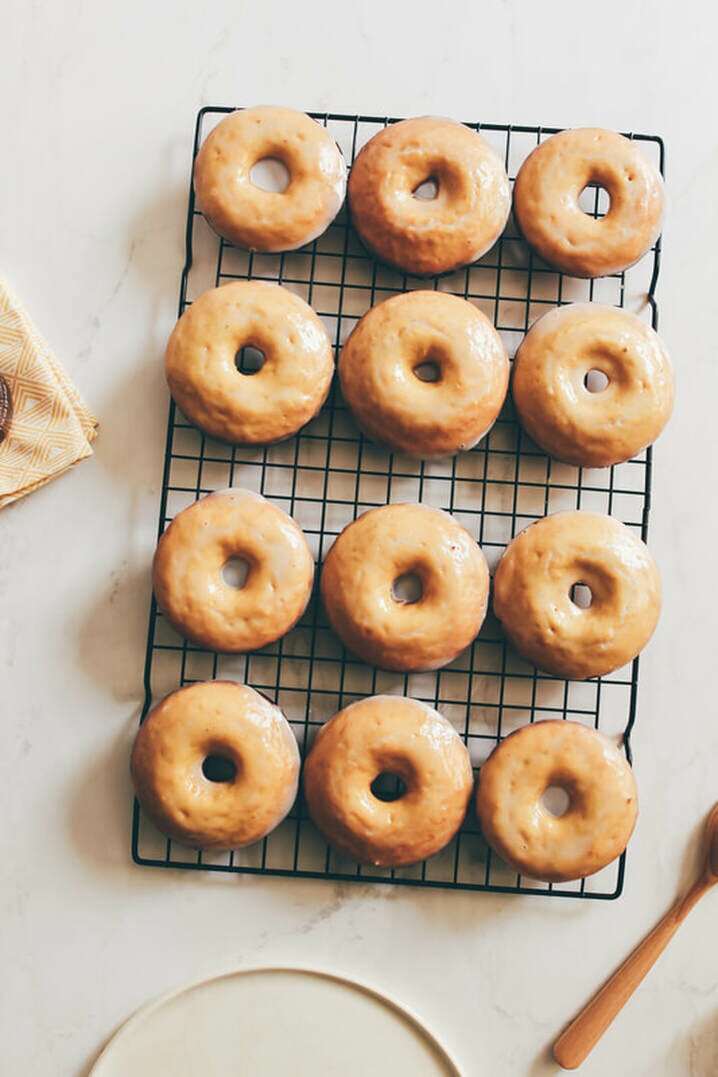
Pour your batter into greased 6-donut pans and bake for 13-15 minutes. Pull when golden and let cool completely on a wire rack. While donuts cool, prepare the honey glaze by whisking together the powdered sugar, milk and honey. Whisk or beat together until smooth.
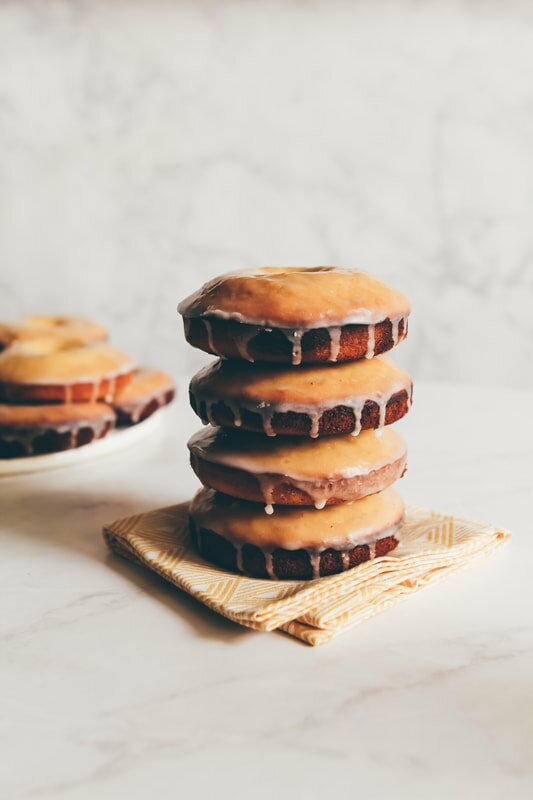
Once the donuts have cooled, gently dip one side of the donut into the honey dip mixture and then set back, glazed side up, onto the wire rack. Drips will happen, so I recommend placing some wax paper underneath your rack while they settle. Once the glaze has set - ENJOY! Leftovers can be saved on the counter for 2-3 days. (SCROLL FOR PRINTABLE VERSION!)

|

|
This is a sponsored conversation written by me on behalf of Barkman. The opinions and text are all mine.
Baking with honey isn't super common. You often have to slightly adjust the amount of liquids and dry ingredients in the recipe to support the added moisture and softer texture, but it is one of my FAVORITE things to sweeten with! Honey adds a lightness and sweetness to baked goods that is simply unparalleled, and using responsibly sourced honey can be GOOD for the bees!
Right now bees are facing a serious threat - and so are we! This threat is called Colony Collapse Disorder and it occurs when worker bees simply disappear from a hive, leaving behind the queen bee, a few nurse bees, and countless baby bees. With no mature worker bees to bring nectar and pollen bak to the hive, the colony collapses and dies. The main causes of CCD are loss of habitat (think expanding road construction + land development), parasites and diseases, air pollution and pesticides. Without bees, everything sort of ceases to function. Plants don't get pollinated, flowers don't grow, animals that eat those plants start to die off - according to the BBC in 2014, a world without bees would struggle to sustain the global human population of (now) over 7.7 billion.
So how can you help? A few great ways! First, plant some flowers! Start a bee-friendly garden (tips at beesponsible.com) that encourages these natural hard-workers to hang out and pollinate your plants! Second, start buying responsibly sourced honey that supports a bigger effort to save the bees. After doing my research, Bee Harmony Honey really is the best. Their honey comes from bees drawing nectar form wildflower blossoms across superior forage lands, tended by trusted beekeepers, using responsible practices that respect the environment. They're not churning out cheap, sugar-filled, honey-flavored crap - this stuff is the real deal, and you can purchase based on the flavor you prefer or the region you live in. And best of all? Every jar of honey you buy from Bee Harmony Honey is traceable from the source; just head to their website and type in the 8-digit code on the bottom of your honey! Mine traced back to where I had hoped it would - my (current) home state of California! That means that I'm taking in honey with more local pollen from local plants, increasing my chances of combating seasonal allergies to those plants and staying healthier year round. Good for the bees, and good for me.
Plus, all the honey comes in reusable, recyclable glass jars, making this sweet company even more sustainable and worth your dollars. I'm a huge fan of supporting companies that are working to better our planet, so today I'm teaming up with Bee Harmony Honey to share one of my favorite honey-sweetened recipes: Honey Dipped Donuts!
The base is simple, sweet, and satisfying every time. The glaze adds a layer of sweet, sticky goodness that goes far beyond your typical donut glaze. Rich, a little buttery, but hard to share - these donuts are a serious crowd pleaser! Recipe is below. Enjoy!
INGREDIENTS:
HONEY DONUTS
1 cup all purpose flour
1 tablespoon baking powder
1/4 teaspoon salt
1/4 cup macadamia nut milk (almond + coconut work great here, too!)
1 tablespoon apple cider vinegar
2 eggs OR 1/3 cup aquafaba
1/2 cup Bee Harmony California Honey
2 tablespoons coconut oil
1 teaspoon vanilla
HONEY GLAZE
2 cups powdered sugar
2 tablespoons macadamia (or your choice of non-dairy) milk
2 tablespoons Bee Harmony California Honey
DIRECTIONS:
Preheat oven to 350 degrees F.
In a large mixing bowl mix together the flour, baking powder, and salt. Set aside.
In a small bowl whisk together the milk and apple cider vinegar and allow to curdle, about 5 minutes.
In a separate, larger mixing bowl beat together the eggs or aqaufaba and honey. Add in the coconut oil and vanilla and beat again until fluffy. Pour the milk mixture into the wet ingredients, stirring to combine. Pour the wet mixture into the dry and mix until just combined. Some small lumps in the batter are okay!
Pour your batter into greased 6-donut pans and bake for 13-15 minutes. Pull when golden and let cool completely on a wire rack. While donuts cool, prepare the honey glaze by whisking together the powdered sugar, milk and honey. Whisk or beat together until smooth.
Once the donuts have cooled, gently dip one side of the donut into the honey dip mixture and then set back, glazed side up, onto the wire rack. Drips will happen, so I recommend placing some waxed paper underneath your rack while they settle. Once the glaze has set - ENJOY! Leftovers can be saved on the counter for 2-3 days.
Healthier Jam Thumbprint Cookies
2 1/4 cups AP flour
2 teaspoon cornstarch
1/2 teaspoon salt
1 cup butter (vegan or regular, unsalted), softened to room temperature
1/3 cup sugar
1/3 cup Lakanto Monkfruit Sweetener (or you can always just use stevia or brown sugar here, instead! You've got options. 😊)
1 large egg yolk (or 2 tablespoons mashed banana, to keep 'em vegan)
3/4 teaspoon vanilla extract
1/3 cup jam or preserves of your choice (I like raspberry but could only find seedless for this batch)
DIRECTIONS:
Preheat the oven to 375 degrees F. Line a baking sheet with parchment and set aside.
In a medium mixing bowl, combine the flour, cornstarch and salt.
In a larger mixing bowl, beat together the butter and sugar until creamy. Add in the egg yolk or banana and vanilla, and beat until well combined. Begin to pour the dry ingredients into the larger, wet ingredient mixing bowl about a cup at a time, mixing consistently until a uniform dough forms. Chill dough for 20-30 minutes.
Scoop 1 inch balls of dough two-inches apart onto your cookie sheet and gently press your thumb into the center to make a small indent for the jam to sit comfortably inside of. Once your cookies have all been pressed, scoop your 1/3 cup of jam into a small bowl and microwave for about 20 seconds to soften. Mix the jam after warming and gently scoop hefty teaspoon-sized amounts into the thumbprint in each cookie, filling to the brim.
Place the baking sheet into the oven and bake for 10-11 minutes, or until bottoms and edges are beginning to turn golden brown in color. Remove the cookies from the oven and place them onto a cooking rack. Once completely cooled, enjoy immediately or wrap and save for up to three days!
If you're interested in following along with the #BeYourBestBabe2019 challenge, head here and print out the challenge calendars. You can do them week by week or all at once - just enjoy the extra productivity and see if it makes you feel like you're being YOUR best babe this month!
Organic Funfetti Cookies for my 28th Birthday!
2 1/4 cup organic all purpose flour
1/2 teaspoon baking soda
1/2 teaspoon salt
1 cup non-dairy butter
1 cup monk fruit sweetener (I used this brand, but you can always use sugar or your fave sub instead. If you choose to use stevia, I would recommend only subbing half the amount for taste.)
1 egg (or vegan egg substitute - a chia egg works great here!)
1 teaspoon vanilla
1/2 cup sprinkles
DIRECTIONS
Preheat your oven to 350 degrees.
In a medium sized mixing bowl combine the flour, baking soda, and salt. Set aside.
In a separate, larger mixing bowl beat the butter and sugar (or sweetener) together until fluffy. Add in the egg and the vanilla and beat until the mixture becomes fluffy again. Pour in the dry ingredient mixture, continuously mixing until a dough forms.
Pour in the sprinkles and use your hands to mix them evenly into the dough. Refrigerate the dough, covered, for 20-30 minutes. While the dough chills, lay out some parchment paper and grab a rolling pin. When your dough is ready, roll it out to about 1/4 inch thickness and use a cookie cutter to cut out your favorite shapes.
Place cut cookies onto a lined baking sheet. Bake for 10-12 minutes. Let cool before enjoying. Leftovers save well in a sealed container for up to a week - if they last that long!
Lemon Sugar Cookie Cake
I shared the simplified recipe on IG when I made it, but wanted to share an easier-to-read, printable version for all my regular readers here, too. It really is the perfect, easy, crowd pleasing summer dessert! Would love to hear your thoughts if you try it - and my Mama would, too! Scroll on down for the recipe and some notes before you bake, too. Enjoy, babes!
COOKIE BASE RECIPE
2 1/4 cups AP flour
1/2 teaspoon baking soda
1/2 teaspoon baking powder
1/2 teaspoon salt
3/4 cup (non-dairy) butter
1/2 cup sugar
1/2 cup monk fruit sweetener*
1 egg (vegan if you prefer)
1 teaspoon vanilla
2 tablespoons lemon juice
Zest of 1 lemon
Strawberries, blueberries + raspberries for topping
CREAM CHEESE FROSTING
8 oz. plain, non-dairy cream cheese
2-3 tablespoons lemon juice
Zest of half a lemon
1 teaspoon of vanilla extract
Maple syrup and/or monkfruit sweetener to taste
DIRECTIONS:
Preheat your oven to 375 degrees and line a round pan (or baking sheet) with parchment paper.
In a large sized bowl combine the flour, baking soda, baking powder, and salt together. In a smaller, separate bowl combine the sugars, egg, vanilla, lemon juice + lemon zest.
Add the wet ingredients to the dry, mixing completely. Once the dough has formed, roll it evenly into a round shape on the pan, about 1/4-1/2 inch thick.
Bake for 10 minutes or until edges begin to brown, then let cool completely. While the cookie layer cools, mix the frosting and chop up the fruit. Once cool, frost the cookie like a pizza and top with fruit. Enjoy babes!
NOTES:
You can use real butter, eggs and milk here if you prefer. I adapted this recipe from my Mom's original which did in fact use the original versions with great success.
Leftovers last up to 2 days on the counter and up to 4 days in the fridge, but - like most things in life - is best enjoyed fresh.
*You can also sub the monk fruit sweetener for stevia or more real sugar.
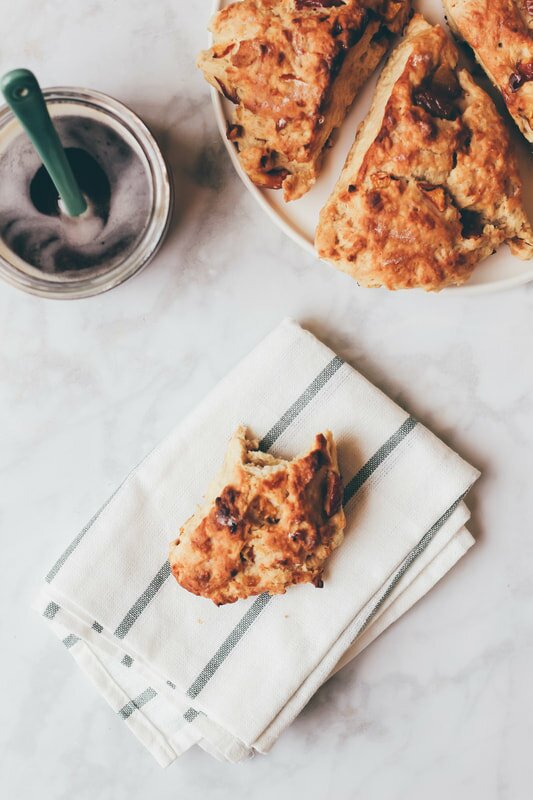
Fresh Cherry Scones
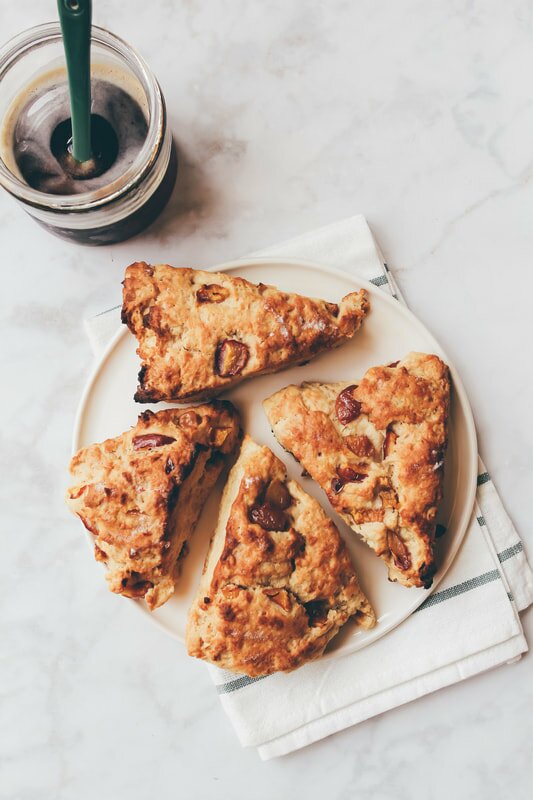
They're light and sweet but full of flavor and just the right amount of 'scone dry' - perfect alongside a glass of milk or a cup of tea. I kept them lower sugar and you can keep them even lower in sugar by skipping the maple drizzle altogether - your choice! Best of all, this scone recipe is super versatile so you can mix it up by adding in different fruits or flours and will always have success. I love it! I've thrown in raspberries, blueberries, even peaches, and they always come out totally brunch- and instagram- worthy.
Cherry Scones
2 cups AP or whole wheat pastry flour
1 tablespoon baking powder
1/2 teaspoon ginger
1/2 teaspoon salt
6 tablespoons cold (vegan) butter
3/4 cup mashed banana or 2 eggs
1/4 cup almond milk
2 tablespoons maple syrup
1 teaspoon vanilla
1 heaping cup pitted and chopped fresh cherries
Glaze
1/4 cup maple syrup (OPTIONAL - or check out our other scones glaze recipes below)
DIRECTIONS
Preheat the oven to 425ºF. Line a baking sheet with parchment paper.
To make the scones, in a large mixing bowl, whisk together the flour, baking powder, ginger and salt. Using a pastry cutter or fork, cut in the cold vegan butter until small crumbs form. Pour in the mashed banana (or eggs), almond milk, maple syrup and vanilla and stir together with wooden spoon until a sticky dough forms. Fold in the fruit gently.
Turn the dough onto a lightly floured surface and form a 1-inch thick disk. Cut the disk into 8 equal scone wedges, like a pizza. Place the scones on the prepared baking sheet and bake for 14-16 minutes, until golden.
Place the scones on a wire rack to cool. While they cool, prepare the maple glaze by beating the maple syrup until it begins to aerate and get a little creamy. Drizzle the glaze over completely cooled scones and enjoy!
NOTES
Makes 8 scones.
Leftovers save well sealed in an airtight container on the counter for up to 3 days. Longer than that, save frozen and heat in the toaster oven when ready to enjoy.
Check out other scone recipes here: Vanilla Glazed Matcha Scones, Mini Chocolate Chunk Scones.
My PERFECT PIZZA DOUGH RECIPE +
TOP TIPS FOR MAKING PIZZA AT HOME!
|
|
|
1. Don't over-handle the dough! Keep your handling of the dough to a minimum until you're ready to stretch it out, and even then don't fold the dough in on itself after separating into two doughs, even though it's tempting. You want your dough to have some lightness and air or you'll have a stiff, too chewy crust.
2. Bake your pizza at 450 degrees F or more. The higher the temperature, the better. Seriously - if your oven gets to 700 degrees, go for it. You'll adjust cooking times properly, so start with about 10 mins and go from there. When the crust is golden to preference and lifts in one solid piece from the pan, you're ready to eat.
3. Shred your cheese, or break in into smaller pieces to ensure even melting - especially if you're using vegan cheese, which tends to be less melty. Our favorite brand to use is Miyoko's Vegan Mozzarella.
4. Once your crust is tossed and spread onto your baking surface, use a fork to poke small holes evenly around the crust to reduce air bubbles forming in the crust.
5. Use a high-quality baking surface. We use a large steel pizza pan, but anything that will heat and cook evenly will work great! We use flour to prevent the dough sticking to the pan.
Now, let's EAT! Scroll on for my dough recipe - there's a printable there version, too!
INGREDIENTS
2 1/4 teaspoons (7 g) active dry yeast
1 1/2 cups (360 ml) warm water
3 1/2 cups (525 g) all purpose flour, plus more as needed
2 teaspoons (6 g) salt
1 teaspoon sugar
2 tablespoons (30 ml) olive oil, plus more for greasing
DIRECTIONS
Pour the yeast and warm water into a small bowl and stir. Set aside for 5 minutes.
In a stand mixer combine the flour, salt and sugar. Pour in the yeast mixture and the olive oil and using the bread hook attachment, knead the mixture together until it comes together and forms a ball. If the dough seems too sticky, add flour as needed. If it’s too dry, add a bit of water.
Move the dough to a lightly floured surface and knead into a smooth, firm, ball. Grease the inside of the mixing bowl lightly and place the dough back inside. Cover with plastic wrap or a clean dishtowel and place in a warm place to double in size, about 1-2 hours.
When ready, turn the dough to a lightly floured surface and, handling as little as possible, cut the dough into 2 equal pieces. Let them rest for 10 minutes before tossing and stretching for pizza!
NOTES
Makes 2 doughs.
Dough can be refrigerated up to two days or frozen indefinitely.
Strawberry Basil Hand Pies
My second cookbook, a collaborative effort titled 'Vegan Bible' will be out later this year, in October. Lots more fun new recipes coming your way! In the meantime, I thought I'd revisit one of my favorites in case you haven't gotten your copy of the cookbook yet. Seriously cannot wait to hear what you guys think when you try them. And know that if strawberries and basil together isn't your favorite flavor combo, you can always ditch the basil, sub out the strawberries for another fruit, or come up with your own flavor combination entirely! No matter what you decide, they're gonna be good. Let’s bake!
Hand Pies:
1 heaping cup (210 g) fresh or frozen strawberries, sliced
1 tablespoon (15 ml) water (ONLY IF USING FRESH BERRIES)
1 tablespoon (3 g) fresh basil, finely chopped
1 teaspoon sugar
1 teaspoon cornstarch
2 cups (315 g) whole wheat pastry flour
1/8th teaspoon salt
2/3 cup (150 g) cold vegan butter
2-4 tablespoons (30-60 ml) ice water
Vanilla Glaze:
6 tablespoons (48 g) powdered sugar
1/4 teaspoon vanilla
1-3 teaspoons (5-15 ml) unsweetened almond milk
DIRECTIONS
Preheat the oven to 375º. Line a baking sheet with parchment paper.
Place the strawberries, water (ONLY IF USING FRESH BERRIES), basil, sugar and cornstarch in a small saucepan over medium heat. Cook for 5-8 minutes, stirring occasionally and smashing down the fruit as it cooks. Remove from heat and set aside.
In a large bowl, mix together the flour and salt. Cut in the cold butter with a fork or pastry cutter until small crumbs form. Drizzle ice water over the mixture about a tablespoon at a time, mixing with a wooden spoon, until a dough begins to form. The dough should be moist but not sticky.
Turn the dough onto a lightly floured surface and shape it into a disc. Use a rolling pin to roll the dough into a large, 1/4 in. thick rectangle. Use a sheet of plastic wrap over the dough to prevent cracking as you roll it out, if needed. Cut the rectangle into 12 equal squares (or rectangles) and move half of them to the lined baking sheet.
Scoop about 1 tablespoon of filling onto the 6 laid squares, leaving about 1/4 inch of space around the edge. Using your finger, dab a bit of water around the edges to help seal them. Top each square with its matching other half, pressing around the edges with a fork to seal them.
Use a toothpick to poke a poke a few small holes in the top, then bake for 20-25 minutes, or until golden brown. While they cook, prepare the glaze by mixing together the powdered sugar, vanilla and unsweetened almond milk.
When the hand pies are finished, let them cool on a wire rack for 5-10 minutes before topping with glaze.
TIPS
Makes 6 hand pies.
Leftover hand pies taste great cooled - no need for reheating!
You can sub in any berries you prefer here and if basil isn’t for you, go ahead and leave it out.
Prefer a lower sugar option? Ditch the glaze!
APPLE CINNAMON DUTCH BABY WITH CRUMBLED WALNUTS
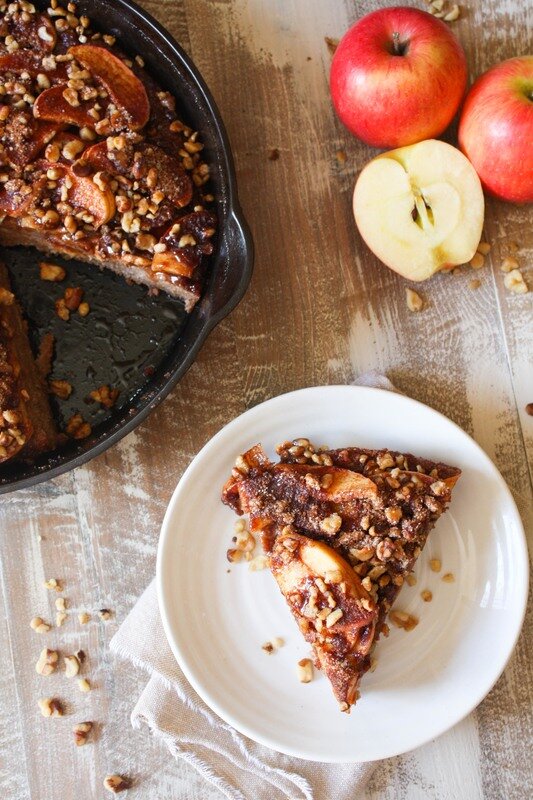
4 tablespoons (28 g) ground flax
1/2 cup + 2 tablespoons (150 ml) warm water
2 cups (340 g) whole wheat flour
2 cups (475 ml) non-dairy milk
1 teaspoon vanilla
1/2 cup (120 ml) applesauce
2 tablespoons (14 g) cinnamon, divided
1/4 cup (60 g) sugar
1/4 cup (45 g) brown sugar
1 teaspoon nutmeg
1/2 cup (75 g) walnuts, finely chopped or crumbled
2 medium-sized tart apples, cored and thinly sliced
4 tablespoons (60 ml) vegan butter or coconut oil
maple syrup or powdered sugar, for garnish
DIRECTIONS
Preheat the oven to 400 degrees. In a small bowl, whisk together the ground flax and water. Set aside to thicken.
In a large mixing bowl whisk together the flour, milk, vanilla, applesauce, thickened flax mixture and one tablespoon of cinnamon. In a separate, smaller bowl mix together the sugar, brown sugar, remaining one tablespoon of cinnamon, nutmeg and walnuts. Set aside. Prepare your apples and set those aside, too.
When the oven has heated, place 4 tablespoons of vegan butter or coconut oil into a 8-in cast iron pan and place it in the oven. Heat until the butter or oil completely melts, about 3 minutes, then remove the pan from the oven and pour in the batter. Place the pan back into the oven and bake 20-22 minutes, until the dutch baby is cooked about halfway through and and the sides are beginning to puff up. Pull it from the oven and cover it in apple slices. Spread the sugar and nut mixture over the top, and put the pan back into the oven. Bake 20-25 more minutes, then remove the pan from the oven. Serve slices immediately with a drizzle of maple syrup or a dusting of powdered sugar.
TIPS
Leftovers can be saved up to 3 days, covered, in the fridge.
Serves 6.
tags
All
Acai
Alcohol
Almond Cream
Almonds
Apple
Aquafaba
Artichoke
Arugula
Avocado
Bacon
Baked
Balls
Balsamic
Banana
Bars
Basil
Bbq
Beans
Beets
Berries
Biscuits
Blondies
Blood Orange
Blueberries
Bok Choy
Bowls
Bread
Breakfast
Broccoli
Broccoli Slaw
Brownies
Bruschetta
Brussels Sprouts
Buffalo
Burger
Burrito
Buttercream
Butternut Squash
Cabbage
Cacao
Cajun
Cajun Spice
Cake
Candy
Caprese
Cardamom
Carob
Carrot
Cashew Creme
Cashews
Cauliflower
CBD
Celeriac
Celery
Cereal
Champagne
Charcoal
Cheese
Cheesecake
Cheesesteak
Cheeze
Cherimoya
Cherries
Chia Pudding
Chia Seeds
Chicken
Chickpeas
Chili
Chips
Chocolate
Cider
Cilantro
Cinnamon
Clafoutis
Coconut
Coconut Milk
Coconut Water
Coffee Cake
Cookie Bars
Cookie Butter
Cookie Cake
Cookies
Cooking Tips
Crackers
Cranberries
Cream Cheese
Crumble
Cucumber
Cupcakes
Dates
Dill
Dinner
Dip
Donuts
Dough
Dressing
Drinks
Easter Eggs
Falafel
Faux Cheese
Faux Meat
Figs
Flatbread
Flax
Fluff
Fondant
French Toast
Fried
Fries
Frosting
Fruit
Fudge
Galette
Garam Masala
Garlic
Ginger
Gingersnaps
Glaze
Gluten Free
Goji Berries
Golden Berries
Golden Milk
Grain Free
Gratin
Gravy
Green Tea
Grinder
Guacamole
Halloween
Hazlenuts
Hearts Of Palm
Hemp Milk
Hemp Seeds
Hemp-seeds
Holidays
Homemade
Honey
Hormone-balancing
Hot Sauce
Hummus
Ice-cream
Jackfruit
Jalapenos
Jam
Jicama
Juice
Kale
Kettle Corn
Kimchi
Kung Pao
Lasagna
Latte
Lavender
Leeks
Leftovers
Lemon
Lettuce Wraps
Lime
Low Sugar
Macadamia Nuts
Mango
Maple
Maple Syrup
Marshmallow
Masa Harina
Matcha
Mayo
Meals
Mediterranean
Milkshake
Mint
Miso
Molasses
Monk Fruit Sweetener
Muffins
Mushrooms
Nachos
Noodles
Not Vegan
Nut Butter
Nutmeg
Nutritional Yeast
Oatmeal
Oats
Olives
Onions
Orange
Pancakes
Panini
Parsley
Pasta
Peaches
Peanut Butter
Pears
Peas
Pecan
Pepitas
Peppermint
Peppers
Persimmon
Pesto
Phyllo
Pickled
Pie
Pilaf
Pineapple
Pine Nuts
Pita
Pizza
Polenta
Pomegranate
Popcorn
Potatoes
Protein
Pudding
Pumpkin
Queso
Quinoa
Radish
Rasins
Raspberries
Raw
Red Bean
Rhubarb
Rice
Ricotta
Rightrice
Roasted
Rolls
Romanesco
Rosemary
Sage
Salad
Sandwich
Sangria
Sauce
Savory
Scones
Seitan
Sesame
Shallot
Shoshito Peppers
Side Dish
Slaw
Sliders
Smoky
Smoothies
S'mores
Snacks
Soba
Soup
Spicy
Spinach
Spread
Squares
Squash
Sriracha
Stevia
Stone-fruit
Strawberry
Streusel
Strudel
Stuffed Peppers
Stuffing
Sugar Cookies
Sugar Free
Sunbutter
Sweet Potato
Sweets
Tacos
Tahini
Tart
Tea
Tempeh
Thumbprint
Thyme
Tigernuts
Tofu
Tomato
Tomatoes
Tortillas
Turmeric
Vanilla
Veganized
Vegetarian
Vegg- The Vegan Egg Yolk
Vinaigrette
Vinegar
Waffles
Walnuts
Wheat Berries
Whiskey
White Chocolate
Wrap
Yeast
Yogurt
Zucchini
 RSS Feed