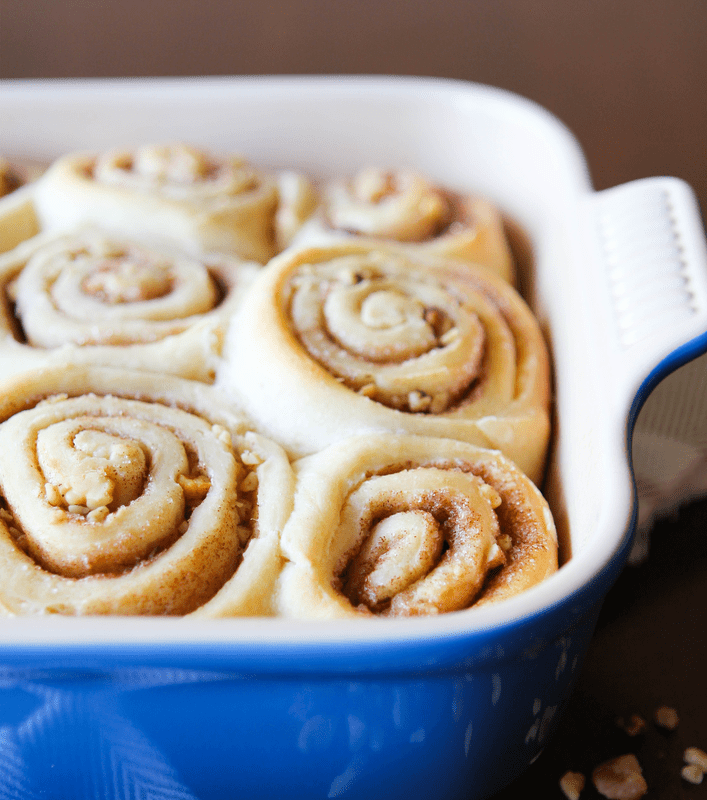
Old Fashioned Cinnamon Rolls with Walnuts + Vanilla Bean Glaze
Nothing makes a better Christmas morning breakfast than one spent enjoying delicious food around the tree. Growing up, my dad always made biscuits and gravy and my mom would always make Pillsbury cinnamon rolls, and my sister and I would patiently wait and play with presents while they cooked. Those are some of my favorite Christmas morning memories now; you never remmeber what you got for gifts - except the year I got a purple beanbag chair. I'll always remember that excitement. Now that we don't live with Mom and Dad anymore, Alex and I have started working on our own traditions to make the Holiday special. Last year we made these Old Fashioned Cinnamon Rolls with Walnuts + Vanilla Bean Glaze for our own Christmas morning breakfast, and they wowed the extended family so much they made it into my Homestyle Vegan cookbook! We knew we had to share the recipe - everyone deserves a warm, sweet, cinnamon-filled tradition.
And whether it's the Holidays or not, there simply is nothing better for breakfast or brunch than a huge, ooey-gooey cinnamon roll dripping with icing and speckled with walnuts. This is the kind of breakfast that actually makes you WANT to get out of bed on a Saturday morning. And paired with homemade vanilla bean glaze? Girrrrrrrl! Go preheat your oven. BUT before you do, just one more thing - everything in our shop is still 10% OFF right now with the code FVHOLIDAYS, and once the merch is gone, it's NOT coming back! Shop here. Otherwise, scroll for ooey gooey goodness!
INGREDIENTS
Cinnamon Rolls: 1 cup (240 ml) unsweetened almond milk, room temperature 1/4 cup (60 g) vegan butter, melted 2 1/4 teaspoons (7 g) active dry yeast 3 cups (510 g) all purpose flour 1 tablespoon (12 g) sugar 1/4 teaspoon salt 1/4 cup (60 g) vegan butter, melted 1/4 cup (50 g) sugar 2 teaspoons (6 g) cinnamon 1/4 cup (55 g) chopped walnuts Vanilla Bean Glaze: 1 cup (175 g) powdered sugar 2 vanilla beans, scraped 2 tablespoons (30 ml) unsweetened almond milk chopped walnuts, for garnish DIRECTIONS Combine room temperature unsweetened almond milk and melted vegan butter in the bowl of a stand mixer. Pour in the yeast and let set to activate, about 5-10 minutes. Meanwhile combine the flour, sugar and salt in a medium mixing bowl. When the yeast mixture is ready, pour the flour mixture in about 1 cup at a time, stirring as you go. When the dough comes together, knead with a dough hook for about 1 minute, to form a loose, sticky ball. You can add a little bit of milk here, if needed, to keep the dough sticky. Move the dough ball to a lightly oiled bowl and cover with plastic wrap or a clean dish towel and leave in a warm place to double in size, about 1-2 hours. Turn risen dough onto a lightly floured surface and roll out to 1/4- inch thick rectangle. Brush the dough generously with the melted butter, then sprinkle the sugar, cinnamon and walnuts evenly all over the top. Starting on one side, roll the dough into one thick log. Using a serrated or very sharp knife, slice into 9 equal rolls. Place the rolls into a well greased 8x8 inch pan and cover with plastic wrap or a clean dishtowel by the oven to rise for about 30 more minutes. Preheat the oven to 350º. Bake the rolls for 25-30 minutes, until golden and fluffy. Once completely cooled, drizzle the vanilla bean glaze generously over the top and garnish with chopped walnuts. Enjoy! NOTES Makes 9 rolls. 
11 Comments
Jackfruit Philly Cheesesteaks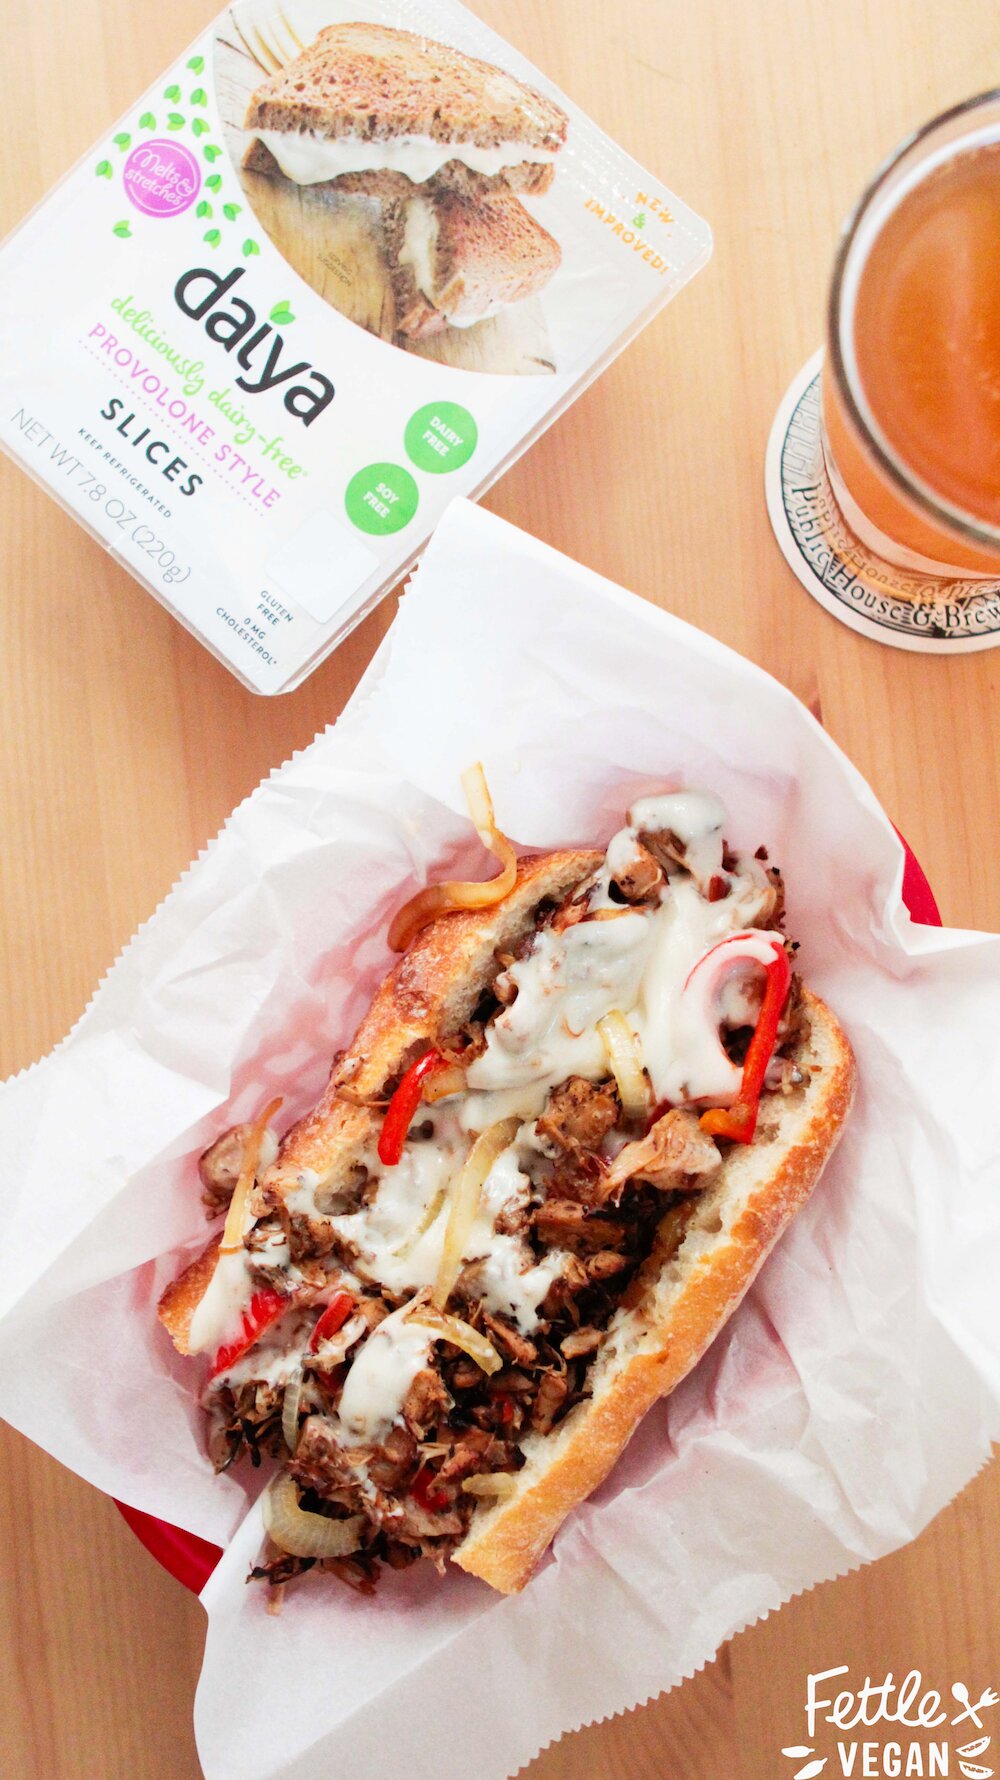
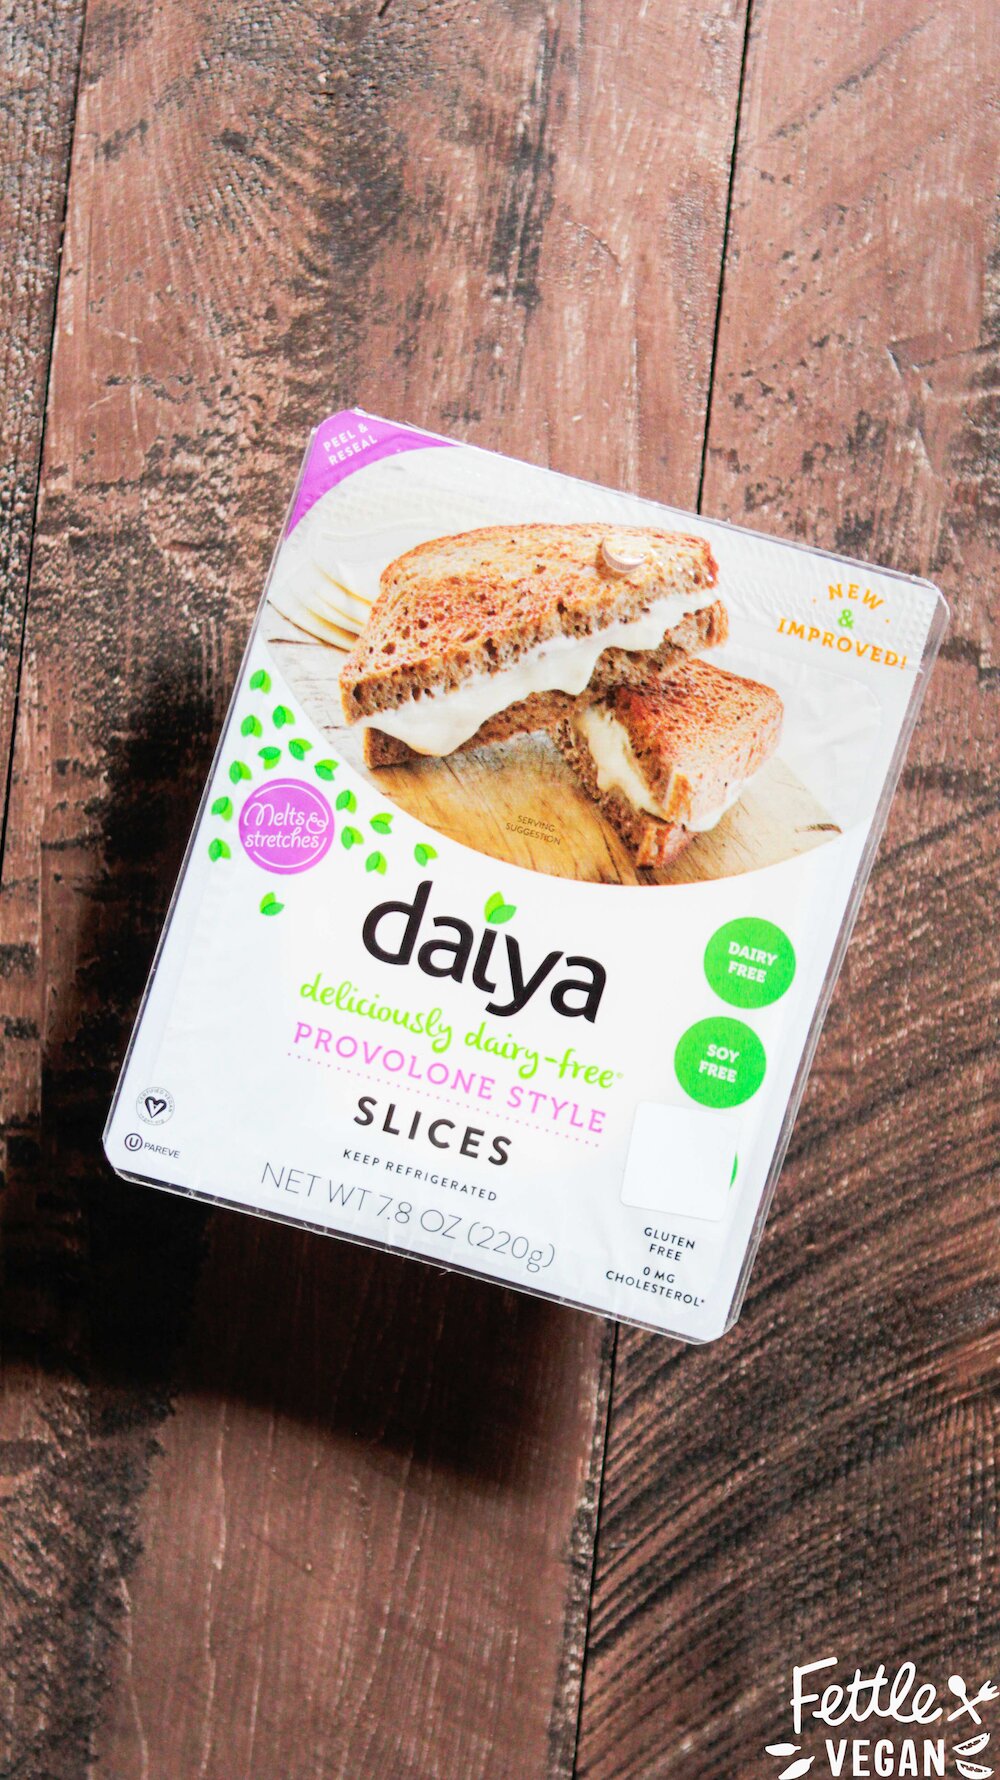
When I first met Alex there wasn't a Philly Cheesteak he wouldn't eat for lunch. He LOVED them! He was a sucker for the 'traditional' - although clearly it's debatable what the traditional version is exactly. He's always considered the melted provolone slices, not the cheeze whiz sauce, the original version - and the chef in me wants to hope he's right. So when he told me he'd sort of been craving that familiar old sandwich, we knew we could make a vegan version that was just as friggin' good. And I think we nailed it on this one. The secret? The cheesier-than-ever Daiya provolone slices! They're the perfect sub for the ooey-gooey, melty cheese that makes the original so memorable. The slices melt and stretch just like real cheese, but are a delicious, plant-based alternative for anyone looking to eat better, whether they’re dairy-intolerant, allergic, vegan, or simply living a healthy lifestyle.
The jackfruit makes the perfect substitute for a shaved steak, and was super like the original once we got a little char on the jackfruit. Our best tip is to cook in cast iron if you can - you'll get nice, crispy edges on the jackfruit. Once you get the jackfruit cooked up you toss in the grilled veggies and cheese, and voila! You've got yourself a super yummy, way healthier Jackfruit Philly Cheesesteak Sub! These sandwiches are so yummy served up fresh, but can be easily wrapped in paper and taken along on a picnic. Either way, do yourself a favor and cook these up for yourself. The recipe makes enough for two, so you can make one for someone you really like or have leftovers for day two. Oh, and people usually ask - we find our jackfruit at local Asian markets, but you can usually find it, though overpriced, at Whole Foods as well. Enjoy! 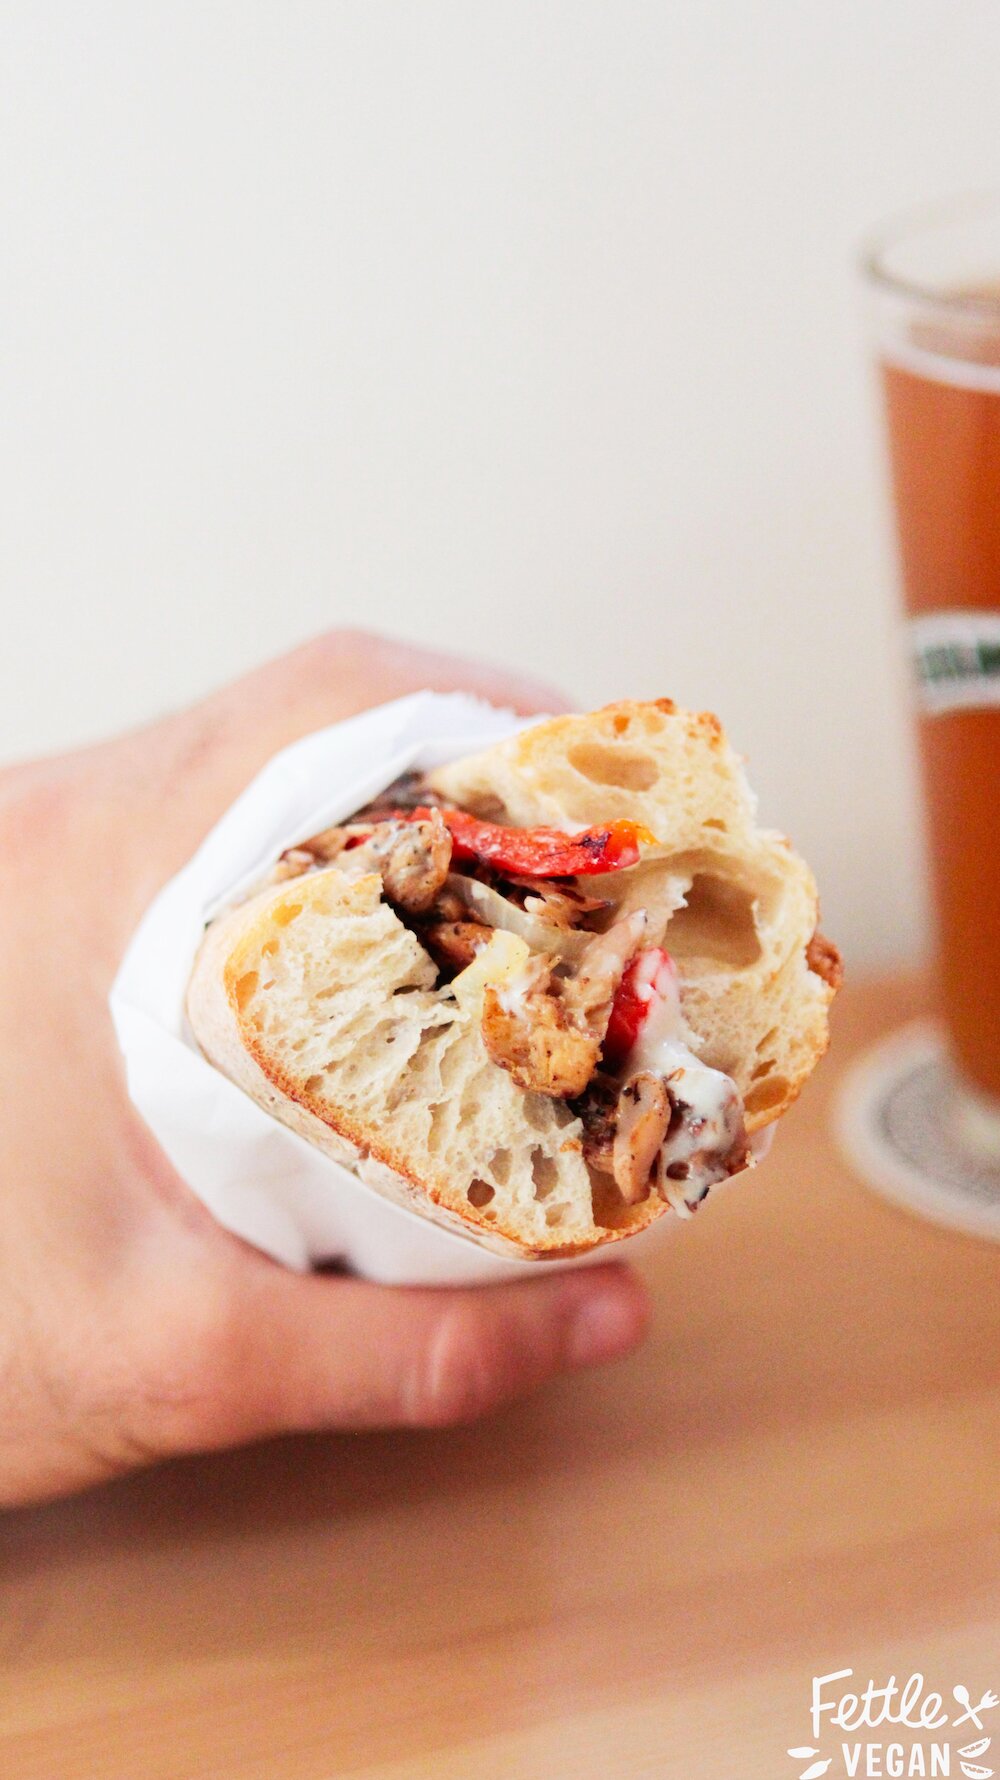
INGREDIENTS
Daiya vegan provolone cheese slices 1 loaf Italian bread or 2 large sub rolls, sliced 1 teaspoon coconut oil 1 medium yellow onion, thinly sliced 1 red bell pepper, thinly sliced 1 teaspoon coconut oil 2 - 20 oz. cans jackfruit, drained and shredded 1/2 cup water 1 large clove of garlic, minced 1 teaspoon liquid smoke 1 teaspoon maple syrup 1 tablespoon white cooking wine 1/2 teaspoon smoked paprika 1/2 teaspoon onion powder 1/2 teaspoon soy sauce salt + pepper to taste DIRECTIONS Place the Daiya slices and sub rolls to the side, you'll need them after the filling is prepared. Heat coconut oil in a medium-sized pan over medium heat. Sauté the thinly sliced onions and peppers until softened, about 8-10 minutes. Remove from heat and set aside. Begin heating the next bit of oil in a large skillet over medium heat. As it heats up, pour in the shredded jackfruit, water, minced garlic, liquid smoke, and maple syrup. Sauté until the liquid reduces to about half, then add the white cooking wine, smoked paprika, onion powder, soy sauce, salt and pepper. Stir to combine, and continue to cook over medium heat until the liquid has completely reduced and the jackfruit is beginning to brown. Throw the onions and peppers into the pan with the jackfruit and toss to combine. Line the mixture into a straight line across the middle of the pan. Place Daiya provolone slices onto the mixture (we used 2 per sandwich), then cover the pan with a lid for about 30 seconds to a minute, or until the cheese has become melty on top of the jackfruit mixture. Use a spatula to scoop the mixture onto your sub rolls and enjoy! NOTES Leftover filling will last in the fridge, covered, for a few days. Traditional cheesesteaks are served on soft bread, but all we could really find was a french baguette. While soft sub rolls are my recommendation, use what you can find. 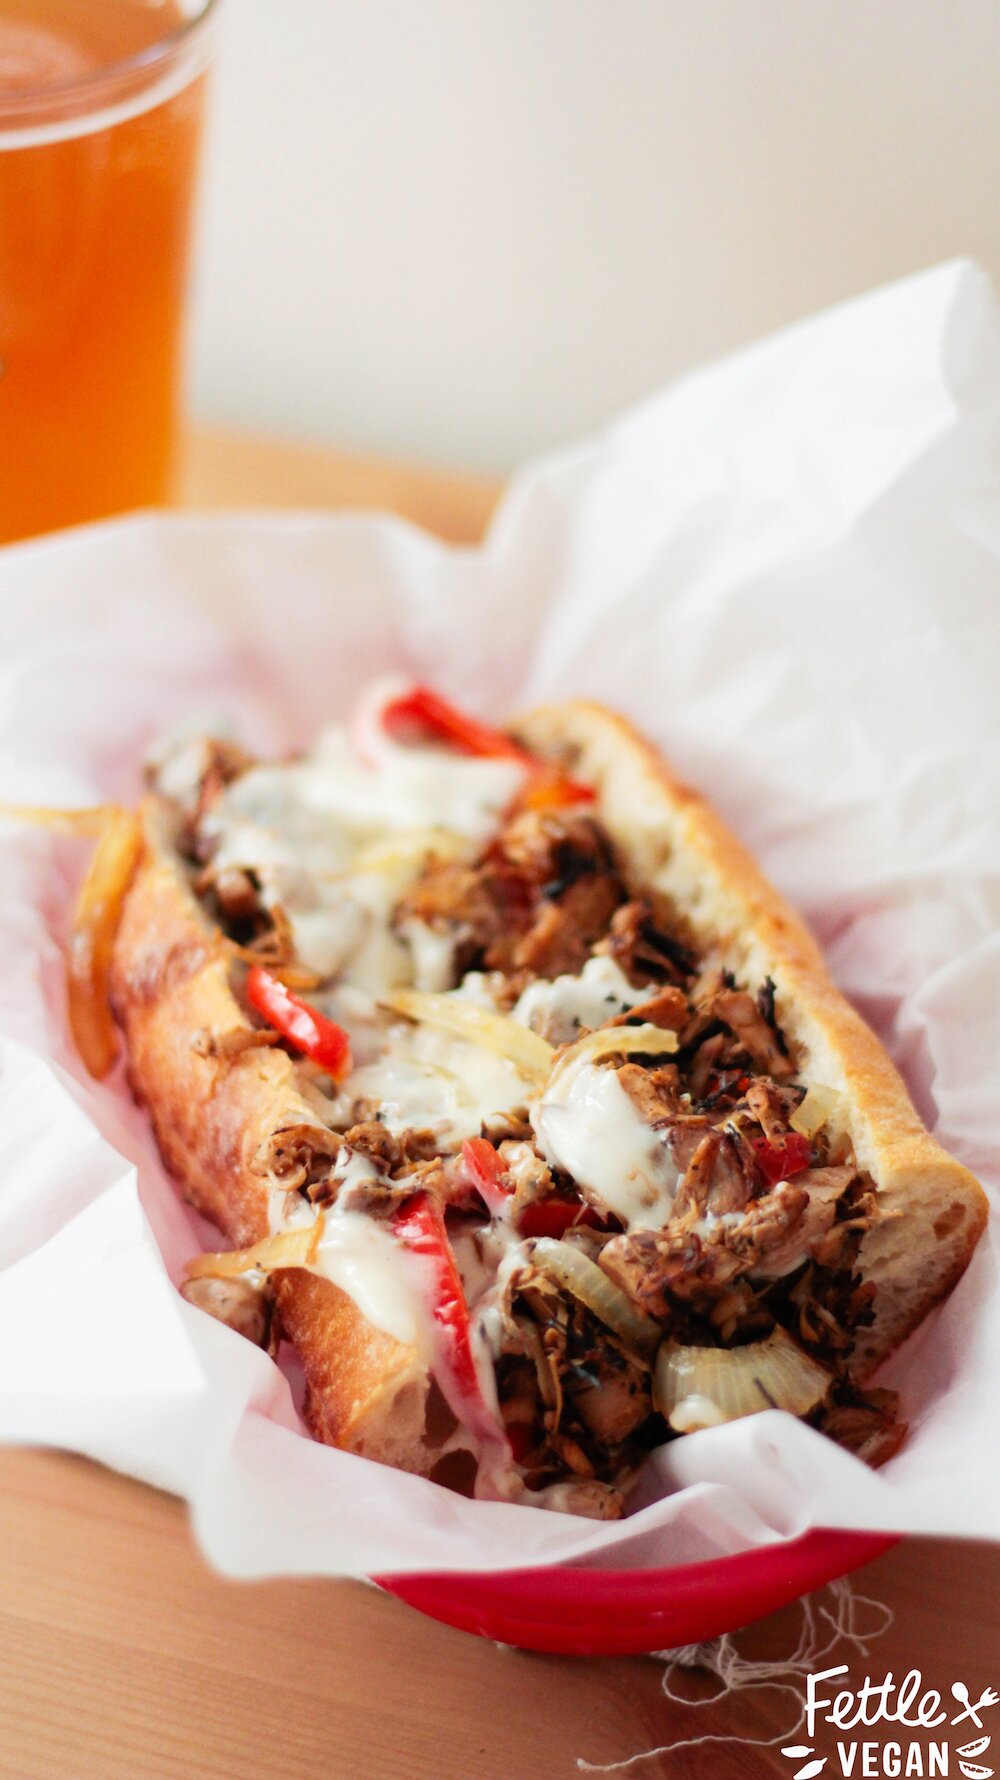
Vegan Yeast Rolls
The key to a great Thanksgiving dinner is a really good dinner roll. They sop up mashed potatoes and gravy, taste great smothered in cranberry sauce, and are something everyone at the table will love. These ones are great because the dough comes together easily, and aside from leaving it alone to rise (twice), you really don't have to do much. It's the kind of hands off recipe thats great for a first-timer and is hard to screw up, and very forgiving if they do. We have some lines on the top of our rolls above because we started rising the second batch without a towel on top to protect it from the air and a bit of a crusty top layer formed. They still turned out absolutely moist + delicious inside, so we kept 'em, but you can prevent that mistake by following the instructions EXACTLY and not being a sloppy chick like I was.
They can be made in a serving dish and left right on the table for people to serve themselves - no carving or ladles needed. Just tear off a buttery roll and start munching. You won't believe what we used the leftovers for...but we'll show you, in a few days! Stay tuned. In the meantime, let's eat!
INGREDIENTS
2 cups all-purpose flour, plus more as needed for kneading 1 sachet active yeast (2 1/4 teaspoons) 2 tablespoons sugar 1/2 teaspoon salt 1/2 cup unsweetened almond milk (room temp is best) 1/4 cup warm water 2 tablespoons melted coconut oil melted coconut oil, as needed for for brushing DIRECTIONS In a stand mixer combine 1 cup flour with yeast, sugar and salt. In a separate bowl, combine room temperature almond milk, warm water + melted coconut oil. You want this mixture to be warm - no warmer or cooler than a bath. (If its too hot, it'll kill the yeast!) Add the wet ingredients to the dry ingredients in the stand mixer and beat 2 minutes, until well combined. Continue to mix in 1/4 cup of flour at a time until a soft dough forms. Transfer the dough to a lightly floured surface and knead until elastic and smooth. Let rest 20-30 minutes. Once the dough has rested, divide the dough into 12 equal balls (feel free to reshape them as needed with your hands) and place into a greased or lightly floured baking dish. The rolls should be *just* touching. They need room to rise and expand, so make sure you haven't packed them too tightly. Cover the dish with a clean dish towel and place in a warm spot to rise. They will need about 1 hour to double in size. When they have doubled in size, preheat the oven to 375 degrees. While the oven preheats, brush the tops of the rolls lightly with melted coconut oil. Bake the risen rolls for 18-20 minutes, until they're golden and fluffy. Serve + enjoy! NOTES Makes 12 dinner rolls. Leftovers can be stored in an airtight container on the counter for up to 3 days, but these are really best served fresh. If your dough appears to have doubled in LESS than an hour, use your best judgement and bake 'em a little early. If you let them OVER-RISE they can collapse, and nobody wants flat dinner rolls! You can sub vegan butter for the coconut oil, if you please. You can use RAPID rise yeast, but you will have to adjust the rising times by about half. 
Cranberry Apple Walnut Stuffing
For years, the only stuffing I'd ever eaten was the weird, kinda mushy, from-a-box version that only came out at our place on Thanksgiving and Easter. And it was okay, but I had no idea what I was missing. I don't remember the first time I had a crusty, moist homemade stuffing, but it changed my mind forever. Once you've had the real thing, you just can't go back. This year I'm tackling stuffing and officially making it my favorite side dish. It tastes great smothered in mashed potatoes and sopping up gravy, and packs much more flavor than you'd imagine for such a quick + easy recipe. It's sweet and savory and looks lovely with all the color from the vegetables peeking out. The walnuts add just a touch of texture and earthy flavor, and the apples and cranberries balance everything out. Missing an ingredient? Sub in something else you love! This recipe is easy to make your own and tastes great just about anyway you serve it. Let's eat!
INGREDIENTS
8 cups stale sourdough bread, cut into 1-in. cubes 2 teaspoons coconut oil 2 cloves garlic, minced 2 celery stalks, thinly sliced 1 medium red onion, chopped 1 medium red apple, cored and chopped 1/4 cup fresh cranberries 1/4 cup walnuts, roughly chopped 2 tablespoons fresh sage, finely chopped 1 teaspoon each salt + pepper 2 cups vegetable broth DIRECTIONS Preheat oven to 350 degrees. Cube up your stale bread and set it aside in a large mixing bowl. In a large cast iron skillet, melt the coconut oil over medium heat. Sauté the garlic, celery and onions until softened and fragrant, about 5 minutes. Add apples and cranberries and continue to cook until apples soften, about 3-4 more minutes. Sprinkle in walnuts, sage, salt and pepper and toss to incorporate. Pour the vegetable mixture into the bowl with the cubed bread, and stir. Pour vegetable broth over the mixture, stirring to evenly coat all the bread with liquid. The bread will absorb most of the liquid, but there should be some left. Pour the entire stuffing mixture into a greased baking dish and bake for 30 minutes, until stuffing is becoming golden brown and making the kitchen smell delicious. Pull it from the oven and serve immediately. Enjoy! NOTES To reheat, you can place the entire baking dish back into the oven covered in foil, removing the foil about halfway through cooking. Or if you have a microwave, feel free to use that. If you don't want to use sourdough bread you can substitute your stale bread of choice.
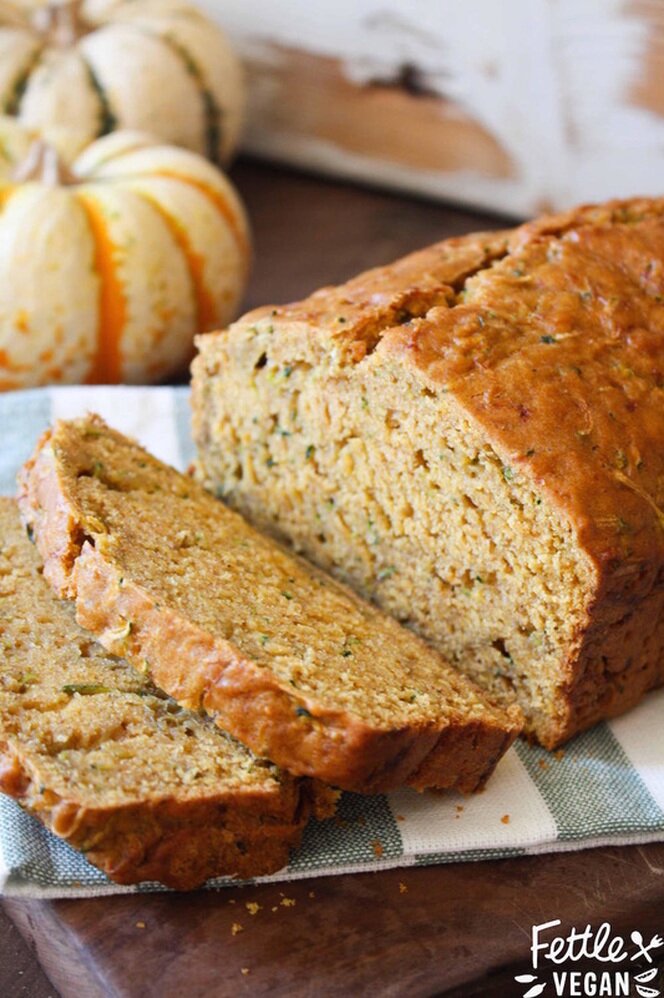
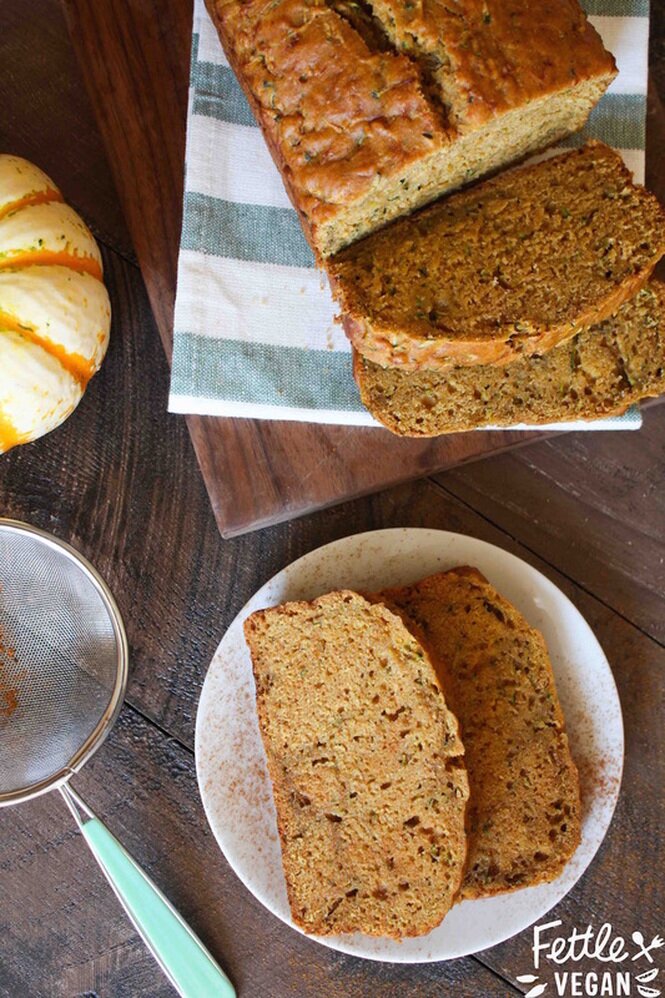
Pumpkin Zucchini Bread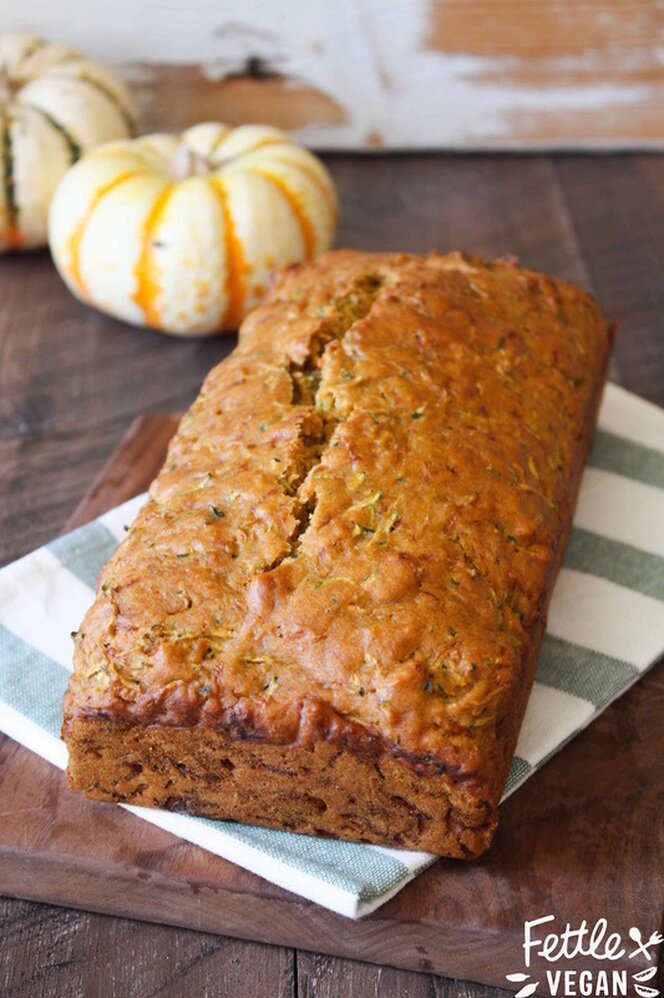
Here we go again, tempting you with pumpkin baked goods! But hey, you can't really blame us. Pumpkin season is short and it's just now starting to feel like fall over here in LA! We've got a short amount of time and all kinds of deliciousness to stuff into it. We hadn't made the announcement official on our personal pages until last week and I'm SUPER excited to share with you guys that about this time next year, we'll be coming out with our very own published COOKBOOK! Yup. And it's gonna be awesome. We'll start posting teasers of what we're working on and what you can expect all over social media so keep an eye out for fun sneak-peeks + behind-the-scenes goodies. In the meantime, its still pumpkin season and we've got all kind of baked goods to enjoy, so let's talk about this bread. Its stuffed full of zucchini and pumpkin so its basically just a vegetable. Or at least, that's what I told myself after eating 3 slices yesterday. We're really trying to cut back on the amount of sugar we're eating lately too, so like our recipe for Pumpkin Oatmeal Cookies, this recipe has about half the amount of sugar you'll find in a traditional zucchini or banana bread recipe. The pumpkin adds some sweetness and helps keep it moist, and if nuts are your thing I bet a sprinkle of walnuts before you tossed it in the oven would be kind of amazing. Either way, we think you're gonna like it. Let's bake!
INGREDIENTS
3 cups all-purpose flour 1 1/2 teaspoons baking soda 1/2 teaspoon baking powder 1 teaspoon salt 1 tablespoon pumpkin pie spice 1/2 teaspoon cinnamon 1/2 teaspoon nutmeg 1/2 cup unsweetened almond milk + 1 teaspoon apple cider vinegar 1/2 cup coconut oil, melted 1/2 cup organic pumpkin purée 3 tablespoons ground flax 1/2 cup sugar 1/2 cup brown sugar 1 1/2 teaspoons vanilla 2 cups zucchini, grated DIRECTIONS Preheat oven to 350 degrees F. Line or grease an 8x4 in. loaf pan and set aside. In a large bowl whisk together flours, baking soda, baking powder, salt and spices. Set aside. Pour almond milk and vinegar into a glass measuring cup and set aside to curdle while you mix up your wet ingredients. To do that, grab a medium sized bowl and whisk together the coconut oil, pumpkin, ground flax, sugars, and vanilla. Pour in the curdled milk mixture and stir to combine. Pour the wet mixture into the dry mixture and mix well to combine. Using a large wooden spoon, fold in the grated zucchini. Feel free to use your hands to evenly distribute the zucchini into the batter. Pour the batter into the prepared pan and pop it in the oven. Bake for 50-60 minutes, until an inserted toothpick comes out clean. Allow bread to cool at least 20 minutes before moving to a wire rack to cool completely. Slice + enjoy! Bread will last in an airtight container on the counter for up to a week. Makes 1 loaf.
Peanut Butter Chocolate Chunk Banana Bread
Summer is here and our CSA boxes have been packed with tons of fresh fruit! We love getting locally grown goodies sent to our door each week, but sometimes we don't make it through the whole box before things start to get a little...brown. Like our bananas! I like bananas just as much as the next girl, but they're not my favorite, and sometimes they get a little too brown before we have a chance to gobble 'em up. Turning mushy, overripe bananas into banana bread is probably my real favorite way to enjoy my bananas, so I never really mind letting them get to that point. And in this combo- mashed with peanut butter + sweet chocolate chunks? ITS AMAZING. And basically a few sprinkles of coconut bacon short of an Elvis sandwich! We've been noshing this loaf all week, but my favorite way is to stick a piece in the warm oven for a few minutes to let the chocolate get a little melty then slather a little butter on it and mmmm...you get it. It's foolproof- and even works well with gluten-free substitutes. Let's eat!
INGREDIENTS:
2-3 bananas, mashed (about 1 1/2 cups) 1/3 cup oil 1/4 cup sugar 1/4 cup peanut butter 3/4 cup non-dairy milk 1 teaspoon vanilla 1 teaspoon vinegar 2 cups whole wheat flour (we have also used a GF flour blend here, but used about 1 3/4 cup) 1/2 teaspoon baking soda 1/2 teaspoon baking powder 1/2 teaspoon salt 3/4 cup chocolate chunks (or chips!) DIRECTIONS: Preheat oven to 350 degrees. In a large bowl, mash your bananas. Set them aside. In a large mixing bowl or in an electric mixer whisk together the oil, sugar, milk, peanut butter, vanilla, and vinegar. Let sit for 3-5 minutes, while you grab a third bowl and combine the flour, baking soda & powder, and salt. Once the wet ingredients are ready, slowly add in the dry ingredients and stir to combine. Once the two are completely combined and a batter has formed, add the mashed bananas. Stir again. Finally, add in the chocolate chunks and mix once to combine. Pour into a greased, lined or non-stick loaf pan. [We used a non-stick pan with a little parchment paper, for easy removal.] Bake for 45-60 minutes, depending on your oven. Bread is finished when a toothpick comes clean. Remove from the oven and let cool at least 30 minutes before enjoying a piece. Cover and save up to a week, or freeze indefinitely!
Kimchi & Coconut Bacon Grilled Cheese
I love fermented foods. Kombucha, sauerkraut, kimchi- you get the gist. My most common grilled cheese to munch is with a bit of thousand island, grilled onions, and sauerkraut, kind of like a tempeh reuben without the tempeh. Something about the way those savory, salty favors mingle makes my mouth water and I can't get enough. In order to fulfill my latest craving but mix it up a bit, I came up with this humdinger. The sour, salty, crunchiness will leave you satisfied and is a fun way to add more probiotic foods to your lunch! They help with digestion, and I know many of us with food allergies suffer from tummy troubles- sometimes explained, sometimes not. Increasing the amount of fermented foods you eat can help your gut's pH and good bacteria increase, and can help you ingest food better. Anyway, try this one- I think you're gonna love it...and your tummy will too!
INGREDIENTS:
2 slices of crusty bread (we prefer sourdough) about 1/4 cup vegan cheese about 1/4 cup coconut bacon kimchi (your amount will vary based on preference) vegan butter or coconut oil, for frying DIRECTIONS: Heat a medium skillet over medium heat until warm. While heating, spread both slices of bread with your favorite vegan cheese (or top with slices. We used Blode kuh Sriracha Cheddar.) Sprinkle with coconut bacon, then assemble sandwich by placing the other slice of bread on top of the first. Spread both outer sides of bread with a thin layer of vegan butter or coconut oil, then place on the heated skillet. Fry until bread becomes golden and crispy, then flip and toast the other side. When sandwich is finished, remove from skillet and open it up. Layer kimchi inside, sprinkle with a bit more coconut bacon, and replace bread. Slice into two melty, crunchy halves and eat immediately. Enjoy!
Spiced Pumpkin Bread with Maple Vanilla Icing
Prepare yourselves: the weathers getting cooler and it's about to get all kinds of pumpkin up in here. After walking the aisles of Trader Joe's last week and seeing pumpkin-themed snacks EVERYWHERE, I was inspired. Last year at this time I was so sick of pumpkin. I'm not even sure we posted one pumpkin recipe on this site last fall. Lame, right?
This year, lucky (or maybe unlucky?) for you, I've jumped back on the pumpkin bandwagon. HARD. The next couple of weeks will be filled with pumpkin treats both sweet and savory...but mostly sweet. I promise not to overdo it. And I promise you will find at least one pumpkin goodie to love. In fact, we're calling it 'GREAT PUMPKIN WEEK' here this week. Use the handy pumpkin on the homepage sidebar to explore ALL of our pumpkin-filled recipes! Now, let's BAKE!
INGREDIENTS:
Spiced Pumpkin Bread 1- 15 oz. can pumpkin purée (about 1.5 cups) 1/3 cup softened coconut oil 1/2 cup organic sugar 1/2 cup non-dairy milk 1 teaspoon vanilla extract 1 teaspoon apple cider vinegar 2 cups whole wheat OR gluten-free flour blend 1/2 teaspoon baking soda 1/2 teaspoon baking powder 1/2 teaspoon salt 1/4 tsp ground cinnamon 1/8 tsp ground ginger Maple Vanilla Icing 1.5 cups raw cashews, soaked 3 tablespoons maple syrup 1.5 teaspoons vanilla extract 1/4 - 1/3 cup water DIRECTIONS: Preheat oven to 350 degrees. In a large mixing bowl, combine coconut oil, sugar, milk, vanilla, & vinegar. Let sit for 3-5 minutes. While you wait, grab a second mixing bowl & combine the flour, baking soda, baking powder, salt, cinnamon, and ginger. Once the wet ingredients are ready (slightly bubbly), slowly add in the dry ingredients and stir to combine. Once the two are completely combined and a batter has formed, add the pumpkin purée. Stir to combine. Pour batter into a greased, lined or non-stick loaf pan. [We used a non-stick pan with a little parchment paper, for easy removal.] Bake for 45-60 minutes, depending on your oven. Bread is finished when a toothpick comes clean. Remove from the oven and let cool at least 30 minutes before transferring to a wire cooling rack. While bread cools, whip us icing by combining soaked cashews, maple syrup, vanilla, and water in a food processor or high speed blender. Fill a piping bag or ziploc bag with a corner cut off with icing mixture and pipe icing over cooled loaf. Loaf lasts well on the counter or in the fridge for about a week, or can be frozen indefinitely. Enjoy!
Triple-Decker Caprese Grilled Cheeze Panini
It's been warm and sunny here in Southern California (surprise, surprise), and our tomato plants are EXPLODING! We're growing 4 different varieties and picking anywhere from 4 to 20 tomatoes a day. It's a good thing we like 'em! We've been making bruschetta, soup, and eating 'em raw with a little olive oil and salt, but this sandwich may be my new favorite way. The best part? You can spread it with your very own, super simple, homemade vegan cheeze! And now you'll have a quick recipe anytime you want spreadable vegan cheese. Don't have cashews? Use any nut you have on hand; fun flavors abound from brazil nuts, macadamias, and pine nuts as well! Keep it gluten-free with gluten-free bread or sub in hearty portobellos for a bread-less alternative. But use three slices anyway- the triple-decker-ness is the best part!
INGREDIENTS:
For Cheeze: 1 cup cashews, soaked 1 tablespoon lemon juice 1 clove garlic 1/4 teaspoon salt 1/4 teaspoon pepper 2-4 tablespoons water Everything Else: 1 medium sized tomato, sliced OR 12ish cherry tomatoes, halved 1/4 cup fresh basil, roughly chopped sprinkle of freshly ground black pepper 3 slices of bread (GF is that's your jam) DIRECTIONS: To make the cheeze, combine cashews, lemon juice, garlic, salt, pepper, and water in a food processor and mix until smooth. Scoop out, set aside. Cut your tomatoes and basil, and set aside. Warm up your panini press (or just a greased pan on the stove). Assemble sandwich beginning with a slice of bread, a generous layer of your homemade cheeze, tomato slices, basil, and a sprinkle of pepper. Top with the next slice of bread, and repeat. Spread the final slice of bread with another thin layer of cheeze before topping the sandwich. Place in panini press until golden lines form and cheeze is melty, or grill until golden and crispy on both sides. If you prefer a crunchier sandwich (Alex does), consider toasting your middle slice before adding it to the sandwich. Enjoy immediately with a frosty bev. (Leftover cheezy spread can be stored in the fridge up to a week.)
Lemon Chia Seed Loaf with Lemon Glaze
Happy Belated Mother's Day to all you FABULOUS moms for all that you do! But especially my mom, 'cause she's the very best. In fact, if we'd able to spend it together, this is what I would've given her; It's moist, sweet, full of flavor, and a perfect Spring treat. Perfect for breakfast, dessert, or for a graduation party pr baby shower. Keeping it gluten-free means sharing with EVERYONE at the party, which makes you an in instant success. Yep, this recipe = success. Making you a winner. Go you! Anyway, I really love how the fresh lemon compliments the crunchy chia seeds, and using almond flour adds a bit of a rich, nutty taste. It's really great, and I think you're gonna love it. Not a loaf kinda gal? Bake 'em up as muffins! Watching your sugar intake? Cut out 2/3 of the sugar by ditching the glaze. Now, let's eat!
Ingredients:
For Lemon Chia Seed Loaf 2 1/4 cups gluten-free flour (we used 1 1/4 cup almond flour + 1 cup teff flour) 2 teaspoons baking soda 1 teapsoon baking powder 1 1/2 teaspoon xantham gum 1 teaspoon salt 1/2 cup coconut oil, melted 1 cup dairy-free milk 1/4 cup organic sugar 1 teaspoon vanilla extract 1 heaping tablespoon freshly grated lemon zest 1/3 cup freshly squeezed lemon juice 2 tablespoons chia seeds For Lemon Glaze 1/2 cup powdered sugar 1-2 teaspoons lemon juice *Glaze is optional, but glaze is delicious. *Whole wheat flour SHOULD be interchangeable here, though I haven't tried it. If you do use WW, omit the xantham. *Sub poppy seeds if you like! *This recipe can be used to make 12 muffins instead of a loaf, if you prefer. They will take less time to cook however, so keep an eye on 'em. Instructions: Preheat oven to 350 degrees. In a large mixing bowl combine flour, baking soda, baking powder, & xantham gum. In a separate mixing bowl whisk together the coconut oil, milk, sugar, vanilla, lemon zest and lemon juice. Pour wet into dry, stirring to combine. Once well mixed, pour in chia seeds and stir again to distribute them evenly through the batter. Pour batter into a greased or lined loaf pan (or into a 12-muffin tin) and toss it in the oven. Bake for 50-60 minutes, until an inserted toothpick comes clean. When finished, remove from oven and move to a cooling rack. Let cool completely before removing from the loaf pan. While loaf cools, make glaze by simply mixing the powdered sugar & lemon juice together until a thick, runny glaze is achieved. Add as much or little liquid as you like, but the more liquid, the thinner the glaze. I recommend starting slow. When loaf cools drizzle with glaze and garnish with a sprinkle of chia seeds and some lemon zest. Lasts 3 days covered on the counter, 5ish sealed in the fridge. Enjoy!
<
|
tagsAll  RSS Feed RSS Feed
|