Creamy Baked Kale + Artichoke Dip
We’re big fans of Sir Kensington’s all natural, non-GMO mustards and ketchups in our household - their spicy ketchup is my FAVORITE on french fries and breakfast potatoes! Last month at Expo West we were lucky enough to get a taste of a brand new product they’ve been experimenting with, and it sort of blew our minds. The secret product had everyone at the show raving and had us going back for samples each day we attended. The secret product? A totally vegan, aquafaba based mayonnaise called Fabanaise! It is literally the BEST vegan - dare I say ANY? - mayo I have ever had. It is light, it is creamy…it is perfect. It comes in two flavors - original and it’s spicier sister, chipotle. And unlike most gloppy eggless mayos, this one has a great, tangy flavor that compliments everything from potato salad to a loaded veggie sandwich. My favorite way to enjoy it is spread thinly over a slice of plain sourdough bead, topped in thinly sliced cucumbers and ground black pepper. It’s almost TOO good, and is the perfect light snack! Anyway, I’m obsessed with it. They generously hooked us up with a few jars after the show and we’ve been slathering it on everything we can since.
In case you’ve been living under a proverbial vegan rock for the last year, aquafaba is a viscous, egg-like binder made of the liquid from cooked beans such as chickpeas, navy or black beans. We’ve used it as an egg replacer in our recipes for Cranberry Orange Clafoutis and Easy Chickpeasy Breakfast Burritos with great success. It is super light and foamy when whipped and takes on whatever flavors it is mixed with, making it the perfect egg-free substitution in this mayo.
Fabanaise will be coming out in stores soon and we cannot wait for you guys to get your hands on it! To celebrate, and because this is our new miracle product in the kitchen, we wanted to share this delicious dish we whipped up using the original flavor - it’s too good NOT to share! Our Baked Kale + Artichoke Dip is creamy, cheezy, and totally decadent. The mayo in the recipe gives the dip the perfect amount of smooth, rich texture but it still light enough to enjoy with thick, crusty bread. It whips up in about an hour and is a total crowd pleaser. Perfect for parties or a movie night-in, you’re going to be blown away by this dip. So, let’s get cooking!
Creamy Baked Kale + Artichoke Dip INGREDIENTS 1 1/2 cups (about 1 - 15 oz. can) cooked white beans 1 cup Sir Kensington's Fabanaise Vegan Mayo 1/4 cup nutritional yeast 1/4 cup roasted red peppers 2 tablespoons lemon juice 1 teaspoon fresh basil, chopped 1 teaspoon salt 1 teaspoon cayenne pepper 1 tablespoon oil or vegan butter 4 cloves garlic, minced 1 medium yellow onion, finely chopped 1 heaping cup artichoke hearts, roughly chopped 3 packed cups de-stemmed kale, leaves roughly chopped 1/2 cup panko breadcrumbs (use GF if you prefer) DIRECTIONS Preheat oven to 375º. In a food processor, combine the white beans, Fabanaise, nutritional yeast, roasted red peppers, lemon juice, fresh basil, salt and cayenne pepper until smooth. Scoop the mixture out into a bowl and set aside. In a medium cast iron pan, melt the oil or butter over medium heat. Sauté garlic and onions together 3-5 minutes, until softened. Pour in the chopped artichokes and stir to combine. Pour in the kale about a cup at a time, stirring to wilt. When the kale has wilted, shut off the heat and pour in the blended white bean mixture. Stir to combine completely. Pour the panko bread crumbs over the top of the mixture, then cover the pan with aluminum foil. Bake for 15 minutes. Remove the foil and bake for another 10-15 minutes, until the mixture is bubbly and hot. Let cool 5 minutes, then serve with bread, chips or sliced vegetables!
You can find Sir Kensington’s products, including their ALL NEW vegan mayo, at a natural retailer near you or at your nearest Whole Foods. And you can use this link for a $1 discount! For more info and recipe ideas, head to SirKensingtons.com or find them on Facebook, Twitter and Instagram at @SirKensingtons.
*Product provided by Sir Kensingtons. Thoughts, opinions, recipe and photos are my own.*
0 Comments
Homemade Vegan Cheez-It Crackers
As a kid I was known as the girl who could eat a whole box of cheez-its in an afternoon. Okay, maybe thats not what people said about me to my face, but I'm pretty sure people thought I was weird and I know for sure that one friend's mom always made sure they had at least one full box before I came over. I just loved them. I was a big cheese kid, but was lactose intolerant, so to compensate and avoid a tummy ache I would just gorge on weird cheesy flavored foods whenever I could get my tiny hands on them. My parents certainly didn't condone it, they just had no idea. And I still got tummy aches, because really who needs to eat an entire box of cheez-its? These days, I 'm a lot better about portion sizes. The originals weren't healthy or good for you and were packed with chemicals - but they were delicious! I decided it was about time I recreated my favorite childhood treat, but knew I needed them to be totally vegan and WAY healthier. And they turned out SO GOOD! They're crispy, crunchy, cheezy, salty, savory and super snackable. Plus, there are only 9 ingredients - and you probably have them all on hand right now. These are the kind of snack you don't at all have to feel guilty about snacking on, even if you do go a bit overboard. Perfect for taking along for lunch or snack at work and bringing on camping or road trips - so let's get snackin'!
INGREDIENTS
3/4 cup all purpose flour 1/4 cup cornmeal 2 tablespoons nutritional yeast 1 teaspoon salt 1/2 teaspoon garlic powder 1/4 teaspoon baking powder 1/8 teaspoon turmeric 5 tablespoons vegan butter 3-4 tablespoons cold water DIRECTIONS Preheat the oven to 350º and line a baking sheet with parchment paper. Add the flour, cornmeal, nutritional yeast, salt, garlic powder, baking powder and turmeric to a food processor and process to thoroughly combine. Add the vegan butter and pulse until crumbly. Add the cold water, a tablespoon at a time, until the dough comes together. Remove the dough from the food processor and form it into a disk. Place the disk onto a lightly floured surface. Lightly dust the top with flour and use a rolling pin to roll it to about 1/8th inch thick. Use a pizza cutter or knife to cut the dough into equal-sized square crackers. Spread the crackers onto the prepared baking sheet. Bake them for 14-18 minutes or until crispy and golden brown. Makes 60-80 crackers. Save leftovers in an airtight container or bag on the counter up to a week. Potato Leek Gratin
If you've hung around here for awhile you probably know that I'm a big potato eater, having grown up in the great state of Maine. I like 'em cooked every which way and eat them way more than I probably should. But screw balance, because potatoes are the star of this dish and they are so, soooo worth it here. We started by slicing up our potatoes really thin, adding leeks cooked in garlic and rosemary, and covering the whole thing in a super cheezy sauce and homemade parmesan. It gets nice and bubbly when it cooks up and packs a ton of flavor. Its an easy dish to whip up and would make a great main or side dish at any meal. I used to love when my Mom would make gratin with dinner, so I'm happy I finally recreated the dish - but with a lot more flavor and a LOT less fat and salt than normal. It's cheezy, oozy-gooey, full of rich, savory flavor and something you're gonna wanna shovel into your mouth as soon as you pull it out of the oven - even Grandma will be impressed. Let's eat!
Looking for more with potatoes? Try our super popular Potato Leek Soup, Celeriac Mashed Potatoes, or Classic Backyard Potato Salad!
INGREDIENTS
2 lbs. gold potatoes, thinly sliced 2 tablespoons coconut oil 4 large leeks, trimmed and thinly sliced 4 cloves garlic, minced 3 sprigs fresh rosemary 1 teaspoon salt 1/2 teaspoon pepper 1 cup unsweetened almond milk 1 - 14 oz. can full-fat coconut milk 1/2 cup nutritional yeast 3 tablespoons corn starch 2 tablespoons fresh rosemary, chopped 1/2 teaspoon salt 1/4 teaspoon pepper 1/4 cup homemade parmesan cheeze, to garnish the top DIRECTIONS Preheat oven to 375 degrees. Thinly slice potatoes and layer them into a greased 9x13 inch baking dish. Heat the coconut oil in a large cast iron pan over medium heat. When melted, sauté the leeks, garlic, and fresh rosemary over medium heat. Season with the salt and pepper and cook until softened and fragrant, about 5 minutes. [Take care NOT to burn the garlic + leeks- they don't taste good.] Remove the pan from heat, toss the rosemary stems, and pour the garlic leek mixture over the sliced potatoes in the casserole dish. In the same pan you used to cook the leeks and garlic, whisk together the almond + coconut milks, nutritional yeast, corn starch, fresh chopped rosemary, salt and pepper. Cook over medium heat, stirring occasionally, until the mixture thickens - about 5 minutes. Pour this mixture over the leek and potatoes in the casserole dish and use a spoon to gently smooth it over the top, letting it fill the crevices between the veggies. Sprinkle parmesan cheeze over the top and bake for 30-35 minutes, until the mixture is golden and bubbling. Serve + enjoy! NOTES Serves 8. Leftovers save well in an airtight container in the fridge up to a week. 
Savory Stuffed Mushrooms
Until a few years ago at a holiday party, I thought I hated stuffed mushrooms. I'd never actually tried them before that but I wasn't a huge fan of mushrooms and it seemed to me like no matter what you stuffed them with, they could't possibly taste that great. I was very, very wrong. The older I get, the more I like mushrooms - they're still not my favorite on their own, but the earthy, rich, almost meaty flavor they lend to dishes is both impressive and delicious, as far as I'm concerned.
Anyway, a friend brought some stuffed mushrooms to that holiday party a few years ago, I tried them, and before I knew it I was popping button mushrooms in my mouth like they were going out of style. I was hooked! But that was over two years ago, and this is the first time I've made a stuffed mushroom recipe since that is just so out of this world I had to share it with you guys. I know there are tons of recipes for this dish online, but I promise this one is really good. And pretty easy, too! It's packed with flavor, the filling has great texture, and the homemade parmesan cheese on top adds some fanciness and helps keep the filling moist. The whole things comes together in your mouth like WOAH. This is a recipe worthy of sharing at your next Holiday party - it's a serious crowd-pleaser! Let's get cookin'.
INGREDIENTS
Stuffed Mushrooms: 24 ounces cremini mushrooms, stems removed 2 tablespoons coconut oil 4 cloves garlic, minced 2 shallots, chopped 4 cups fresh spinach 1 cup wild rice, cooked 1/2 cup roasted red peppers, chopped 1/2 cup walnuts, finely chopped 1/2 cup bread crumbs 1/2 cup fresh parsley, chopped 1 tablespoon + 2 teaspoons balsamic vinegar 1 teaspoon salt 1/2 teaspoon pepper fresh chopped parsley, for garnish Parmesan Cheeze: 1 cup cashews 1/4 cup nutritional yeast 3/4 teaspoon salt 1/4 teaspoon garlic powder DIRECTIONS Preheat oven to 375 degrees. Gently wash the mushrooms and remove the stems. Place them cap down onto a lined baking sheet and set aside. In a large cast iron pan, melt the coconut oil over medium heat. Sauté the garlic and shallots until soft and fragrant, about 5 minutes. Add the spinach, stirring continuously until it has wilted. Remove the pan from heat and pour the cooked veggies into a large mixing bowl. Stir in the wild rice, roasted red peppers, walnuts, bread crumbs, parsley, balsamic vinegar, salt and pepper. Toss the mixture together and set it aside to cool for a few minutes. While the mixture cools, you can prepare the parmesan cheeze by placing all of the ingredients into a food processor and pulsing until the mixture becomes a fine meal. Save some (about 1/4-1/2 cup) to sprinkle over the mushrooms and save the rest in an airtight container in the fridge up to 2 weeks. When the mixture has cooled enough to handle, use a spoon, ice cream scoop, or your fingers to scoop the mixture into the cap of each mushroom. The amount you use will vary depending on the size of the mushroom cap. Once all the caps are filled, sprinkle the reserved parmesan cheeze over the top. Bake the stuffed mushrooms for 20-25 minutes, until tender. Remove from the oven, let cool slightly, and serve immediately! NOTES It was hard to come up with just how many people this serves since it really depends on how big the shrooms are, how many people are around, and how many each person eats BUT this recipe gave me 1 packed baking sheet full of stuffed mushrooms. Leftovers can be saved in the fridge up to 3 days. They are best reheated in a microwave or in an oven at about 350 degrees for 10-15 minutes, though they may get slightly softer after reheating.
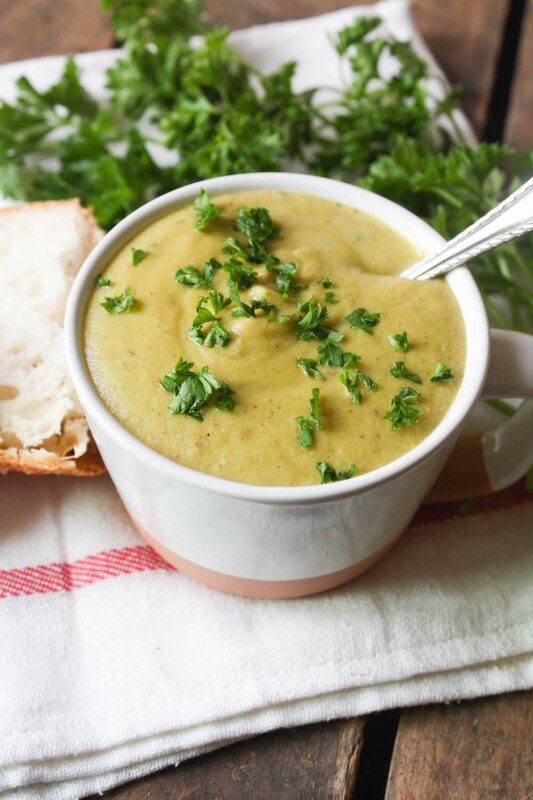
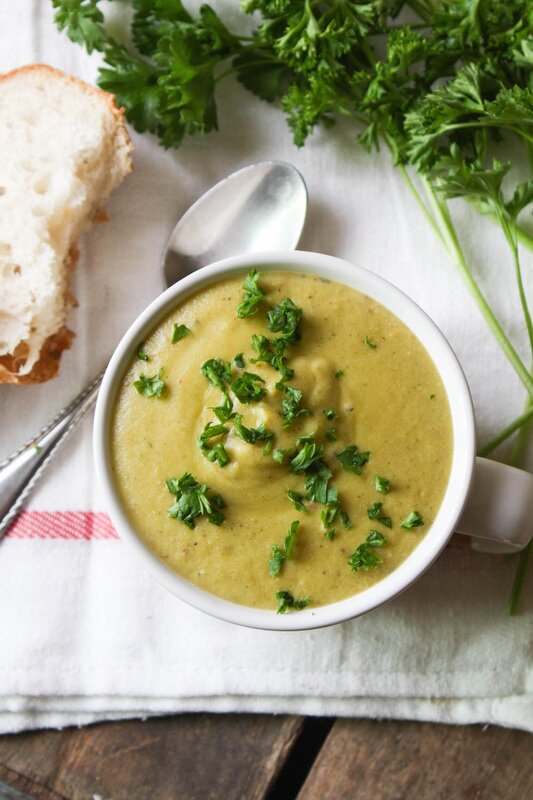
Broccoli Cheeze Soup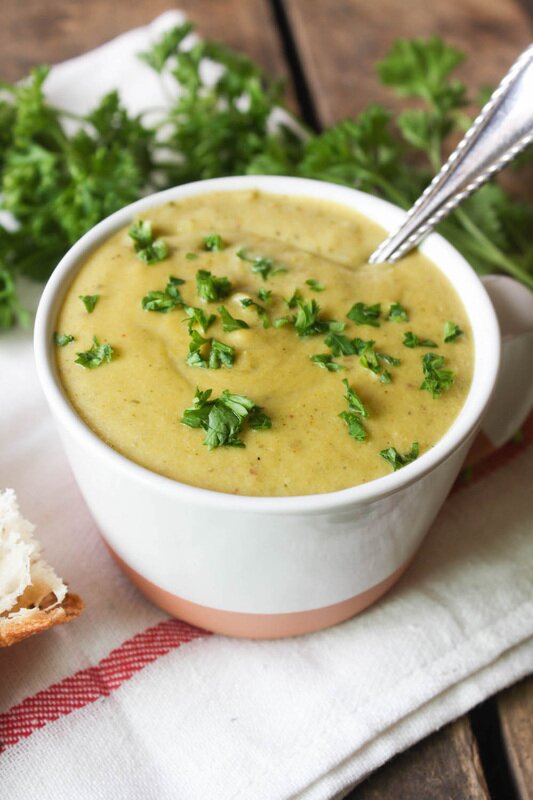
I'm big on comfort food. Growing up my favorite food was mashed potatoes with gravy, and I ate them as often as I could. Lucky for me, I grew up in a state where some counties took the month of September off from school to harvest potatoes! They were on the table 5 nights a week, and I just learned to love 'em. I try to eat more of a variety of a color palette now, but I still LOVE comfort foods. And this week, I've been feeling pretty under the weather. As a nanny, I get sick nearly every time the little ones do, no matter how much vitamin C I've consumed, and this week I went down hard. Some combination of tummy trouble/ chills/ sore throat + an awful cough had me down and all I wanted was a warm, creamy, cheesy bowl of soup to make me feel better. This soup is perfect. The carrots and celery add great flavor and the potatoes keep it creamy, and the addition of cayenne kicks it up just a bit. Just serve with fresh parsley, a bit of crusty bread, & a Netflix marathon and call it an afternoon.
INGREDIENTS
1 tablespoon coconut oil 2 garlic cloves, minced 1 medium onion, chopped 2 stalks celery, thinly sliced 2 medium carrots, thinly sliced 3 small potatoes, cut into small cubes 2 heads broccoli florets with stems removed (about 4 cups), chopped 3 cups vegetable broth 2 tablespoons nutritional yeast 1/4 teaspoon cayenne pepper 1/4 teaspoon each salt & pepper 1 cup vegan cheese (we used Blode Kuh's White Cheddar, but any cheeze capable of melting should work here!) 2 tablespoons fresh parsley, chopped DIRECTIONS In a large pot, heat oil over medium heat. Sauté garlic with onions, celery, and carrots in a mirepoix until they begin to soften. Add potatoes and broccoli florets and sauté all together for a few minutes, stirring occasionally. Add in vegetable broth, nutritional yeast, cayenne pepper, salt, and pepper and cook over medium heat for about 20 minutes, or until potatoes are fork tender. Remove from heat, add the cheese, and blend with an immersion blender or in a regular blender in batches to desired creaminess. We like to leave some chunks! Stir in the freshly chopped parsley, then serve. Makes 6-8 servings, and lasts up to a week in the fridge. Freeze for long-term saving. Enjoy!
Crispy Cauliflower Nuggets
Exciting news! (I mean, beside the fact that you're about to make your own deliciously crunchy cauliflower nuggets.) I got the job I've been so hoping to hear back from at the non-profit, and I'm so excited about it! So excited, in fact, that I demanded we celebrate by making nuggets and fries for dinner. Alex happily obliged. Now the nuggets might be gone but the excitement is STILL HERE! I feel like this move is to a position that is much more closely aligned with the work I'd like to spend the rest of my life doing, and again, I'm PUMPED! So, go me. Enough of that though...how 'bout those nuggets?
Crispy, perfectly golden, fried cauliflower nuggets will change the future of nuggets as we know it. Alex claimed they were better than any chicken nugget he had ever had (duh!), and loved the slight crunch and the fact that he didn't feel like crap after eating them. I love all things fried (in moderation, of course), and was happy to have something to slather in ketchup- my guilty pleasure. Now I know frying is bad and we shouldn't do it, but if we're gonna splurge here, at least you're frying up a vegetable, right? And 2014 has been named the Year of the Cauliflower- so let's do this thing!
INGREDIENTS
2 cups cauliflower florets (about 1/2 head of cauliflower) 1/4 cup high heat oil, for frying (coconut, grapeseed, and avocado oils are all great high-heat options) Flax Wash: 1/4 cup ground flax 1/4 cup almond meal 3/4 cup water Flour Mix: 1 1/2 cups bread crumbs (gluten-free or regular) 1/4 cup almond meal 1 teaspoon organic sugar 2 tablespoons nutritional yeast 1/2 teaspoon garlic salt 1/2 teaspoon sea salt 1/4 teaspoon cracked black pepper 1/4 teaspoon cayenne pepper DIRECTIONS In a small bowl, make flax wash by mixing ground flax, almond meal, and water. Set aside. Next, mix together in a medium-sized mixing bowl the bread crumbs, almond meal, sugar, nutritional yeast, garlic salt, salt, pepper, and cayenne. This mixture will become your breading. Heat 1/4 cup oil n a large frying pan over medium heat. Dip cauliflower florets into the flax wash mixture, coating lightly but evenly. Next, dip cauliflower into the flour mixture and coat completely. Drop coated cauliflower nuggets into the heated oil, and cook until golden and crunchy, then flip and repeat until the nugget is evenly fried, about 2-3 minutes on each side. Using tongs or a spatula, move cooked nuggets to a paper towel lined plate to absorb excess oil, let cool several minutes, then enjoy with your favorite dipping sauce! Best if eaten immediately. Uneaten nuggets can be reheated in the oven at 375 degrees for 10 minutes, or until warm. Enjoy! **Not much for fried foods? You can try baking these at 400 degrees for about 20-30 minutes, flipping halfway through. They won't be nearly as crunchy and crispy, but probably much healthier. Do what you gotta do!
Cauliflower Queso
More cauliflower? YES!! Because its still the Year of the Cauliflower (all year long!), and I had a serious cheeze craving. And who doesn't love a good batch of vegan nachos, anyway? This deliciously cheezy sauce started as an attempt to use up the rest of the cauliflower left over after the Kung Pao Cauliflower recipe and turned into 2 more heads of cauliflower worth of recipe testing, but I am SO EXCITED to share this one with you. In my (clearly humble) opinion, this is the BEST knock-off queso I have EVER eaten. Its spicy, full of flavor, and tastes like the real thing! Its even mimics the texture almost exactly, without any weird stabilizers. Plus, its a nacho topper you can feel pretty good about, being that its made from cauliflower. But trust me, if you don't tell anyone, they would never know. Top it with a sprinkle of red pepper flakes or cilantro and serve on homemade nachos, burritos, and enchiladas. Its great warmed up but pretty darn good straight out of the fridge, too!
Ingredients:
1 tablespoon coconut oil 2 heaping cups cauliflower florets (about 1/2 head of cauliflower) 2 cloves garlic, minced 1 medium onion, chopped 1-12 ounce jar roasted red peppers, drained 1 tablespoon lemon juice 1 tablespoon white miso (or any color, but I prefer the tanginess of a lighter, sweeter miso) 1/2 cup nutritional yeast 2 teaspoon cumin 1 teaspoon crushed red pepper 1 teaspoon chili powder 1/2 teaspoon smoked paprika 1/2 teaspoon salt Directions: In a medium sized frying pan, begin to melt the tablespoon of coconut oil. Add in the cauliflower, garlic, and chopped onions. Cover and cook on medium heat, stirring occasionally and cook until onions turn glassy and cauliflower begins to brown, about 8-12 minutes. Remove from heat and set aside to slightly cool. While the veggies are cooling, pull out a high speed blender or food processor (we used our Vitamix), and toss in all the other ingredients- from the roasted red peppers to the salt. Mix them on high for about a minute, just combining them. Add in slightly cooled veggies and blend or process on high for 20 seconds to 2 minutes, depending on the strength of your machine. You want everything to be completely blended, so you're left with a pourable, dippable queso cheeze. Once finished, move the queso to a bowl and serve with chips or over your favorite Mexican dishes. Store in an airtight container in the fridge for up to two weeks, or freeze. To reheat, pour into a saucepan and cook on low, stirring frequently, until heated through. Makes 4(ish) cups.
Spinach & Wild Mushroom Lasagna with Basil Almond Cream
On weeks I work a lot, I like to make giant pots full of something to bring for lunch all week. I like it full of protein to keep me from snacking, be easy to reheat if I get the chance, and if not- taste good enough cold to enjoy. After weeks of chili and potato based soups, I was craving something a little different. With plenty of dehydrated mushrooms from late summer gathering and lots of fresh spinach in the fridge, I got to work using up those GF lasagna noodles I picked up so long ago. We were pleasantly surprised with the amount of flavor in this dish, and loved the almost meaty texture of the mushrooms. Topped with a little homemade parmesan cheeze, it was a serious treat as leftovers for three days before we'd gobbled up the whole pan. And don't worry- we give instructions for regular 'boil' noodles and the often criticized (but equally delicious in our opinion) 'no-boil' noodles. Let's eat!
Basil Almond Cream Sauce:
1 cup soaked almonds 2 cloves garlic 2 tablespoons lemon juice 1 tablespoon dijon mustard 1/2 cup nutritional yeast 3 tablespoons dried basil OR a heaping 1/2 cup fresh basil 1 cup water Soak 1 cup almonds in warm water for at least an hour. Drain the almonds, set aside, and save 1 cup of the soaking water for blending. Combine all ingredients in a high-speed blender or food processor until a creamy consistency is reached, about 30 seconds to a minute. Scoop into a bowl and set aside to use later in the lasagna. Spinach & Wild Mushroom Lasagna: 1 box (about 9 ounces) gluten-free no-boil lasagna noodles* 25-30 ounces of pasta sauce (about 3+ cups) 2 tablespoons olive oil 1 large yellow onion, diced 3 cloves garlic, minced 1.5 ounces of dried, wild mushrooms OR 8 ounces fresh wild mushrooms, roughly chopped** 4 packed cups fresh spinach 1/4 cup water 1 tablespoon dried oregano salt & pepper to taste 1/2 recipe vegan parmesan cheeze OR about 1/2 cup of your favorite parmesan substitute *If using noodles that require boiling, cook to instructions on package, drain, and use in place of the noodles in our recipe. Also, remove about 10-15 minutes earlier than the total cook time of about 45 minutes that ours requires. **You can use your favorite mushrooms from the grocery store, too. Button, cremini, and chanterelles would all be great here.
Instructions:
If you haven't already made the Basil Almond Cream Sauce, do that (recipe above.) If you have, start here: Preheat oven to 400 degrees and lightly grease a 9 x 13 in. baking dish. Heat olive oil in a large, deep skillet and toss in onions and garlic, and cook until onions are softened and turning slightly translucent. Add mushrooms, water, and spinach by the handful, stirring to wilt spinach and help mushrooms absorb the water. Cover with a lid and let simmer, stirring occasionally, for about 5-8 minutes or until spinach is wilted and mushrooms have absorbed all the liquid and onions are beginning to caramelize. Add in spices and simmer one more minute. Remove from heat and set aside. Now, pull out that lightly greased casserole dish and spread about 1 cup of pasta sauce across the bottom. Top with noodles, about 4 per layer, spread evenly across and covering the sauce. Next spread about 1/2 of the Basil Almond Cream across the noodles, top with half of the spinach & mushroom mixture, sauce, and more noodles. Do another round of Basil Almond Cream, cooked veggies, and noodles, saving the last of the sauce to cover the top layer of noodles and prevent them from burning. Finally, sprinkle the top with your parmesan cheese, cover with a lid or aluminum foil, and bake for 45-50 minutes, until sauce is bubbling and cheese is slightly browned. Let cool, slice, and enjoy! Saves well in the fridge for about a week.
VEGAN MAC' AND CHEEZE
I scream, you scream, we all scream for MAC' N CHEEZE!
Especially those of us with food allergies, dietary preferences, or just a healthy appreciation for health. It can be hard to find meals as satisfying as the ones you used to remember eating. You know, like when you were six and ate tacos for breakfast and waffles for dinner. (Okay, I'm exaggerating: I'm almost 23 and I still do that.) But seriously- I MISS MAC' N CHEESE. Like, the super gross kind you could heat up in the plastic cups in the microwave (cancer, anyone?). But since I can't justify that awful snack, I decided to create a slightly spicy, flavorful, much healthier recreation of the old favorite. Loaded with secret ingredient goodies like nutritional yeast, tahini, and turmeric, its worth more than you'd expect, too. The cheezy sauce is chock full of B vitamins and anti-inflammatory power just waiting to be gobbled up!
This dish makes me forget why I ever ate cheese in the first place. With alternatives this good, what was I waiting for?
The cheeze sauce is a little tangy, with just enough spice added to give you a few extra layers of flavor. Whenever I make this dish, we finish the whole pot in a day. Never any leftovers, here. And sometimes-maybe its the B vitamins, or maybe its that cheesy flavor- I just crave a spoonful of nutritional yeast. And though I certainly don't mind just going for it, it can be a little dry. This is a way better alternative.
Did I mention this was a two step recipe? Blend, stir. Enjoy.
Seriously though, you're gonna love me for this. You're only fifteen minutes from a big, warm bowl of childhood memories...ready, GO!
Ingredients:
12 ounces gluten-free pasta elbows 1 cup raw cashews 1 cup unsweetened milk substitute of choice (we've used hemp, almond, and walnut-all delicious!) 2 cloves garlic 1/3 cup nutritional yeast 2 tablespoons tahini 3 teaspoons lemon juice 1 teaspoon turmeric 1/8 teaspoon cayenne red pepper 1/8 teaspoon smoked paprika 1/4 teaspoon salt 1/8 teaspoon pepper
Instructions:
Cook the pasta according to the directions on the package. Gluten-free pasta, especially when brown rice based, tends to absorb more water than normal, so be sure to add extra water to the pot before boiling; it usually takes a few extra minutes for GF pasta to reach the al dente stage, too. And be sure to add a little salt to the water before boiling- it flavors the pasta. As pasta cooks, combine the raw cashews and nut milk in a blender or food processor. I never soak mine before hand- I prefer the slightly thicker sauce that results from not soaking them in this recipe. Once combined, add the rest of the ingredients. Yup, all of 'em. (Told you this recipe was easy!) Blend until combined. Set aside. Once pasta is al dente (literally meaning "to the bite"; leave a little texture in that pasta! Don't boil it into mushy submission.), strain, rinse, and put it back into the pot. Pour in the cheeze sauce, using a wooden spoon to gently toss and coat the pasta. Turn the burner back onto low and continue to cook the pasta and cheeze sauce together about 3-5 minutes, stirring occasionally until the sauce thickens to the noodles. Serve with a garnish of fresh basil or cilantro, avocado, or a little hot sauce for the best grown-up vegan mac' n cheeze you can imagine. To reheat, simply warm the pasta in a pan with a little non-dairy milk, stirring 'til creamy. Saves well in a refrigerated space for about a week.
Beer Battered Onion Rings
The other day we made Baked Black Bean Burgers to share with you guys, but you should know-we didn't eat those burgers alone; they each came with a hefty side portion of these awesome, crispy onion rings.
We filled the onion ring batter with an orange wheat beer that truly compliments the thick, crunchy rings and makes for an onion ring so good, its more suited to being an onion-ring-donut! We don't normally make or eat many fried foods, but sometimes, you just have a craving that needs to be caved to. And frankly, these were worth every extra bit of oil and calories involved. I know we shouldn't make a treat like this weekly, but damn its tempting.
Ingredients:
1 large onion 1 cups whole wheat flour 1/2 cup cornstarch 2 teaspoons nutritional yeast 2 teaspoons salt 2 teaspoons pepper 2 teaspoons baking powder 1 tblsp onion powder 2 tsp garlic powder 1 bottle (vegan!) orange wheat beer 1 cup peanut oil, for frying
Directions:
First, chop your onion into large rings by slicing the onion width-wise about every 1/4-1/2 inch. Set aside. Grab a mixing bowl and whisk together flour, cornstarch, nutritional yeast, salt & pepper, baking powder, onion powder, and garlic powder. Add the orange wheat beer and whisk again to combine all ingredients. Once mixture is prepared, pour the one cup of peanut oil into a deep, heavy skillet and let heat to between 350-375 degrees. Test using a thermometer. Place individual slices of onion into the batter, coating thoroughly. Once coated, drop into the heated oil using tongs. Let fry on each side for about 3-5 minutes, flipping midway. Be sure when you're adding rings to the oil to not overcrowd the rings. Usually about 3-5 rings can fit to fry at a time. Rings are finished when they reach a uniform golden-brown color and crunch. Remove the rings from the oil using tongs, and immediately place onto paper-towel lined plates. This allows the rings to cool while the paper towels soak up any extra oil. Wait until cooled, then enjoy with ketchup, mustard, bbq sauce, or just by themselves! (We ate ours pretty quickly, and I wouldn't recommend saving any extras. Fried foods get kind of yucky when left over night in the fridge! However, the batter would be fine by itself in the fridge for several days.)
<
|
tagsAll  RSS Feed RSS Feed
|