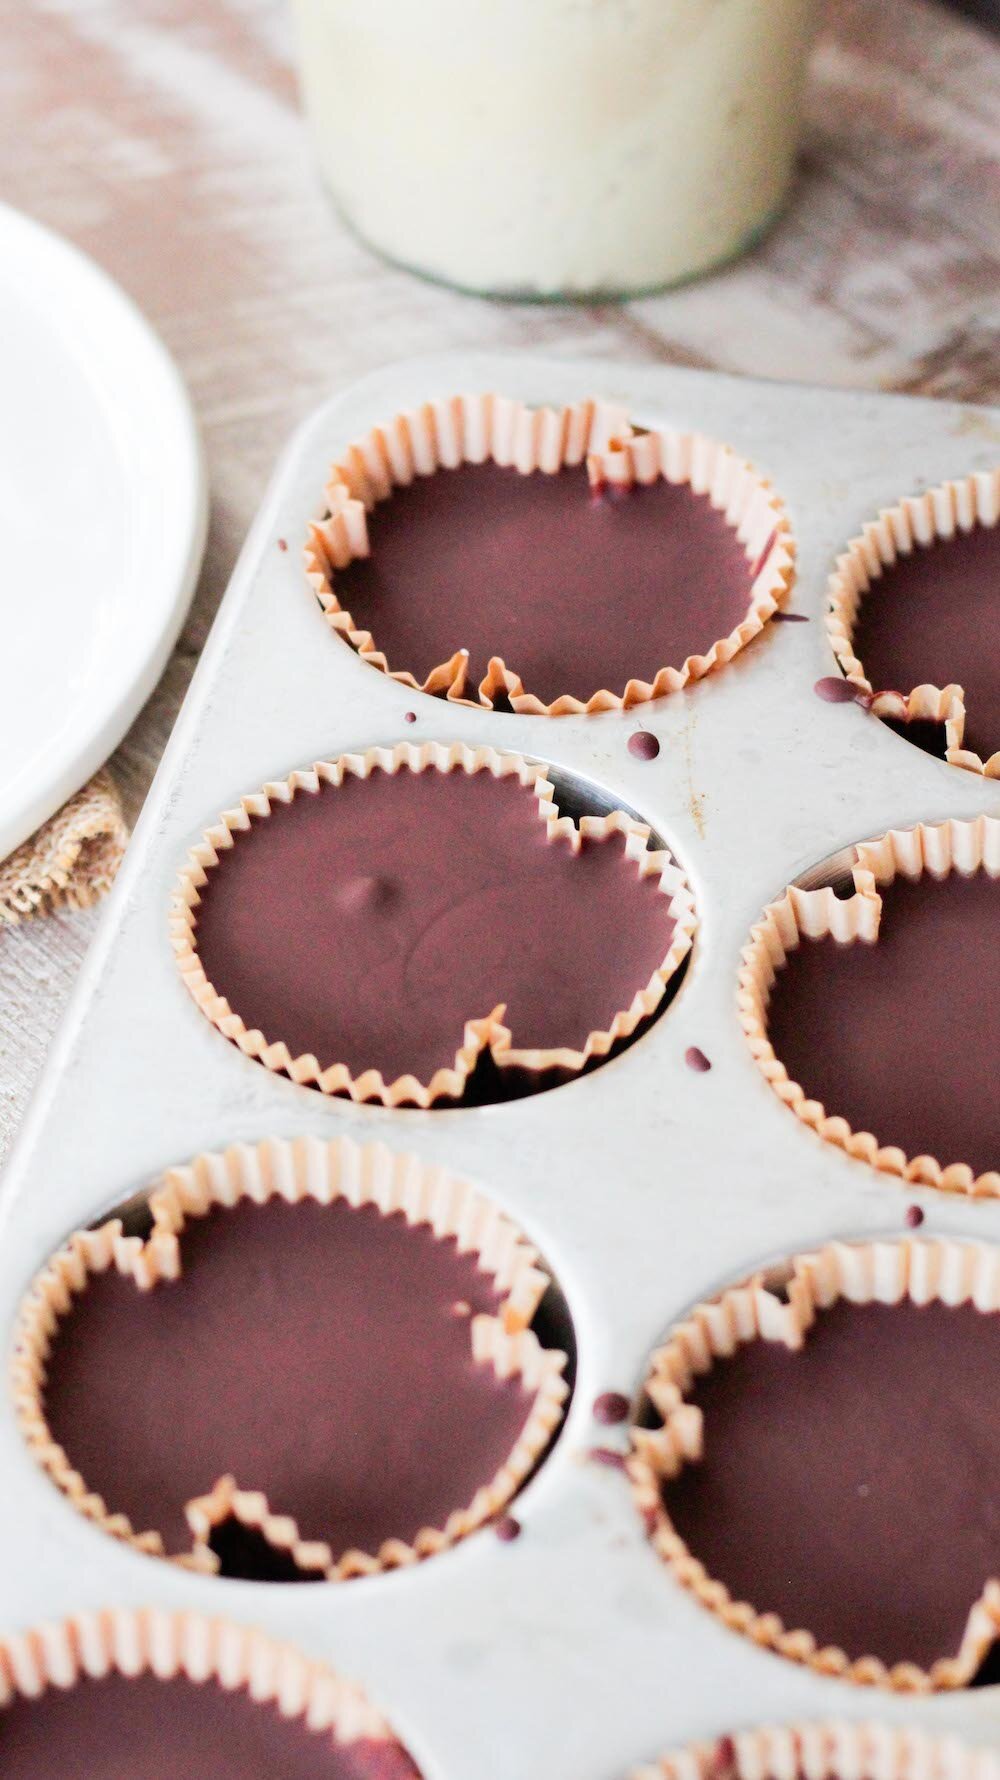
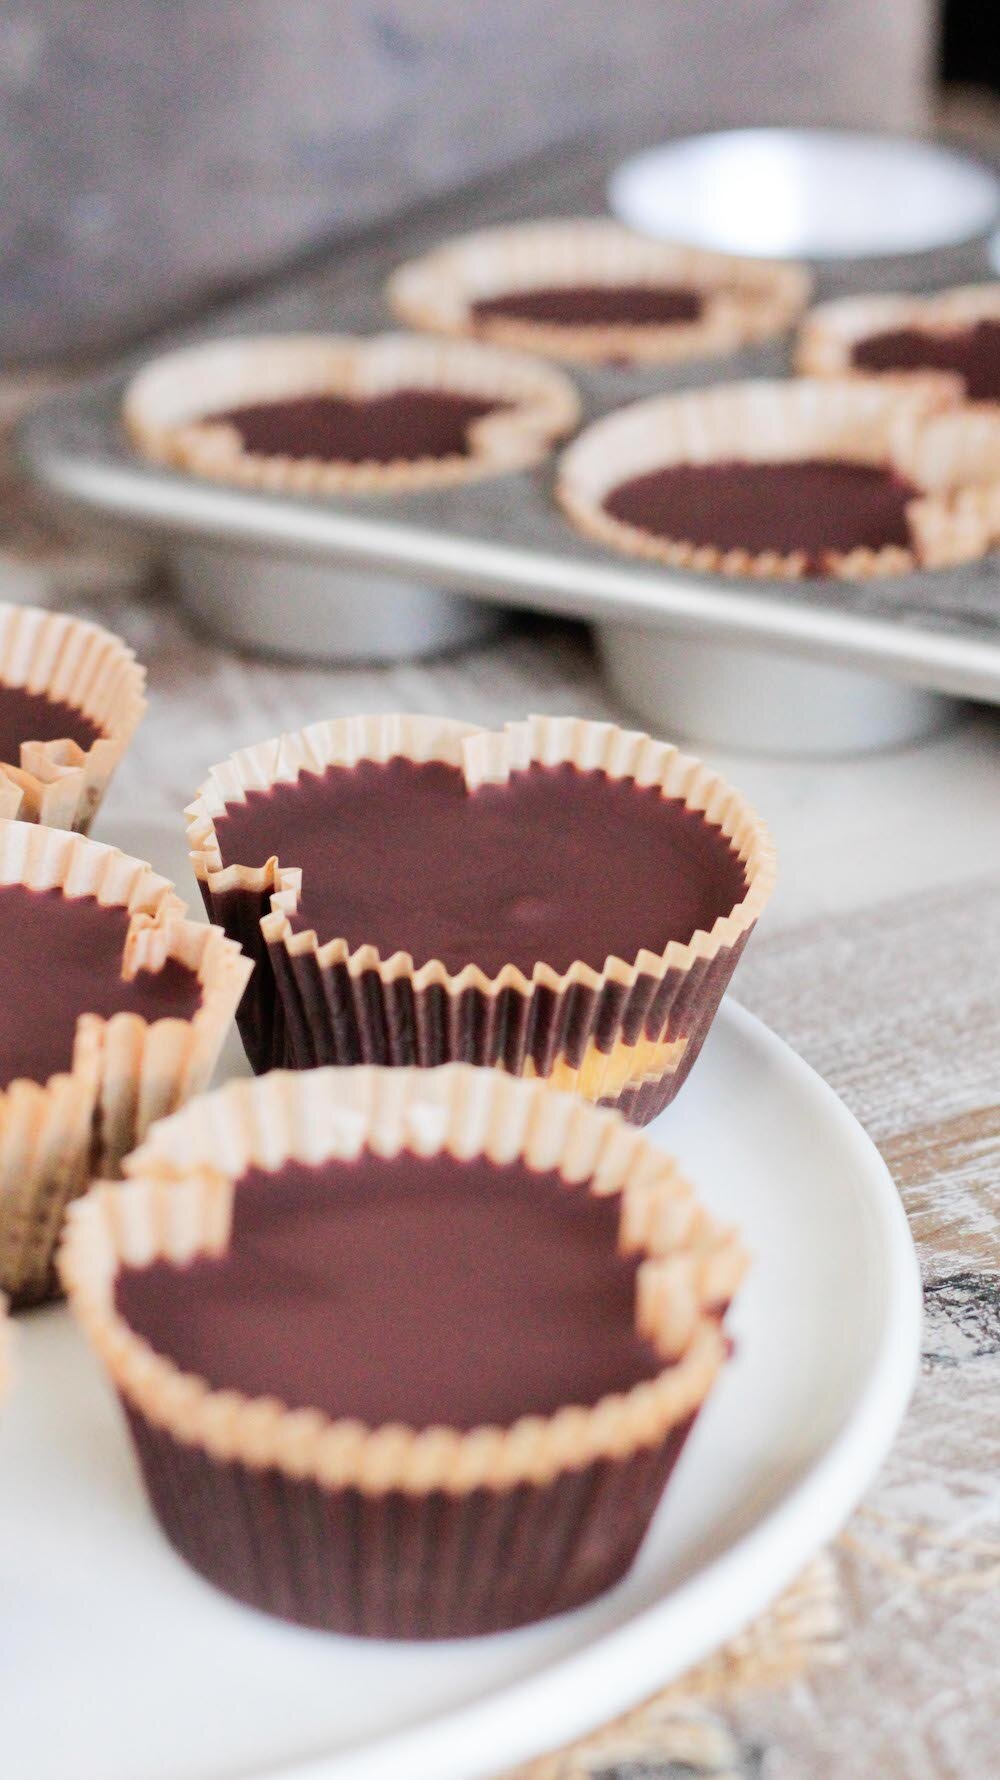
Vanilla Cashew Butter Cups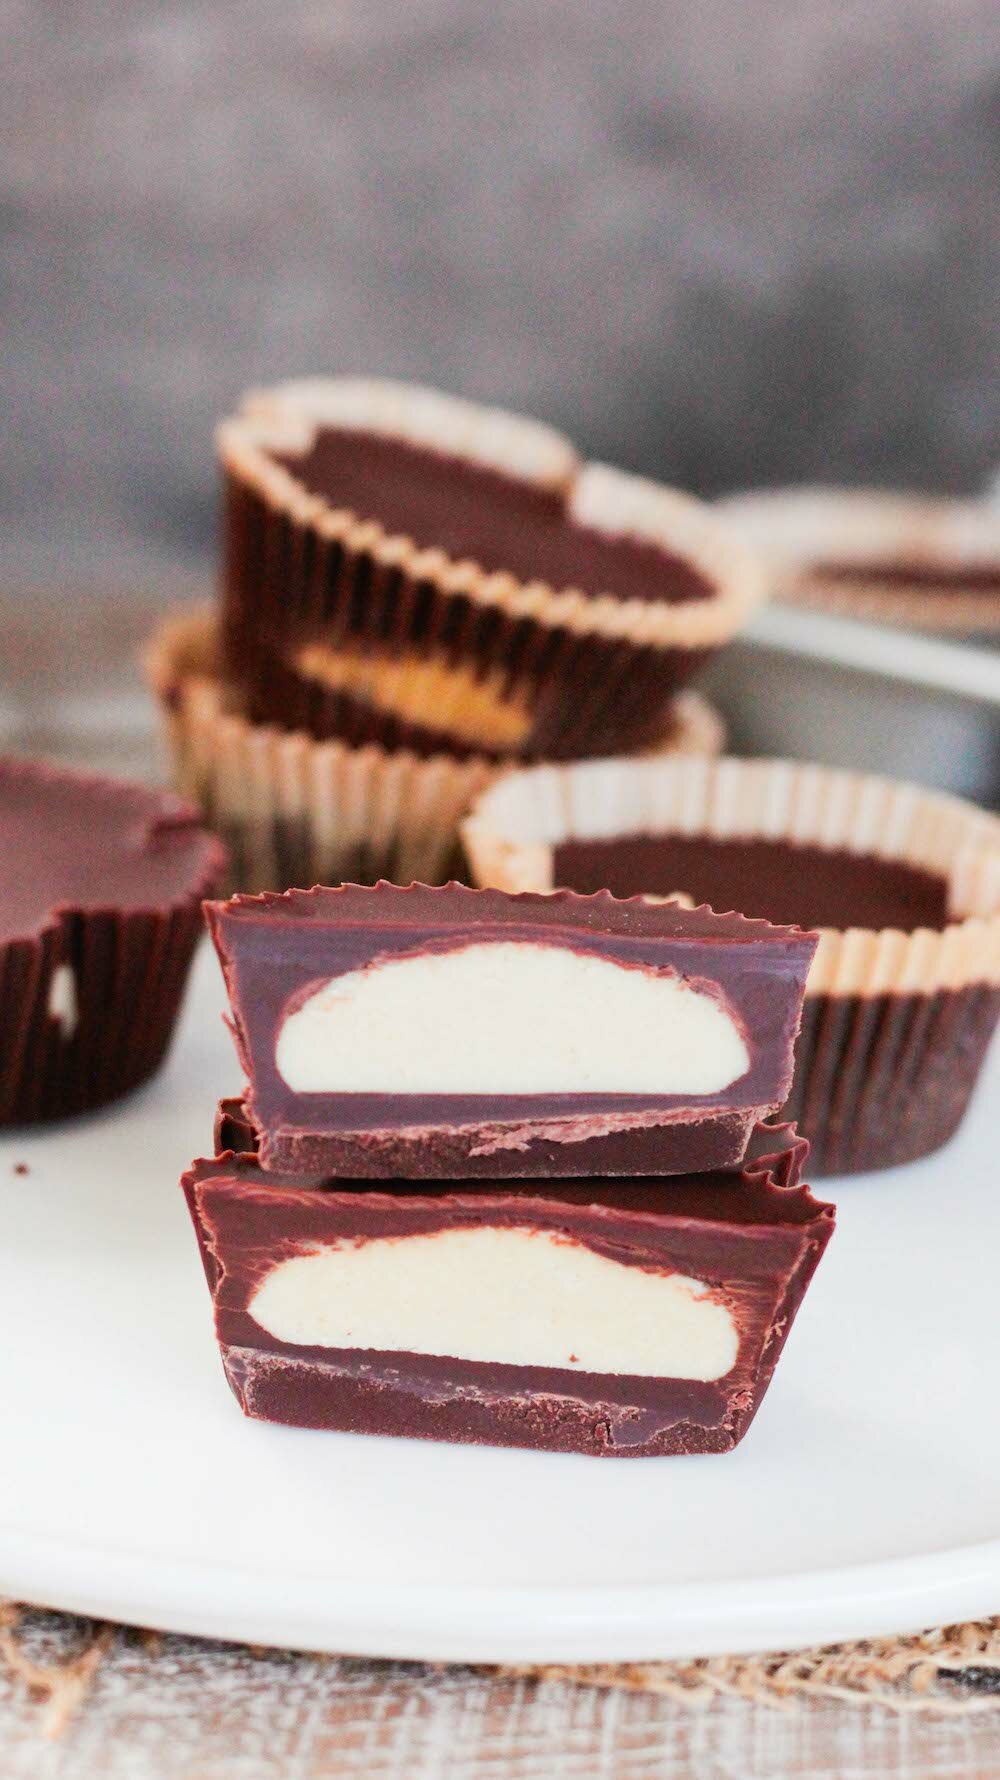
Guys the countdown is on - I am officially 100 days away from my WEDDING! Don't worry, I'm not freaking out or anything (I'm totally freaking out) and the stress has been minimal (It's all LIES!), so it couldn't be going any smoother (Is it too late to elope?). That being said, I've only got so much control over the outside vendors and other things happening this far out, but I have total control over my workouts and diet, and that may be the only thing keeping me sane. I'm the kind of person who works really well with a goal date in mind, so knowing I want to tone up before the wedding has been fun to work toward. I'm in decent shape, but have been really stepping up my runs and strength-training workouts, and working on cutting out all the sugar from my diet. I've had great results lately, losing inches around my waist and thighs and I think more than the working out, it is due to the removal of sugar from my diet. We've all heard it by now - sugar is AS addictive as hard drugs to the brain. That's right, your brain's pleasure centers can't distinguish the two, they just know it feels great and they want it again. Being a sugar-addict sounds like a silly thing, but in reality most Americans are totally hooked and don't even realize it.
When I officially started cutting out the sugar, about three months ago, it was due to a combo of wedding prep and having rented 'That Sugar Documentary' and realizing it was time to make a change. The doc showed that the USDA recommends about 10% of calories per day come from sugar - this was about 25 grams of sugar per day, for most people - but the doc showed that most people are eating closer to 80 grams of sugar per day. WHAT?! That's more than 3x as much! I was blown away. And I immediately thought, 'Not me!' because of course I wanted to believe I was achieving something better and because we all want to believe that we're being successful. I'm a pretty healthy eater, but that doesn't mean I'm eating healthfully all the time. Pro tip: I WASN'T. When I started recording my eaten sugars I was totally embarrassed - the first day, I hit 36 grams by 3 pm and was still craving dessert all night. There just seem to be hidden sugars everywhere! Now, I'm not a total nut. I eat healthy, normal foods like fruit without checking the sugars, I just eat it in moderation. Because of course pancakes aren't the same as an apple. But not all people know that! So i'm here to give you a heads up. Cut the sugar out! It was a hard two weeks of cravings and a few headaches for me, but overall the withdrawal symptoms weren't as bad as I expected at all and now, I don't get the cravings at all. (Unless I'm on my period - those cravings conquer all.) So how did I cut the sugar out? Well, I started weaning myself off by making myself some sugar-free and super low-sugar treats to keep in the fridge. It helped hugely! Now when I wanted a sweet treat, I'd have a little nibble off of one of my guilt-free fridge treats instead of a 1/2 pint of ice cream. And it worked! Soon I wasn't craving the sweets as often, and when I did, I had a healthy solution to reach for before I could make an unhealthy choice instead. That's it! No magic pill, just an upcoming wedding and a solid amount of will power. You can do it too! And the perfect way to start is with these - almost TOO easy to make - Vanilla Cashew Butter Cups! They're rich, creamy, and decadent - and you'd NEVER know they had no added sugar. I used the recipe for the Vanilla Cashew Butter from my Homestyle Vegan Cookbook (it's got great reviews on Amazon!), but you could definitely use the nut butter of your choice here instead. Quick note: The chocolate you buy will affect the sugar in this dessert. If you buy a 70% + Dark Chocolate like I did, the sugar should be under 9 grams per serving, which is reasonably low. You can look for a sugar-free chocolate, but I think real, rich, dark chocolate really works great here. And plus, we don't want to demonize sugar, just eat a ton less of it. Looking for more low-sugar desserts? Find our favorites here. Also, we want to give a shout to Honeycomb Studio in Atlanta for the gorgeous, hand-made, small-batch porcelain plates in the photo. They are almost too pretty to use - we love them!
INGREDIENTS
Vanilla Cashew Butter (from my Homestyle Vegan Cookbook) 2 cups raw cashews 1 vanilla bean, scraped 1/4 teaspoon cinnamon pinch of salt Vanilla Cashew Butter Cups 1 cup cashew vanilla cashew butter 1/4 cup coconut oil (optional) 3 cups dairy-free chocolate chips or chunks 1-3 drops vanilla stevia (optional) DIRECTIONS Vanilla Cashew Butter Preheat oven to 325º. Line a baking sheet with parchment paper. Spread the cashews onto the baking sheet and roast for 10-15 minutes, stirring once, until golden and fragrant. Let the cashews cool completely, then pour them into a food processor with the vanilla bean innards, cinnamon and salt and process until smooth. It might take a while - it took us about 5 continuous minutes of processing to get a super smooth consistency. Of course, if you prefer it a little chunky, you do you - just stop processing while there are still some chunks left. Pour the nut butter into an airtight container and set aside. Vanilla Cashew Butter Cups Line a muffin tin with paper liners and set aside. Using the double boiler method, begin to melt the chocolate chips over medium heat, stirring as they soften. Pour in the coconut oil and stevia, if using, and continue to stir until the chocolate is completely melted and smooth. Pour about 1 tablespoon of melted chocolate into each lined cup. Pop the tray into the freezer for 5-10 minutes to set. Pull the tray out and scoop about 1 tablespoon of the vanilla cashew butter onto the chocolate layer of each cup, centering it as best you can. Once all the cups have the cashew butter, pop the tray in the freezer for another 5-10 minutes to set again. While it sets, make sure your chocolate it still melty and ready to go. When set, pull the tray from the freezer again and top each cup with 1-2 tablespoons of the remaining melted chocolate mixture, until the cashew butter is completely covered or 'sealed' within each cup. Pop the tray back in the freezer to set, another 10-15 minutes. Once set, remove the cups from the tray and enjoy! They will soften at room temperature if coconut oil was added, so keep them in a cool place until you'r ready to eat them. NOTES Makes 12-14 cups. Leftover vanilla cashew butter doesn’t need to be refrigerated, and should keep at least two weeks out of the fridge. It will last indefinitely in the fridge. Leftover cups are best saved in an airtight container in the fridge or freezer for up to 6 months. 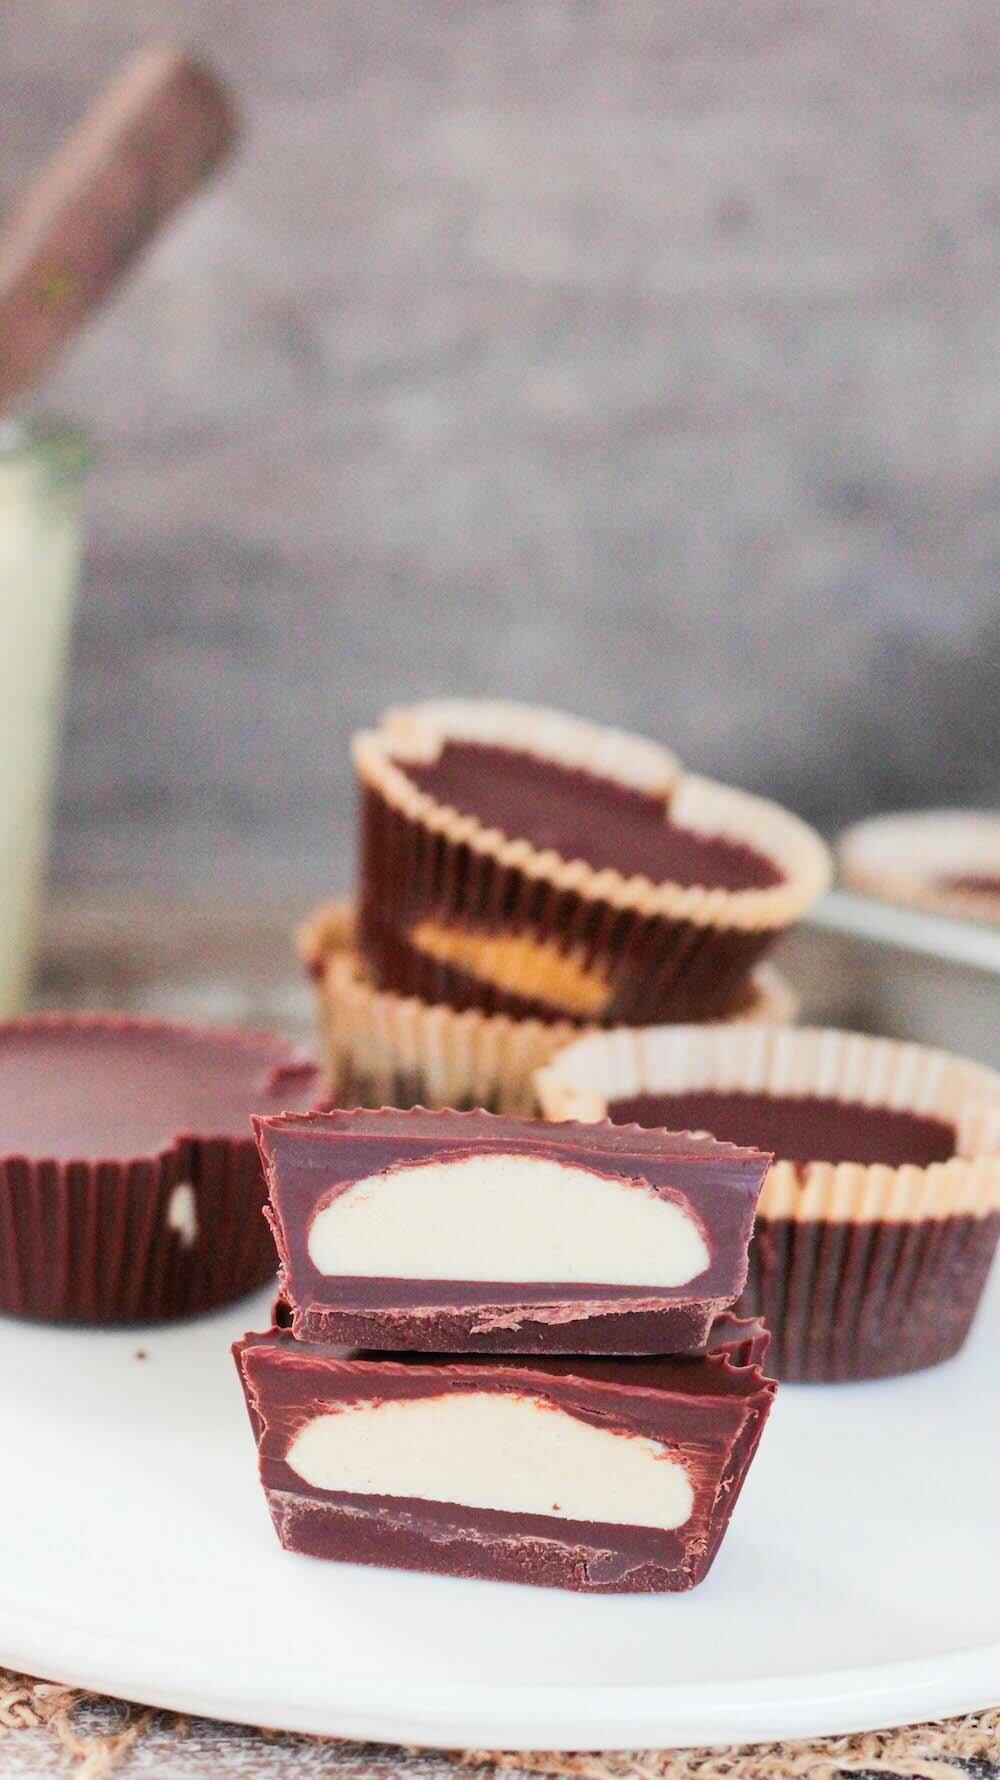
0 Comments
Purple Sweet Potato Pie Bars
Last week Alex and I took a day to start wedding planning together - FINALLY! So far, we have a venue, at The Riverbed Farm in Anaheim, and a date - June 10th, 2017, but other than that we've got nothing planned. Whoops! Time seems to be flying by at this point so my next big things to mark off the checklist are our save the dates and invitations, finding a caterer and finalizing details like the drink menu and decor. I'll have a post up soon on all the details and what we've learned so far in planning our vegan wedding!
In the meantime, a girl's gotta eat, and I've been loving all the fall produce we've been getting in our CSA box + seeing in supermarkets lately. We went on a date day last and ended up at a cute little kombucha + fermented goods bar in Costa Mesa called Farm + Culture Co. that served these yummy bites made with purple sweet potato and I was totally inspired. I wanted to create something similar, but with a little more focus on something sharable for the Fall season - so we came up with these Purple Sweet Potato Pie Squares. These pie squares are an incredibly gorgeous color - shockingly purple! - that just make you wanna eat 'em up. These bars are:
The sweet potatoes are paired with warm fall flavors like maple, cinnamon, and ginger on a chewy cashew-date-macadamia crust that makes them irresistible and much like a traditional sweet potato pie - but far healthier! They're are totally naturally sweetened, and you can omit the maple syrup if you prefer to keep them date-sweetened only. Eat them on their own or top them with a bit of whipped cream and a sprinkle of fresh nutmeg for the perfect fall treat. They're an indulgence you don't have to have any guilt about, so go ahead - have two!
INGREDIENTS
Cashew Date Macadamia Crust Layer: 1 1/2 cups cashews 1 cup macadamia nuts (or skinless almonds) 1 cup pitted dates 3 tablespoons coconut oil Purple Sweet Potato Pie Layer: 1.5 lbs purple sweet potatoes, boiled, skinned + mashed (about 2 1/2 cups mash) 3/4 cup unsweetened almond milk 3 tablespoons maple syrup 1 tablespoon coconut oil 1 tablespoon lemon juice 1 teaspoon vanilla 1/2 teaspoon ground ginger 1/2 teaspoon cinnamon 1/8 teaspoon nutmeg 1/8 teaspoon salt DIRECTIONS Cashew Date Macadamia Crust Layer: Soak the cashews and macadamia nuts in warm water for at least one hour. Drain off the liquid, and pour the soaked nuts into the food processor. Add in the pitted dates and coconut oil and process until a sticky crust forms. Grease or line a 9x9 inch glass baking dish. Scrape the crust mixture into the baking dish and use a rubber spatula to spoon to press the mixture firmly and evenly into the pan. Refrigerate or freeze to set the crust, about one hour, before topping with the sweet potato mixture. Wipe the processor bowl out with a paper towel and set aside. Purple Sweet Potato Pie Layer: Place the sweet potatoes into a large pot of water and bring to a boil. Cook until the potatoes are fork tender, about 10-15 minutes. Remove from the water and let cool completely. Once cooled, remove the skins and toss 'em into the compost or trash bin. Place the sweet potatoes into the processor bowl with the almond milk, maple syrup, coconut oil, lemon juice, vanilla, ginger, cinnamon, nutmeg, and salt. Process on high until the mixture is completely combined and smooth. Pour the mixture over the cooled crust layer and spread it evenly around. Place the baking dish back into the freezer to firm - they'll be much easier to slice this way. Once they're firm, about 3+ hours later, slice the bars even squares. Serve immediately or let soften in the fridge until you're ready to enjoy! NOTES Makes 16-20 bars. Leftovers can be saved in the fridge for several days or the freezer indefinitely. Purple Sweet Potatoes are different than Japanese Sweet Potatoes, which are purple on the outside but white on the inside. Make sure you double check or your pie squares - while delicious! - certainly won't come out looking like ours. Golden Beet Salad with Balsamic + Cashew Ricotta
Beets are definitely one of the most underrated root vegetables. Most people think they don't (or KNOW they don't) like them, and most restaurants won't put a dish on the menu that nobody will order. It's a sad cycle, and beets usually get the short end of the stick. But unlike their earthier, more bitter, urine-dying red beet cousin, the golden beet is a sweet veggie that tastes great whether you pickle, bake, brine, roast or juice it. It has a mellow flavor (and color) that pairs really well with tangy, acidic flavors like balsamic vinegar and richer textures like crunchy walnuts and creamy cashew ricotta - which is why we paired them together! Plus, yellow beets are packed with good-for-you vitamins and minerals like fiber, iron, potassium and folic acid. If you haven't tried golden beets, or have just been waiting for the right recipe to test them out in, make this salad. It comes together super easily and tastes great, plus it somehow totally looks and sounds like a dish you'd only find at a fancy restaurant. Let's eat!
INGREDIENTS
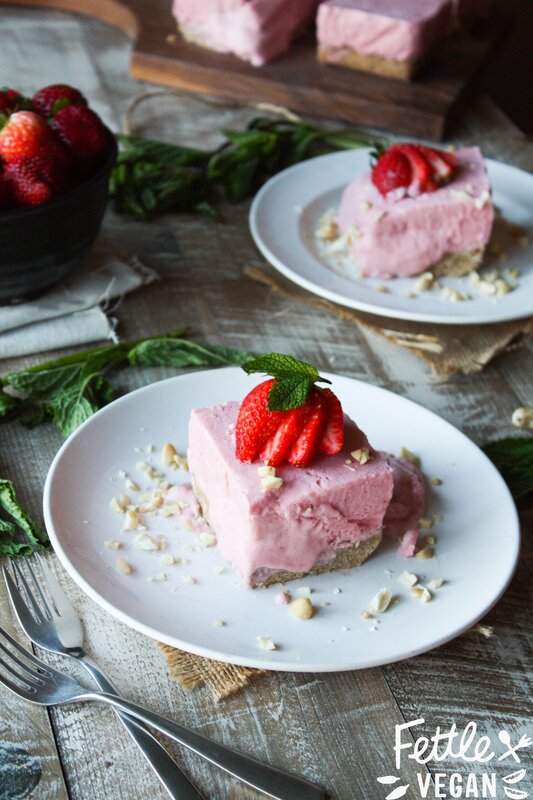
1/2 cup walnuts, chopped 1 cup raw cashews, soaked in warm water 2 tablespoons water 1/4 teaspoon salt 4 medium golden beets 4 cups arugula balsamic vinegar, as needed for serving DIRECTIONS Preheat the oven to 350º. Spread the chopped walnut onto a lined baking sheet. Bake for 8-10 minutes, stirring once. When finished, set aside to cool. Soak the raw cashews in warm water for at least 30 minutes. Drain the nuts and pour them into a food processor. Pour in the water and salt and pulse until a fluffy, chunky texture is achieved (similar to ricotta cheese). Set aside. Trim the ends of the beets, then place them into a medium-sized pot of water. Bring to a boil, then lower heat and cook over medium heat until fork tender, about 20-30 minutes. Drain the water and let cool slightly before using your fingers to slide the skins off. Toss the skins in the compost or trash and thinly slice the cooked beets. Spread the arugula between two large plates and top with the toasted walnuts, a couple tablespoons of the cashew ricotta, sliced golden beets and a drizzle of balsamic vinegar. Serve immediately! (Or, just prep it and take it for lunch to work all week!) NOTES Serves 2. Leftovers last up to a week in the fridge. Strawberry Cheesecake Squares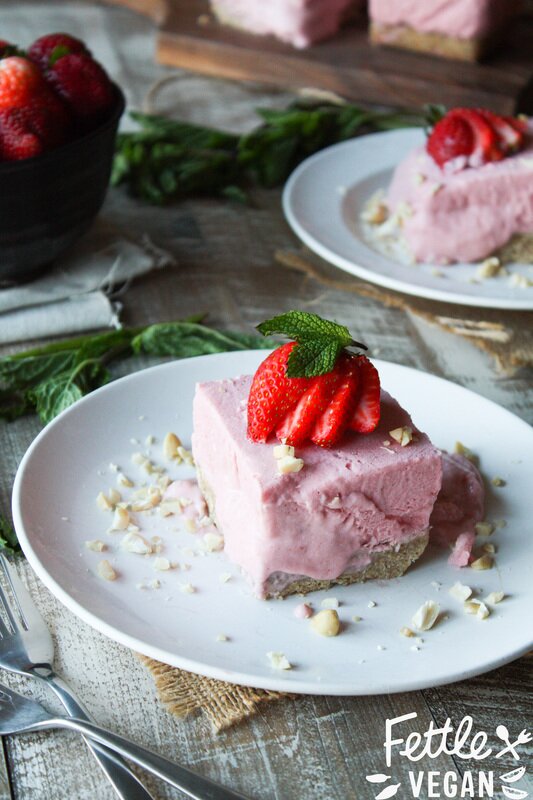
It's the hottest time of the year just about everywhere right now, and Southern California is no exception. In fact, most Angelinos will tell you that the past month has included some weird very june-gloom-esque weather. Lots of cloudy, humid mornings leading to sunny, hot afternoons. Basically, every afternoon becomes an excuse for me to run to the grocery store and pick up a pint of DF Mavens Mint Chip (my latest obsession) Ice Cream and then come home and eat it all, justifying that without it, I would be a puddle! The problem? I still kind of puddle out around 3 pm when the heat reaches its peak, but I've also eaten 600 calories worth of ice cream and my daily allotment of sugar. Whoops! This week I'm giving up the ice cream and packed the freezer with these sweet, low sugar Strawberry Cheesecake Squares. They're just the right amount of sweet on top of a chewy date-oat-nut crust, and make the perfect afternoon cool-down treat or late-night snack. They're packed full of good fats from the nuts and coconut milk, and are a nice break from a traditional round cheesecake. Easier to serve + share! Plus, when it's as hot as it has been here lately, you only want to have to pull out a piece at a time because, you know, MELTING. As you can see as proof above (well, and below), things got a bit melty under photography lights in the hot hot afternoon, but it still tastes amazing. If its that hot, keep them in the freezer until ready to serve. Otherwise, you can soften them a bit in the fridge, but since coconut milk/cream is so melty, the cooler the better for these babies. Let's eat!

INGREDIENTS:
Crust 1½ cups cashews 1½ cups oats 1 cup pitted dates 6 tablespoons melted coconut oil Cheesecake 4 heaping cups strawberries, green tops removed 1 - 14 oz. can coconut cream OR 2 cans coconut milk, refrigerated overnight + liquid drained 1 teaspoon vanilla ½ cup melted coconut oil 2-4 tablespoons maple syrup OR agave nectar DIRECTIONS: Crust Soak cashews in warm water for at least one hour. Blend all ingredients together in a food processor or high speed blender. Grease or line a 9x9 inch glass baking dish. Press date & nut mixture into the bottom of the baking dish. Refrigerate or freeze to set coconut oil, about one hour. Cheesecake Blend strawberries, coconut cream, vanilla, coconut oil and maple syrup in a high speed blender until completely combined. Remove crust-filled baking dish from the fridge and fill evenly with the cheesecake mixture. Cover + place in the freezer or fridge to set for at least 3 hours or overnight. When ready, remove from the fridge, cut with a large knife into 12 even squares, and plate. Sprinkle with crushed cashews, fresh strawberries, and a bit of coconut whipped cream, if you like. Since coconut cream can get melty in the heat (like in some of the photos above!), this dessert is best left in the fridge or freezer until you are ready to eat it. It lasts indefinitely covered in the freezer, and makes 12 medium-sized or 15 small cheesecake squares. Enjoy! 
Parsley Pesto
Here in Southern California, the growing season starts earlier than most places. Thanks to our high temps and sunny days, our garden started growing back in March and hasn't stopped since. In other words, our parsley plant is bigger than most peoples large dog. We have SO MUCH parsely- we're overrun! And there's only so much garnishing you can do with parsley before you're sick of it. A better way to use up mass amounts of fresh, fragrant parsley? This simple Parsley Pesto recipe! It whips up quickly and taste great spread on everything! I'm loving pairing it with sweet cherry tomatoes on crackers and crusty bread and mixing it into pasta dishes like this Caprese Pasta Salad. I was hesitant when I started messing around with this stuff- what if I didn't like it as much as my traditional Hemp Seed Basil Pesto? What if it just didn't taste right? Well, SURPRISE! It tastes AMAZING! Adding the green onions and extra garlic give it a ton of flavor and take away from the bitterness of having too much parsley, and the nuts keep it smooth and mellow. It's green gold! And it saves well in the fridge for up to a week, so you can enjoy fresh, flavorful pesto all week long. Lets eat!
INGREDIENTS:
3 packed cups fresh parsley, stems removed 1 cup almonds or cashews 1/2 cup olive oil 1/2 cup green onion, chopped 3 tablespoons lemon juice 4 cloves garlic 1/2 teaspoon salt 1/2 teaspoon pepper DIRECTIONS: In a high speed blender (we used our Vitamix) or a food processor, combine all ingredients. Blend until smooth, or until your desired texture- you can leave it chunkier if you like! [If you don't have a great blender to work with, try soaking your nuts in warm water for at least an hour before blending them, it'll help break them down much more easily.] Spread it on everything from bread and crackers to pizza dough and rice cakes. Saves well in an airtight container for about a week, or until pesto begins to brown. Enjoy!
Strawberry Cheesecake Smoothie
While most people are starting this easter morning with pancakes, baked goods, and sweet treats- we're starting slow. We need to pace ourselves because this afternoon I'M GOING TO EAT SO MUCH CANDY. I can't help myself. Luckily, I've got a protein powder like Sunwarrior's Warrior Blend protein to help me start the day in a much more balanced + healthy place. Sunwarrior protein is amazing. It's got a great, rich, sweet flavor and isn't the least bit chalky (and you can buy it HERE). The Warrior Blend has a whopping 19 grams of protein per serving (about 40% of your daily need!) and ZERO sugar. Sun warrior is formulated to be easily digestible and is made of things like pea, hemp seed, cranberry and coconut oil- you know, REAL food! It has a complete amino acid profile (meaning all of 'em) and has extra lysine and leucine, which can be lacking in plant-based proteins. And, as you can see from the photo, it's free of soy, gluten, GMO's, and crappy fillers like sugar. Its a plant-based win, for sure. Plus, if you're into it, Sunwarrior also sells things like sprouted barley, fluvial acid, immunity shields and other plant-based proteins too. Basically everything you need to make sure your active body is performing at its very best! This protein powder gives this smoothie a rich, creamy taste- hence the 'cheesecake' part of the title. The addition of more cashews adds a bit of fullness and more protein to the smoothie, while the strawberries and granola 'crust' keep it light and sweet...like having dessert for breakfast! Now grab those easter baskets, start filling 'em with goodies, and lets eat!
INGREDIENTS:
1 scoop OR individual packet of Sunwarrior Vanilla Protein powder 1 cup fresh strawberries 1/2 cup raw cashews 3 medjool dates, pits removed 12 oz. non-dairy milk (we like coconut!) 1 cup ice granola, for garnish (optional) DIRECTIONS: Blend all ingredients in a high speed blender until smooth. Top with a bit of granola (its like the 'crust' of the cheesecake!) and serve in two small glasses- or one big one. Enjoy!
Persimmon & Ginger Tart
Until a few years ago, I had never tried a persimmon. I grew up in Maine, where anything but local produce can be hard to find, and in the winter time, it can be hard to find any produce at all. Needless to say, I had long since moved to California when I got my first taste of these little beauties. Native to China, they were introduced in California sometime in the middle of the 19th Century, and Americans have been hooked ever since. They have a delicate flavor, sweet with a little tang, and are great in baked goods or sliced with a sprinkle of cinnamon and sugar. I've seen loads of persimmon based muffins, cookies, crumbles, and cakes lately, so I decided to make my own version: a buttery, flaky gluten-free crust (yes it CAN be done!) under a rich, gingery cheesecake middle, topped with sugared persimmon slices and finished with a sweet smattering of coconut whip. This dessert is low sugar, so pretty guilt-free, and a crowd-pleaser- we shared with our friends and it was gone in one night! It would make a great Thanksgiving dessert and takes about an hour to throw together. We hope the friends at your table love it as much as ours! Let's eat.
INGREDIENTS:
Buttery Crust: 2 cups gluten-free flour blend (we used Bob's Red Mill 1:1 GF Baking flour) 1/4 teaspoon xantham gum (only if your flour blend doesn't include any, and even then- optional) 1/8 teaspoon salt 2/3 cup vegan butter 9-12 tablespoons ice cold water Ginger Cashew Cream: 2 cups cashews, soaked for at least 30 minutes in warm water 3/4 cup water 1/3 cup maple syrup 1 tablespoon fresh ginger, or about a 1-inch chunk 1 1/2 teaspoons vanilla 1/4 teaspoon nutmeg Persimmon Topping: 4 persimmons, thinly sliced 2 tablespoons sugar 1/4 teaspoon ground ginger Coconut Whip: 1 can full fat coconut milk 3-6 tablespoons powdered sugar 1-2 teaspoons vanilla INSTRUCTIONS: Buttery Crust: 1. To prepare the buttery crust, mix flour, xantham if using, and salt in a large bowl, then cut in butter using a fork or pastry butter until crumbs form. Drizzle tablespoons of ice cold water one at a time over the mixture, using a wooden spoon to stir and work the liquid in until a dough begins to form. Add water until dough is moist enough to form a ball but not too sticky to knead. Add more flour, a little at a time, if needed. Once dough is prepared, roll out to about 1/4 thickness and press into your 11-inch tart pan, being sure to line the edges as evenly as possible. I use the back of a wooden spoon to press the dough evenly into the tart pan. Once finished, place in fridge to chill while you prepare the rest of the ingredients. Ginger Cashew Cream: 2. In a high-speed blender or food processor, combine soaked and drained cashews, water, maple syrup, ginger, vanilla and nutmeg and blend on high for about 1 minute, until mixture is completely creamy and smooth. Pour the mixture into your prepared crust and set aside. Persimmon Topping: 3. Wash and thinly slice the persimmons, discarding the ends. Toss persimmons in sugar and ground ginger mixture, then arrange them around the tart, starting on the outside and working your way in, overlapping the persimmon slices slightly. Bake the tart, uncovered, at 375 degrees for 30-35 minutes. Remove, let cool, and serve with coconut whip. Coconut Whip: 4. Refrigerate coconut milk overnight, being careful not to shake or jostle cans. Once you're ready to make the whip, gently open the can and use a spoon to remove the thick white layer of coconut from the top half of the can, leaving the clearish liquid left at the bottom. Put the thick white cream into a mixing bowl with the sugar and vanilla. Mix with hand beaters until mixture is smooth, creamy, and whipped up. Serve a dollop with each slice of tart! Leftovers can be refrigerated for several days, re-fluffing with beaters as necessary. 5. To serve, slice tart into pie-slices, then top with coconut whip and a sprinkle of nutmeg. Save leftovers, covered in the fridge, for up to a week. Enjoy!
Spiced Pumpkin Bread with Maple Vanilla Icing
Prepare yourselves: the weathers getting cooler and it's about to get all kinds of pumpkin up in here. After walking the aisles of Trader Joe's last week and seeing pumpkin-themed snacks EVERYWHERE, I was inspired. Last year at this time I was so sick of pumpkin. I'm not even sure we posted one pumpkin recipe on this site last fall. Lame, right?
This year, lucky (or maybe unlucky?) for you, I've jumped back on the pumpkin bandwagon. HARD. The next couple of weeks will be filled with pumpkin treats both sweet and savory...but mostly sweet. I promise not to overdo it. And I promise you will find at least one pumpkin goodie to love. In fact, we're calling it 'GREAT PUMPKIN WEEK' here this week. Use the handy pumpkin on the homepage sidebar to explore ALL of our pumpkin-filled recipes! Now, let's BAKE!
INGREDIENTS:
Spiced Pumpkin Bread 1- 15 oz. can pumpkin purée (about 1.5 cups) 1/3 cup softened coconut oil 1/2 cup organic sugar 1/2 cup non-dairy milk 1 teaspoon vanilla extract 1 teaspoon apple cider vinegar 2 cups whole wheat OR gluten-free flour blend 1/2 teaspoon baking soda 1/2 teaspoon baking powder 1/2 teaspoon salt 1/4 tsp ground cinnamon 1/8 tsp ground ginger Maple Vanilla Icing 1.5 cups raw cashews, soaked 3 tablespoons maple syrup 1.5 teaspoons vanilla extract 1/4 - 1/3 cup water DIRECTIONS: Preheat oven to 350 degrees. In a large mixing bowl, combine coconut oil, sugar, milk, vanilla, & vinegar. Let sit for 3-5 minutes. While you wait, grab a second mixing bowl & combine the flour, baking soda, baking powder, salt, cinnamon, and ginger. Once the wet ingredients are ready (slightly bubbly), slowly add in the dry ingredients and stir to combine. Once the two are completely combined and a batter has formed, add the pumpkin purée. Stir to combine. Pour batter into a greased, lined or non-stick loaf pan. [We used a non-stick pan with a little parchment paper, for easy removal.] Bake for 45-60 minutes, depending on your oven. Bread is finished when a toothpick comes clean. Remove from the oven and let cool at least 30 minutes before transferring to a wire cooling rack. While bread cools, whip us icing by combining soaked cashews, maple syrup, vanilla, and water in a food processor or high speed blender. Fill a piping bag or ziploc bag with a corner cut off with icing mixture and pipe icing over cooled loaf. Loaf lasts well on the counter or in the fridge for about a week, or can be frozen indefinitely. Enjoy!
Triple-Decker Caprese Grilled Cheeze Panini
It's been warm and sunny here in Southern California (surprise, surprise), and our tomato plants are EXPLODING! We're growing 4 different varieties and picking anywhere from 4 to 20 tomatoes a day. It's a good thing we like 'em! We've been making bruschetta, soup, and eating 'em raw with a little olive oil and salt, but this sandwich may be my new favorite way. The best part? You can spread it with your very own, super simple, homemade vegan cheeze! And now you'll have a quick recipe anytime you want spreadable vegan cheese. Don't have cashews? Use any nut you have on hand; fun flavors abound from brazil nuts, macadamias, and pine nuts as well! Keep it gluten-free with gluten-free bread or sub in hearty portobellos for a bread-less alternative. But use three slices anyway- the triple-decker-ness is the best part!
INGREDIENTS:
For Cheeze: 1 cup cashews, soaked 1 tablespoon lemon juice 1 clove garlic 1/4 teaspoon salt 1/4 teaspoon pepper 2-4 tablespoons water Everything Else: 1 medium sized tomato, sliced OR 12ish cherry tomatoes, halved 1/4 cup fresh basil, roughly chopped sprinkle of freshly ground black pepper 3 slices of bread (GF is that's your jam) DIRECTIONS: To make the cheeze, combine cashews, lemon juice, garlic, salt, pepper, and water in a food processor and mix until smooth. Scoop out, set aside. Cut your tomatoes and basil, and set aside. Warm up your panini press (or just a greased pan on the stove). Assemble sandwich beginning with a slice of bread, a generous layer of your homemade cheeze, tomato slices, basil, and a sprinkle of pepper. Top with the next slice of bread, and repeat. Spread the final slice of bread with another thin layer of cheeze before topping the sandwich. Place in panini press until golden lines form and cheeze is melty, or grill until golden and crispy on both sides. If you prefer a crunchier sandwich (Alex does), consider toasting your middle slice before adding it to the sandwich. Enjoy immediately with a frosty bev. (Leftover cheezy spread can be stored in the fridge up to a week.)
Mini Key Lime Cheesecakes
Its (almost) SUMMERTIME and I've been craving guilt-free goodies. Nothing taste more like summer to me than a giant slice of key lime pie and a margarita, and today, I'm going to do just that. One mini-cheesecake, one stiff drink, a beach towel, and a book. Anyone care to join me?
These cheesecakes are so easy to whip up they'll have you feeling like you really ARE on summer vacation already. And maybe you are! In that case, have two margaritas. This recipe is broken up into several 'set it & forget it' steps, followed by a large serving of DELICIOUS. You're gonna love the creamy, zesty lime flavor, accented by a sprinkle of coarse sea salt and the chewy, sweet, date & nut crust. Perfect for sharing, summer sized-portions, and adorable snacking. Can also be made in cake pan-size, if you prefer. Either way, I'll see you at the beach. Enjoy!
Ingredients:
Crust: 1/2 cup pitted dates 1 1/2 cup nuts (I used almonds and cashews) 3 tablespoons melted coconut oil Cheesecake: 3 cups soaked cashews 3/4 cup freshly squeezed key lime juice 2/3 cup agave nectar or maple syrup 3/4 cup melted coconut oil 1 teaspoon sea salt 1 teaspoon vanilla extract 1 key lime, zested (about 1 teaspoon) sprinkle of coarse sea salt, for garnish Directions: Crust: Blend all ingredients together in a food processor or high speed blender. Grease or line 4-6 ramekins or tart dishes OR 1 9-inch spring form pan. Press date & nut mixture into bottom of ramekins or pan. Refrigerate or freeze to set coconut oil, about one hour. Cheesecake: Soak cashews in warm water for at least one hour. Blend cashews, lime juice, agave, coconut oil, salt, vanilla, and lime zest in a food processor or high speed blender until completely combined. Remove ramekins or cake pan from the fridge and fill to the top with key lime mixture. Put in the freezer or fridge to set for at least 3 hours before serving (or just eat it- it might not keep its shape as well but it'll still taste delicious). When ready, remove from the fridge and plate. Sprinkle with coarse sea salt and a lime wedge to garnish. Serve, and enjoy! Great topped with coconut whipped cream or all by itself. Last indefinitely covered in the freezer and at least 1 week in the fridge. Makes 4-6 small ramekins or tarts OR one 9-in cake pan worth of cheesecake.
<
|
tagsAll  RSS Feed RSS Feed
|