Healthier Jam Thumbprint Cookies
This month has been INSANE. We've all seen the memes - January felt like it lasted 2018287324 days and let me be the first to say THANK GOD it's over. I feel like it was one things after another - things going wrong at work, won't weather, days just not being long enough to get everything - or seemingly anything - done. Luckily, amongst the chaos, I had a little bit of a plan: #BeYourBestBabe2019! I loved creating this challenge with Nathalie, my partner on the Real Good Podcast, and I loved participating in it even more! The challenge was broken down into 4 weeks, each week with a different focus, and each filled with simple and fun daily challenges designed to help the crazy month be as productive as possible. It was fun, and even though the month flew by, I feel like I can actually look back and realize I had a pretty successful month!
One thing I did several times this month, no checklist reminders needed? Made batches of homemade cookies! It's one of my favorite ways to decompress and satisfy a sweet tooth. And this past month? I made some REALLY great batches of cookies. And after posting about them on my IG, I got tons of requests for recipes! I'm still working on my super duper chocolate chunkers but I've damn near perfected these Healthier Jam Thumbprint Cookies and it was time to share. They're buttery, soft, and full of flavor, and then topped with your favorite jam! Even better? I made them nearly entirely sugar-free! You can always add more sweetness if you like, but I'm all about adding less sugar so I can eat more cookies - ya know what I mean?! Recipe below, babes!
INGREDIENTS:
2 1/4 cups AP flour 2 teaspoon cornstarch 1/2 teaspoon salt 1 cup butter (vegan or regular, unsalted), softened to room temperature 1/3 cup sugar 1/3 cup Lakanto Monkfruit Sweetener (or you can always just use stevia or brown sugar here, instead! You've got options. 😊) 1 large egg yolk (or 2 tablespoons mashed banana, to keep 'em vegan) 3/4 teaspoon vanilla extract 1/3 cup jam or preserves of your choice (I like raspberry but could only find seedless for this batch) DIRECTIONS: Preheat the oven to 375 degrees F. Line a baking sheet with parchment and set aside. In a medium mixing bowl, combine the flour, cornstarch and salt. In a larger mixing bowl, beat together the butter and sugar until creamy. Add in the egg yolk or banana and vanilla, and beat until well combined. Begin to pour the dry ingredients into the larger, wet ingredient mixing bowl about a cup at a time, mixing consistently until a uniform dough forms. Chill dough for 20-30 minutes. Scoop 1 inch balls of dough two-inches apart onto your cookie sheet and gently press your thumb into the center to make a small indent for the jam to sit comfortably inside of. Once your cookies have all been pressed, scoop your 1/3 cup of jam into a small bowl and microwave for about 20 seconds to soften. Mix the jam after warming and gently scoop hefty teaspoon-sized amounts into the thumbprint in each cookie, filling to the brim. Place the baking sheet into the oven and bake for 10-11 minutes, or until bottoms and edges are beginning to turn golden brown in color. Remove the cookies from the oven and place them onto a cooking rack. Once completely cooled, enjoy immediately or wrap and save for up to three days!
This recipe has quickly become a favorite in our house - which is funny, because jam-filled cookies were literally my least favorite for YEARS! I don't know if I'd just had too many fig newtons forced on me as a kid or if the jam my cookies were being topped with just wasn't as up to par, but I never liked them until now! These ones are soft, buttery, and topped with the perfect amount of sweet jam on top. I am super guilty of eating a half-batch in a day. Thank goodness they're HEALTHIER!
If you're interested in following along with the #BeYourBestBabe2019 challenge, head here and print out the challenge calendars. You can do them week by week or all at once - just enjoy the extra productivity and see if it makes you feel like you're being YOUR best babe this month!
0 Comments
Organic Funfetti Cookies for my 28th Birthday!
I have always been the kind of person who LOVED birthdays. I would celebrate as long as possible - the whole month if you'd let me! If you listened to the latest episode of my podcast, you know that I'm a total PITTA and that fire in my belly keeps me craving attention, so it makes sense that I would love a day centered around celebrating ME! I've had a pretty great last few birthdays, but this year totally snuck up on me. I have been so insanely busy between the blog, podcast, and new promotion at the yoga studio (studio assistant what whatttt) that I literally didn't realize until just a few days ago when my husband reminded me that we needed to figure out how we were going to celebrate. YIKES! (I must be getting old guys - I'm already forgetting my OWN birthday! 🙈)
It's the Thursday before my Saturday birthday and I still don't know how I want to celebrate (taking suggestions!) but I DID know what I wanted to eat on my birthday. I love sweets but I'm all about that low-sugar life, so I created the birthday cookie cookie of my dreams - an Organic Funfetti Sugar Cookie that hold its shape when it bakes, so you can cookie cut them into whatever cute shapes you like! They're light, sweet, and the PERFECT cookie to splurge on for your birthday - because you can eat as many as you want without having to worry about your sugar intake! Also it's your damn birthday and SOMEONE better make you cake, so let these be your at home treat. I had 6 yesterday. No regrets - bring on 28!
Turning 28 isn't a huge milestone, but 27 was a pretty great year for me. I had a lot of great experiences, made new forever friends, found some workouts that have kept me sane + feeling confident about my health and my body, and did some serious traveling. I made so many great memories and proved to myself how much growth I could experience in a year. 26 was hard, 27 was great, and I expect 28 to be filled with even more opportunities and positive memories! These cookies totally fit for who I am now - obsessed with eating as many cookies as possible as healthfully as possible! A few years ago I would've made a huge, triple layer cake or fudge-filled brownies but these days I'm all about indulging in a guilt-free way - and these cookies rival any cookie with 3x the sugar, guaranteed. I didn't write any long words of wisdom about this birthday, but a few years ago I did come up with 25 Things I'd Learned at 25 and they still stand pretty true. Maybe I'll make another list at 30. For now - let's bake, babes!
INGREDIENTS
2 1/4 cup organic all purpose flour 1/2 teaspoon baking soda 1/2 teaspoon salt 1 cup non-dairy butter 1 cup monk fruit sweetener (I used this brand, but you can always use sugar or your fave sub instead. If you choose to use stevia, I would recommend only subbing half the amount for taste.) 1 egg (or vegan egg substitute - a chia egg works great here!) 1 teaspoon vanilla 1/2 cup sprinkles DIRECTIONS Preheat your oven to 350 degrees. In a medium sized mixing bowl combine the flour, baking soda, and salt. Set aside. In a separate, larger mixing bowl beat the butter and sugar (or sweetener) together until fluffy. Add in the egg and the vanilla and beat until the mixture becomes fluffy again. Pour in the dry ingredient mixture, continuously mixing until a dough forms. Pour in the sprinkles and use your hands to mix them evenly into the dough. Refrigerate the dough, covered, for 20-30 minutes. While the dough chills, lay out some parchment paper and grab a rolling pin. When your dough is ready, roll it out to about 1/4 inch thickness and use a cookie cutter to cut out your favorite shapes. Place cut cookies onto a lined baking sheet. Bake for 10-12 minutes. Let cool before enjoying. Leftovers save well in a sealed container for up to a week - if they last that long! Lemon Sugar Cookie Cake
My favorite way to celebrate any holiday is with FOOD, and this 4th of July I wanted to crack into some of that summer nostalgia from when I was a kid with one of my favorite summertime treats! I finally called Mom to get the recipe she always used to make for us when we were kids; She would always make a giant cookie layer base, slather it in frosting and cover it in fresh fruit. Usually a summertime snack for it's portability and use of that fresh, seasonal fruit I’ve been craving this Lemon Sugar Cookie Cake ever since I made it a few weeks ago! I simplified and slightly health-ified her original recipe and got something I think is even better. Sorry Mom!
I shared the simplified recipe on IG when I made it, but wanted to share an easier-to-read, printable version for all my regular readers here, too. It really is the perfect, easy, crowd pleasing summer dessert! Would love to hear your thoughts if you try it - and my Mama would, too! Scroll on down for the recipe and some notes before you bake, too. Enjoy, babes!
INGREDIENTS:
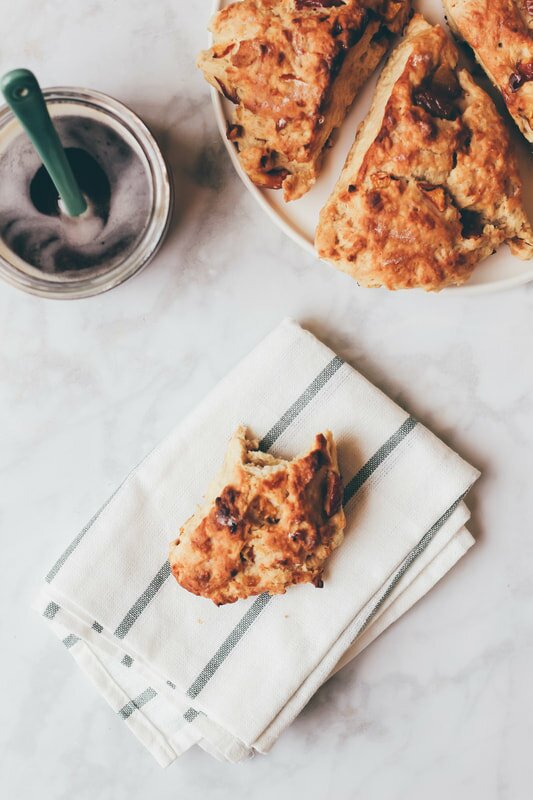
COOKIE BASE RECIPE 2 1/4 cups AP flour 1/2 teaspoon baking soda 1/2 teaspoon baking powder 1/2 teaspoon salt 3/4 cup (non-dairy) butter 1/2 cup sugar 1/2 cup monk fruit sweetener* 1 egg (vegan if you prefer) 1 teaspoon vanilla 2 tablespoons lemon juice Zest of 1 lemon Strawberries, blueberries + raspberries for topping CREAM CHEESE FROSTING 8 oz. plain, non-dairy cream cheese 2-3 tablespoons lemon juice Zest of half a lemon 1 teaspoon of vanilla extract Maple syrup and/or monkfruit sweetener to taste DIRECTIONS: Preheat your oven to 375 degrees and line a round pan (or baking sheet) with parchment paper. In a large sized bowl combine the flour, baking soda, baking powder, and salt together. In a smaller, separate bowl combine the sugars, egg, vanilla, lemon juice + lemon zest. Add the wet ingredients to the dry, mixing completely. Once the dough has formed, roll it evenly into a round shape on the pan, about 1/4-1/2 inch thick. Bake for 10 minutes or until edges begin to brown, then let cool completely. While the cookie layer cools, mix the frosting and chop up the fruit. Once cool, frost the cookie like a pizza and top with fruit. Enjoy babes! NOTES: You can use real butter, eggs and milk here if you prefer. I adapted this recipe from my Mom's original which did in fact use the original versions with great success. Leftovers last up to 2 days on the counter and up to 4 days in the fridge, but - like most things in life - is best enjoyed fresh. *You can also sub the monk fruit sweetener for stevia or more real sugar. Fresh Cherry Scones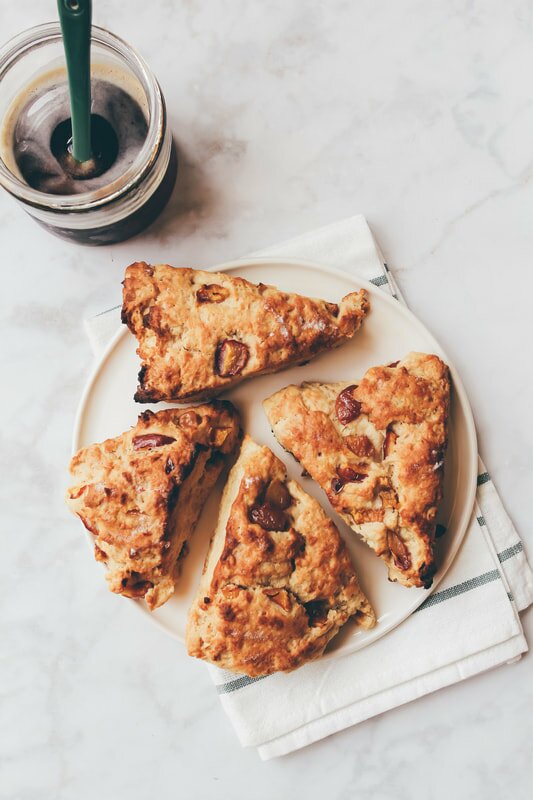
Guys, I love breakfast. It is my FAVORITE meal of the day. I love it sweet, savory, salty, sticky, soupy - any which way, I'm here for it! I'm also a HUGE fan of fresh cherries. As soon as they're in season I make my way to my farmer's markets and buy them up by the slightly overpriced pound. It's my favorite time of the year! So I combined my favorite meal with my favorite season and got these sweet, delicate, delicious beauties!
They're light and sweet but full of flavor and just the right amount of 'scone dry' - perfect alongside a glass of milk or a cup of tea. I kept them lower sugar and you can keep them even lower in sugar by skipping the maple drizzle altogether - your choice! Best of all, this scone recipe is super versatile so you can mix it up by adding in different fruits or flours and will always have success. I love it! I've thrown in raspberries, blueberries, even peaches, and they always come out totally brunch- and instagram- worthy.
If you love a good scone (and who doesn't?) then this recipe is for you. Just the right amount of moist and 'scone' dry, they whip up super easily and are easily made when you're ready to eat them but also last well overnight so you can bake ahead and sleep in before brunch, no stress. What're we doing still chatting? You've got some baking to do, babes!
INGREDIENTS
Cherry Scones 2 cups AP or whole wheat pastry flour 1 tablespoon baking powder 1/2 teaspoon ginger 1/2 teaspoon salt 6 tablespoons cold (vegan) butter 3/4 cup mashed banana or 2 eggs 1/4 cup almond milk 2 tablespoons maple syrup 1 teaspoon vanilla 1 heaping cup pitted and chopped fresh cherries Glaze 1/4 cup maple syrup (OPTIONAL - or check out our other scones glaze recipes below) DIRECTIONS Preheat the oven to 425ºF. Line a baking sheet with parchment paper. To make the scones, in a large mixing bowl, whisk together the flour, baking powder, ginger and salt. Using a pastry cutter or fork, cut in the cold vegan butter until small crumbs form. Pour in the mashed banana (or eggs), almond milk, maple syrup and vanilla and stir together with wooden spoon until a sticky dough forms. Fold in the fruit gently. Turn the dough onto a lightly floured surface and form a 1-inch thick disk. Cut the disk into 8 equal scone wedges, like a pizza. Place the scones on the prepared baking sheet and bake for 14-16 minutes, until golden. Place the scones on a wire rack to cool. While they cool, prepare the maple glaze by beating the maple syrup until it begins to aerate and get a little creamy. Drizzle the glaze over completely cooled scones and enjoy! NOTES Makes 8 scones. Leftovers save well sealed in an airtight container on the counter for up to 3 days. Longer than that, save frozen and heat in the toaster oven when ready to enjoy. Check out other scone recipes here: Vanilla Glazed Matcha Scones, Mini Chocolate Chunk Scones. Strawberry Basil Hand Pies
These are maybe one of the yummiest things I’ve ever made. They take a little work, but they are SO SO worth it. Basically a healthier, adult-friendly pop tart, these sweet little guys are packed with fruit and drizzled in sweet vanilla glaze. They’re buttery, rich, and taste WAY BETTER than store-bought! That I can promise. These babes first debuted in my Homestyle Vegan Cookbook two years ago, but they've become a Sunday morning staple in our house ever since! They're easy to whip up, and are a total crowd pleaser. Who doesn't love pop tarts?!
My second cookbook, a collaborative effort titled 'Vegan Bible' will be out later this year, in October. Lots more fun new recipes coming your way! In the meantime, I thought I'd revisit one of my favorites in case you haven't gotten your copy of the cookbook yet. Seriously cannot wait to hear what you guys think when you try them. And know that if strawberries and basil together isn't your favorite flavor combo, you can always ditch the basil, sub out the strawberries for another fruit, or come up with your own flavor combination entirely! No matter what you decide, they're gonna be good. Let’s bake!
INGREDIENTS
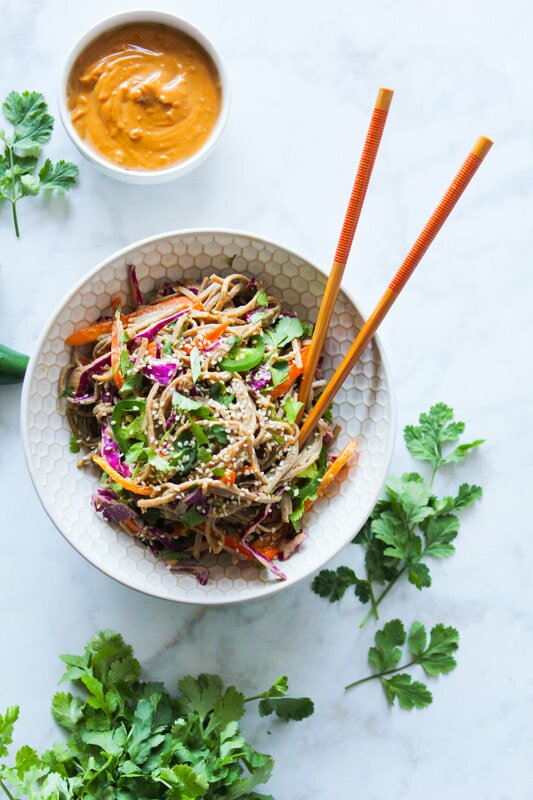
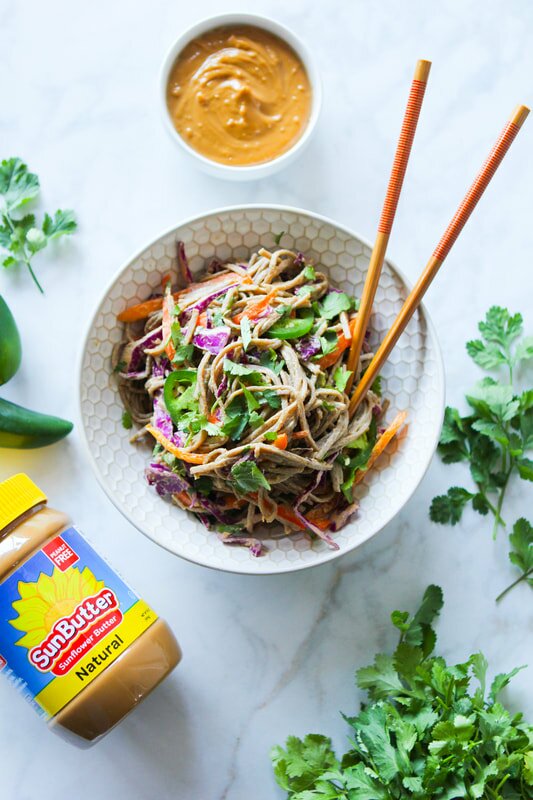
Hand Pies: 1 heaping cup (210 g) fresh or frozen strawberries, sliced 1 tablespoon (15 ml) water (ONLY IF USING FRESH BERRIES) 1 tablespoon (3 g) fresh basil, finely chopped 1 teaspoon sugar 1 teaspoon cornstarch 2 cups (315 g) whole wheat pastry flour 1/8th teaspoon salt 2/3 cup (150 g) cold vegan butter 2-4 tablespoons (30-60 ml) ice water Vanilla Glaze: 6 tablespoons (48 g) powdered sugar 1/4 teaspoon vanilla 1-3 teaspoons (5-15 ml) unsweetened almond milk DIRECTIONS Preheat the oven to 375º. Line a baking sheet with parchment paper. Place the strawberries, water (ONLY IF USING FRESH BERRIES), basil, sugar and cornstarch in a small saucepan over medium heat. Cook for 5-8 minutes, stirring occasionally and smashing down the fruit as it cooks. Remove from heat and set aside. In a large bowl, mix together the flour and salt. Cut in the cold butter with a fork or pastry cutter until small crumbs form. Drizzle ice water over the mixture about a tablespoon at a time, mixing with a wooden spoon, until a dough begins to form. The dough should be moist but not sticky. Turn the dough onto a lightly floured surface and shape it into a disc. Use a rolling pin to roll the dough into a large, 1/4 in. thick rectangle. Use a sheet of plastic wrap over the dough to prevent cracking as you roll it out, if needed. Cut the rectangle into 12 equal squares (or rectangles) and move half of them to the lined baking sheet. Scoop about 1 tablespoon of filling onto the 6 laid squares, leaving about 1/4 inch of space around the edge. Using your finger, dab a bit of water around the edges to help seal them. Top each square with its matching other half, pressing around the edges with a fork to seal them. Use a toothpick to poke a poke a few small holes in the top, then bake for 20-25 minutes, or until golden brown. While they cook, prepare the glaze by mixing together the powdered sugar, vanilla and unsweetened almond milk. When the hand pies are finished, let them cool on a wire rack for 5-10 minutes before topping with glaze. TIPS Makes 6 hand pies. Leftover hand pies taste great cooled - no need for reheating! You can sub in any berries you prefer here and if basil isn’t for you, go ahead and leave it out. Prefer a lower sugar option? Ditch the glaze! Chilled SOBA NOODLE SALAD WITH SUNBUTTER SAUCE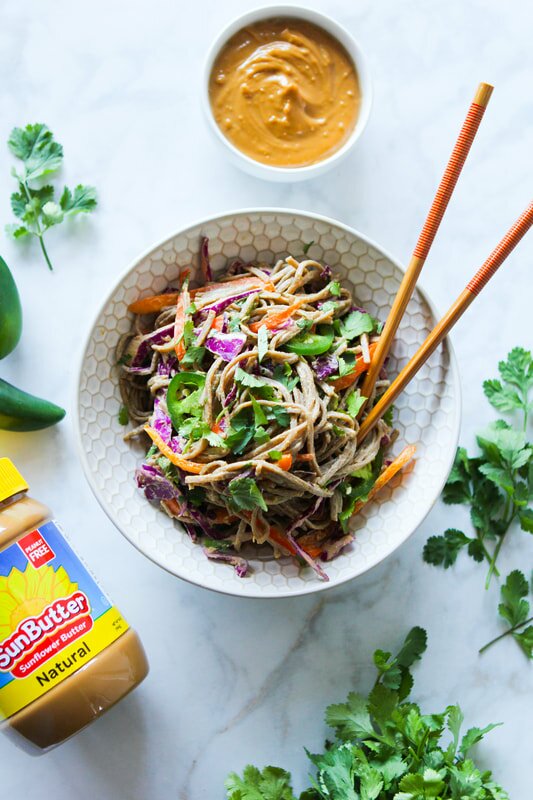
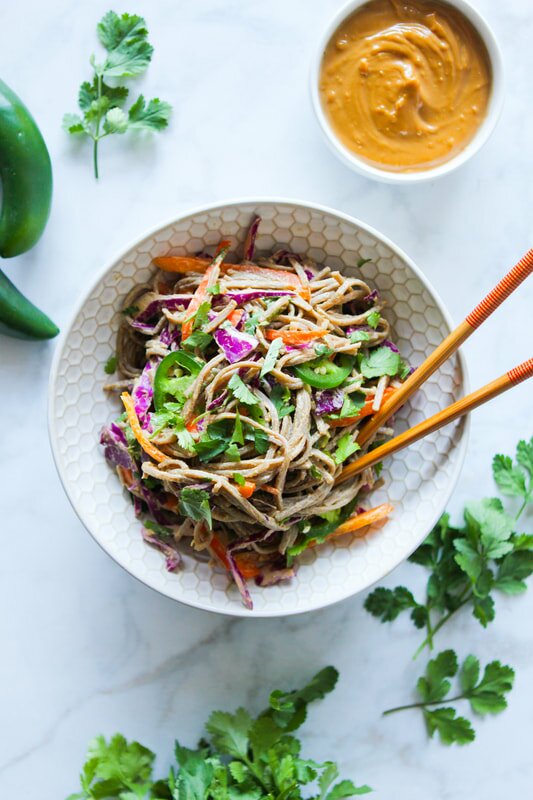
I’ve been really grooving on quick, healthy, on-the-go meals lately. They never go out of style, make running out the sorry and to the studio much easier, and are a great way to make sure you’re packing some real food and real nutrition into your busy days.
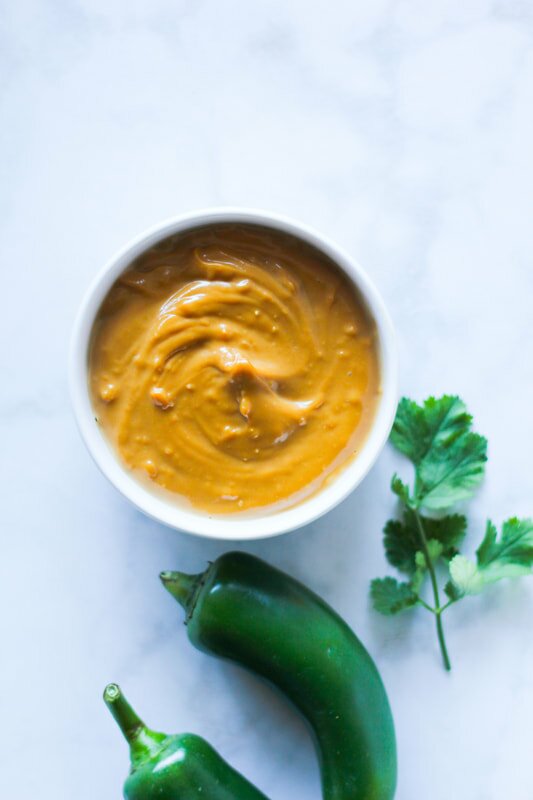
One of my favorite cold salad options is a soba noodle salad. I had my first one years ago and have loved the simplicity ever since. Cold, sturdy, wheat-based soba noodles boiled to perfection and chilled, then tossed with a sweet, tangy peanut sauce and fresh, crisp veggies - the perfect lunch or dinner! However, as someone with a few food allergies herself, I get that those delicious peanut sauces aren’t especially delicious or functional for people with nut allergies. So I’ve partnered with my pals over at SunButter to create a totally nut-free version of one of my favorite dishes - simplified and paired down to the easiest version BUT that still tastes like the traditional version - so you can be eating in no time!
SunButter makes the best sunflower seed butter option on the market - and it’s totally free of the top 8 food allergens! A serving packs just as much protein as traditional nut butter, but more magnesium, vitamin E and iron - and less saturated fat, too. It makes a great snack on it’s own, but you are going to fall in love with it as the main sauce ingredient in this satisfying bowl. Since it is allergen-free, SunButter also makes a great option for kid’s lunches and is available at major grocers and food stores all over the US!
To get started, all you’ll need is your favorite jar of SunButter, some quality soba noodles, and your favorite uncooked veggies. Let’s get cooking!
INGREDIENTS:
SunButter Sauce: 1/2 cup Natural SunButter 2 tablespoons fresh lime juice 1 tablespoon coconut aminos 1/2 teaspoon maple syrup 1/4 teaspoon sesame oil 1 1/2 teaspoons fresh ginger, grated 2 cloves garlic, minced 3-6 tablespoons water Soba Noodle Bowl: 6 oz whole wheat soba noodles 2 cups red cabbage, thinly sliced 1 1/2 cup bell pepper, thinly sliced 1 cup carrot, thinly sliced 1 jalapeño, thinly sliced 1/4-1/2 cup cilantro, roughly chopped sesame seeds, for garnish DIRECTIONS: In a small bowl, whisk together the SunButter, lime juice, coconut aminos, maple syrup, sesame oil, fresh ginger, and garlic. Once combined completely, begin adding in water 1 tablespoon at a time, until mixture becomes smooth and creamy. Add water until the sauce is your preferred texture. Set aside. Cook the soba noodles to directions on package. Remove from heat, strain, and run under cold water until the noodles are no longer hot to the touch. Place the noodles into a bowl and into the fridge to chill while you prep the veggies. Thinly slice your cabbage, bell pepper, carrot, jalapeño and cilantro and toss them into a large mixing bowl. Pour your SunButter Sauce over the veggies and toss to combine. Throw in the chilled soba noodles and gently toss again to combine. Top with a little extra chopped cilantro and sesame seeds for garnish and enjoy immediately! NOTES: Serves 4-6. Leftovers last 3 days in the fridge. Sub in whichever favorite veggies you prefer! 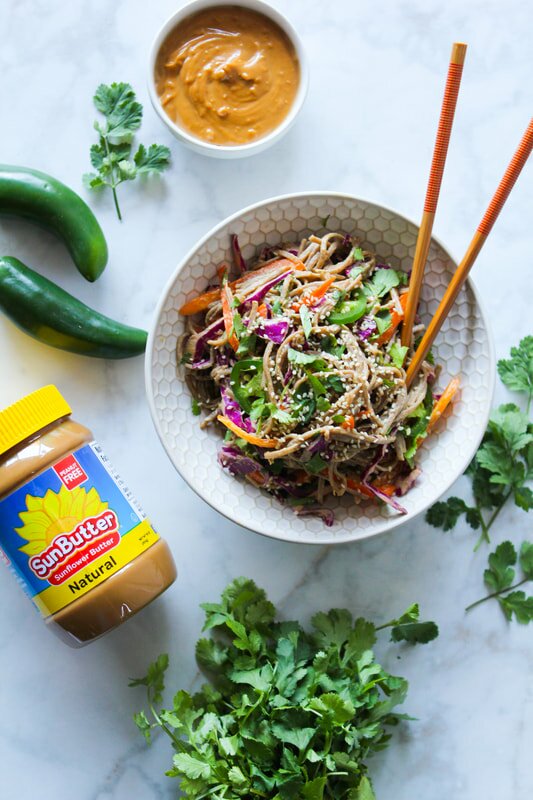
Wild Blueberry Overnight Oats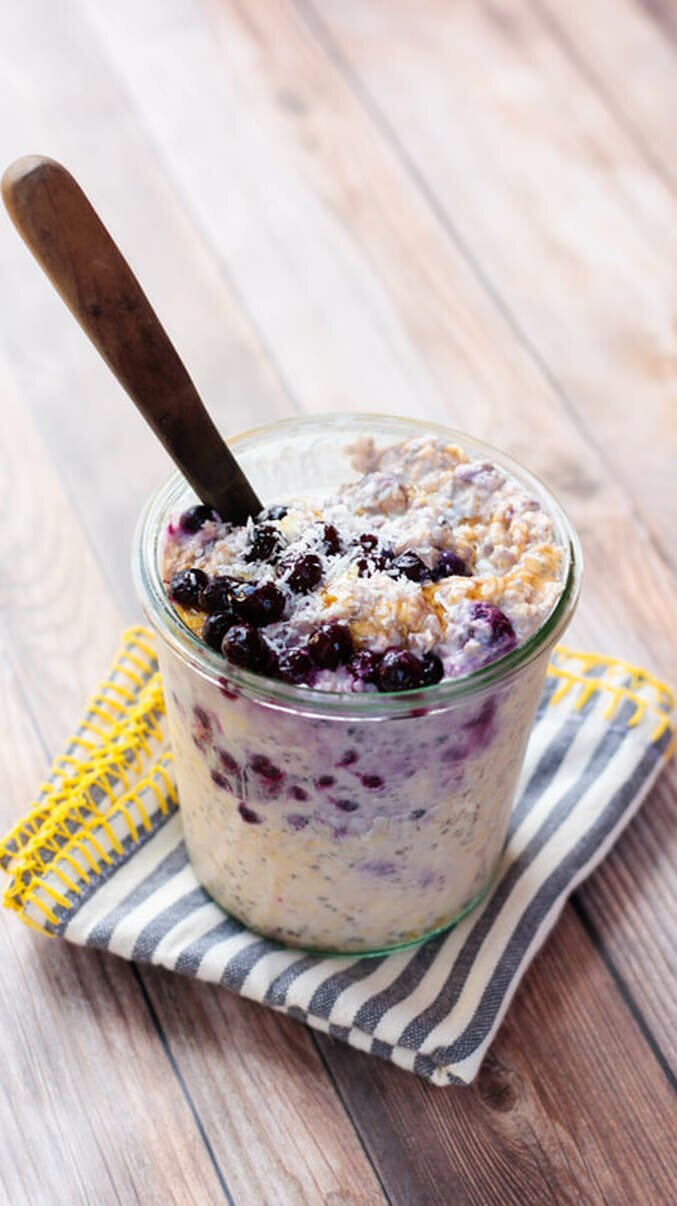
This is a super simple recipe, but sometimes those are the best recipes. I get into food moods all the time, and lately I've been super busy and hooked on easy, on-the-go breakfasts and lunches that pack some real nutrition and can keep me filled up when I have to teach back to back classes with no snack time in between. Being a Maine girl at heart my berries of choice were of the small, tart, and wild variety - but you can sub in whatever fruit or berries you prefer here, instead. The addition of coconut butter adds healthy, hearty, good-for-you fats that'll help keep you moving and the chia seeds add just a little extra texture (and a whole lotta omegas!) to the mix. All you'll need is a few simple ingredients that you probably already have on hand, a glass jar, and a serious appetite. Let's eat!
Before you make your way down to the recipe, a quick reminder that I'm currently teaching 4x a week at CorePower Yoga in Brea, if you're looking to get your sweat on - and soon will have my own yoga vids for you guys to access on my YouTube whenever you need to flow! Send me your flow requests and I'll try to make them happen. Alright - keep scrolling! 
INGREDIENTS:
1/2 cup almond milk 2 teaspoons chia seeds 1 tablespoon coconut butter (or nut butter of choice) 1 tablespoons maple syrup 1/2 cup (GF) rolled oats 1/2 - 1 cup wild blueberries (fresh or frozen) DIRECTIONS: In a mason jar or small bowl, combine the almond milk, chia seeds, coconut butter, and maple syrup and stir or shake to combine. The coconut butter doesn't need to be completely mixed with the almond milk - and you'll get swirls of coconut butter to enjoy the next day! Add the oats and blueberries and stir or shake a few more times. Make sure all of the oats are saturated in the wet mixture. Cover and place in the fridge overnight or for at least 6 hours to set. When ready, simply pull out the oats, give 'em a stir and enjoy! You can add extra fruit or toppings as desired. Enjoy! NOTES: Leftovers last in the fridge up to 2 days, but are best enjoyed within 24 hours. Serves 1, but recipe is easily doubled. 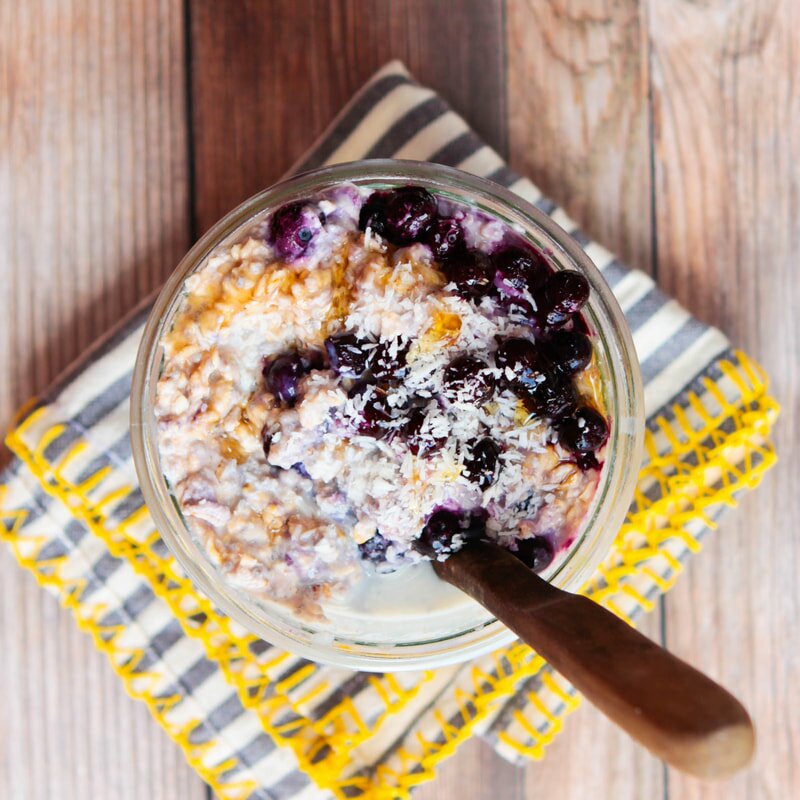
Healthy Matcha Waffles
I was always a pancakes-kind-of-girl growing up. Every Sunday morning my family would pile into the car and drive to our local diner, Brownies, for some really greasy, disgustingly delicious brunch food. Picture the most quintessential diner heart attack food - now you're there! Haha. I would order a stack of flapjacks with butter and syrup and always got an extra side of syrup. I usually also got a side of corned been hash or bacon, and literally could almost finish it all - even at 10 years old. Yikes! These days, my kind of brunch usually involves much more of the color 'green', at least a few vegetables, and usually a mimosa or two. But sometimes, you just want to go back and have those childhood favorites - without the guilt or greasy food hangover!
These days I prefer the snap of a crispy waffle more a pile of soggy pancakes, and lucky for me we just got a new waffle iron for Christmas! It was time to test it out and make some crispy waffles to satisfy my cravings. I didn't just want any old waffles, so I used my sugar-free protein batter base and added a pop of color and antioxidants with the addition of matcha powder! The matcha powder turned them a lovely shade of green, too. Might have to whip these back out in time for St. Patty's day this year!
I can promise you after rounds and rounds of testing - nothing binds together the batter AND gives the cooked waffles a crispy edge like adding in some protein powder. Plus, all of a sudden my waffles carry a protein content of over 20 grams. BONUS! Now they're not only a great breakfast addition, but the perfect post-workout snack, too. The freeze and reheat really well, and I've taken to making a double or triple batch and freezing the leftovers for easy grab-and-go breakfasts. Let's get out the waffle iron and get cooking!
INGREDIENTS
1 cup all-purpose or whole wheat flour (both work well! For GF use 1/2 c almond + 1/2 c Teff flour) 1/4 cup vegan protein powder* 2 tablespoons matcha powder 2 teaspoons baking powder 1/2 teaspoon salt 1 1/3 cups water 2-3 drops vanilla stevia (optional, for a sweeter waffle) 1 tablespoon oil DIRECTIONS In a medium mixing bowl combine the flour, protein powder, baking powder and salt. Create a well in the center of the mixture, and pout into it the water, stevia and oil. Whisk the mixture together until the batter just comes together. Its okay if there are a few lumps! Do not mix until smooth - unless you want flat, chewy waffles. Ick! Let the mixture set for about 5-10 minutes, let scoop the appropriate amount of batter into your waffle iron and let it cook up until the waffle is perfectly fluffy with crispy edges. Keep it going until all your waffles are cooked up. Enjoy! (I like mine with butter and syrup or a bit of peanut butter and fruit!) Leftovers freeze and reheat really well - I highly recommend making a double batch and sticking some in the freezer for easy toaster breakfasts later! NOTES Makes 2-4 waffles, depending on the size of your waffle iron. *I use Sprouts brand Vegan Vanilla Protein Powder. It's pea protein based and has just 1 g of sugar per serving, which is how I am able to keep the sugar in these waffles nearly nonexistent. Use your favorite protein here, but account for textural differences if it is not pea protein. I usually use softened coconut oil here, but you can sub in any flavorless oil you like. Nearly Sugar-Free Muddy Buddies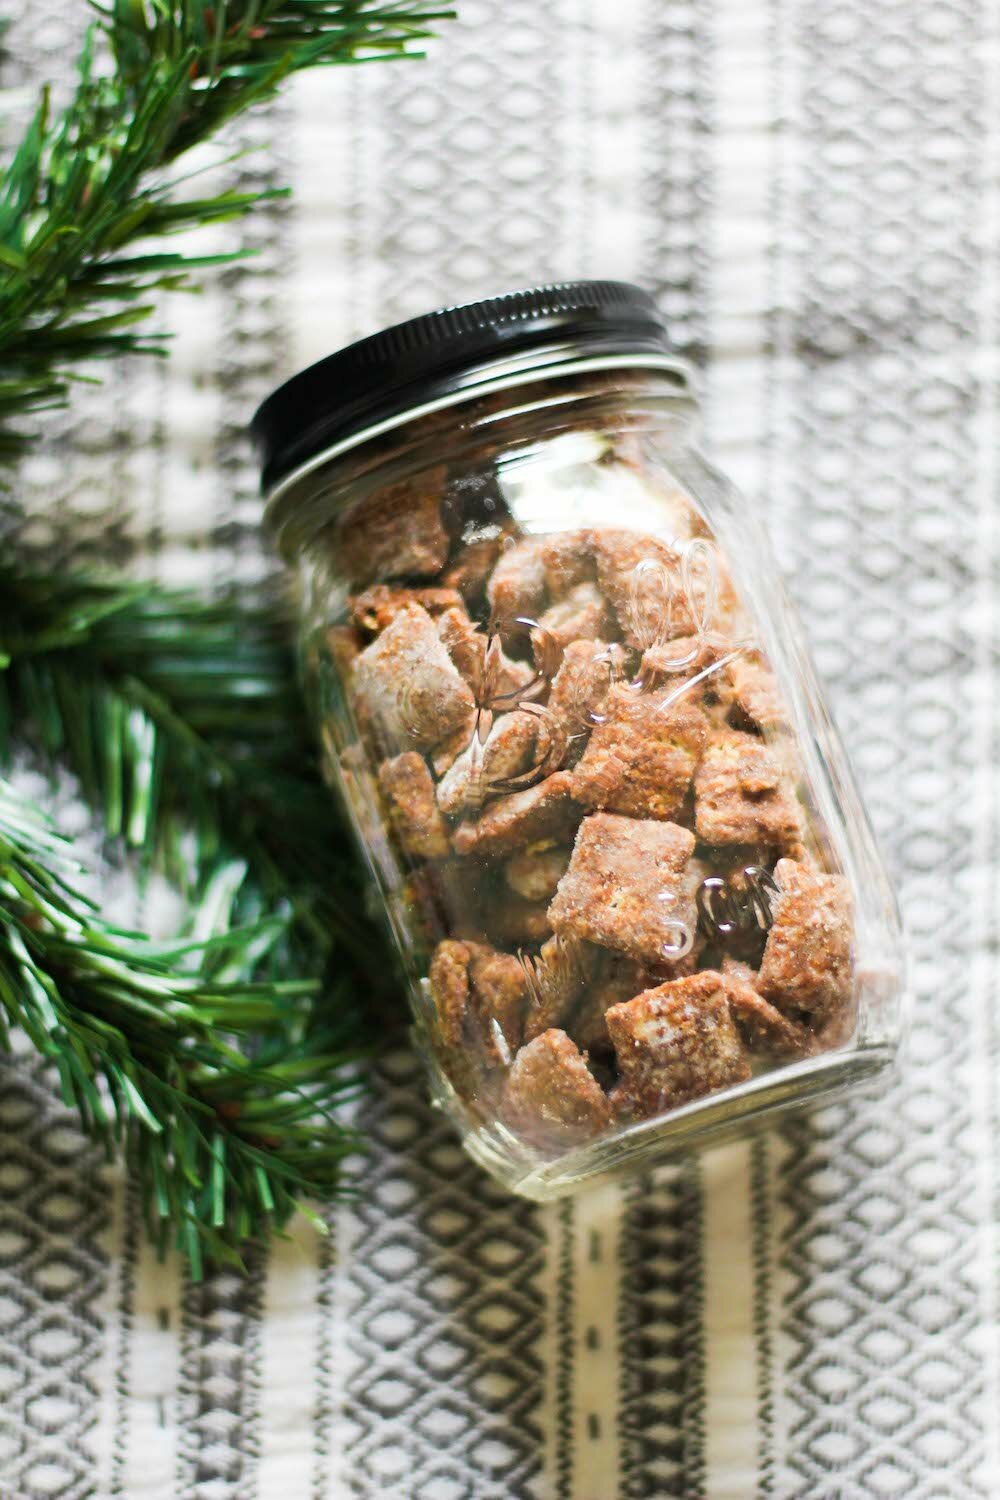
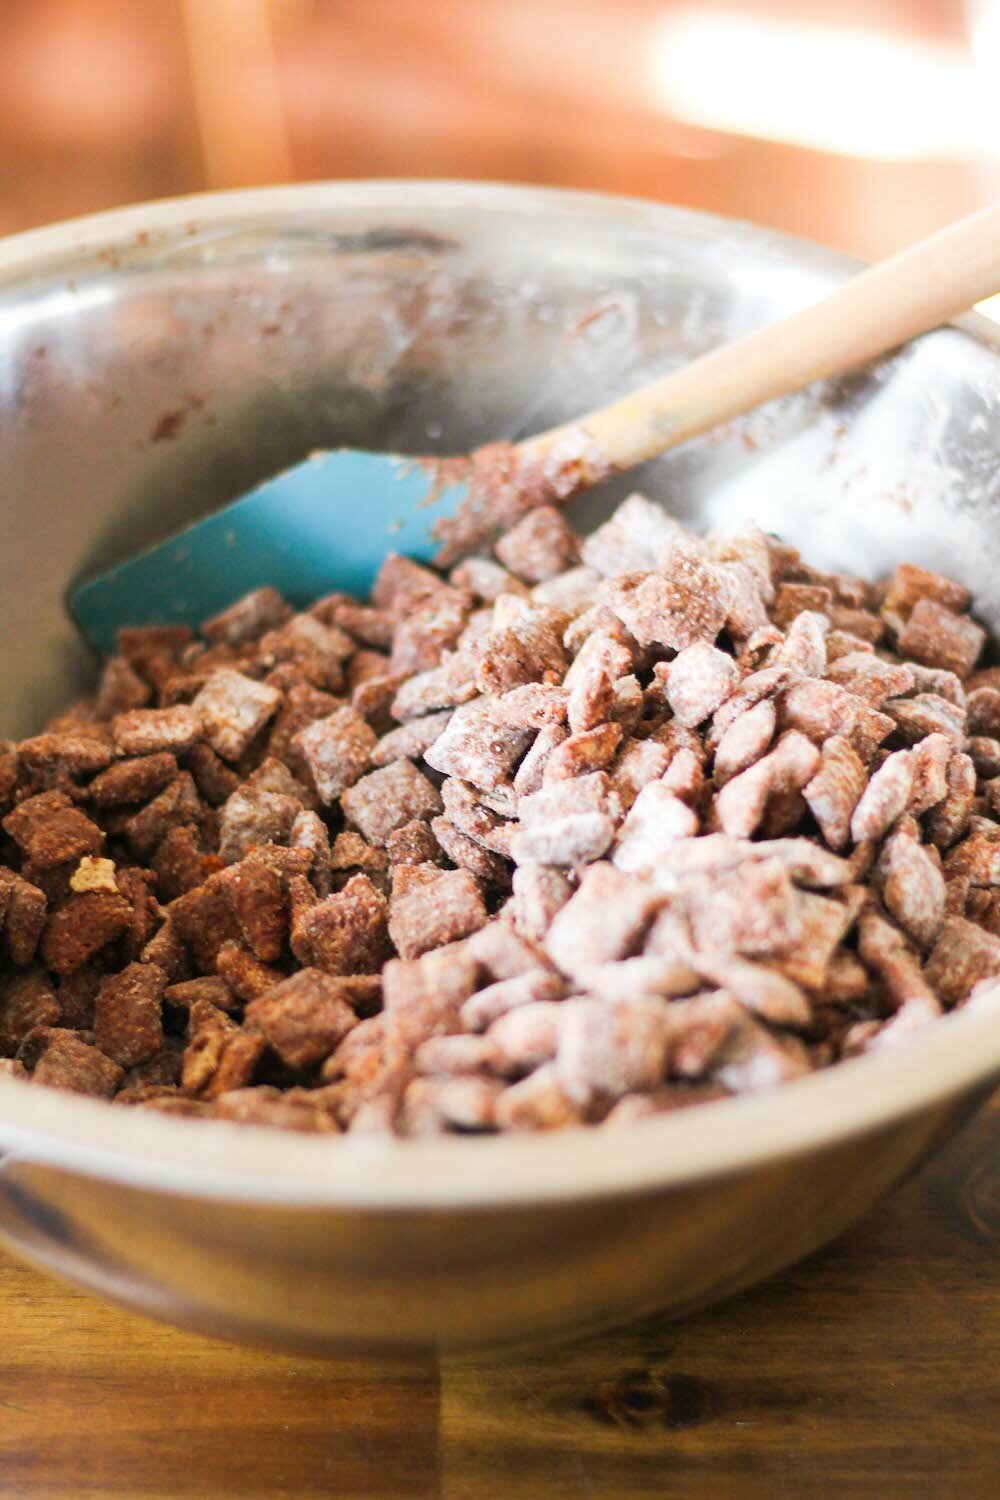
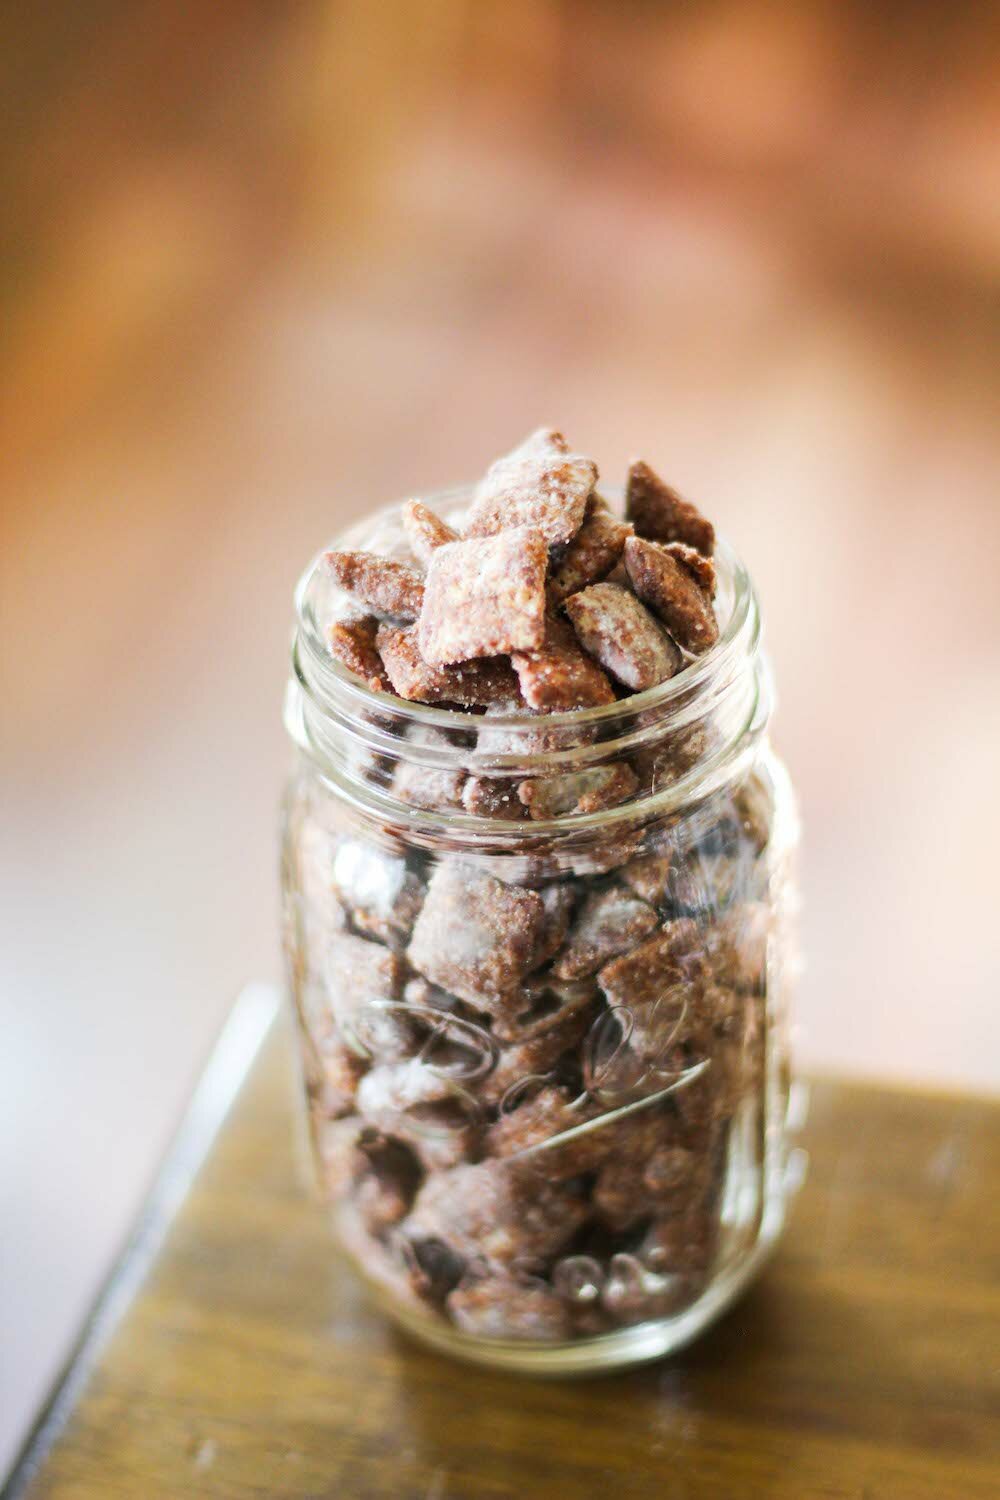
The Holidays are in full swing and I've been feeling ALL the stress! Between present buying, prepping for the New Year - and my Husband's 30th birthday immediately after, writing my 2nd cookbook manuscript and preparing for yoga auditions at my favorite studio just after the New Year - I've been busy! But we all are this time of year. Wrapping up everything in 2017 up nicely before tearing into the giant gift that is 2018!
Because I'm a totally stress eater, I try to help myself out during this crazy time of year by NOT having tons of sweet treats around to pick at. It's only trouble if I do! That said, it just isn't the Holidays if there isn't some type of snackable chocolate something on the counter! This year I decided to reform my normal chocolate Muddy Buddies recipe and make them something I could snack on - guilt and nearly sugar-free - through Christmas. So I subbed out the powdered sugar for a homemade, sugar-free, monkfruit version, instead! Muddy Buddies are a totally Holiday classic in this house and one of my Husband's favorite things to snack on while watching Christmas movies. The only sugar in these babies are the trace amounts in the cereal and dark chocolate chunks we melted down for coating! We used EnjoyLife's Mega Chocolate Chunks for this recipe since they're allergen-free (and I have all the allergies), but you can use whatever chocolate makes your heart happy. Let's make some muddy buddies!
INGREDIENTS
9 cups Rice Chex (they're vegan - but you can use whatever kind or brand you prefer!) 2 cups powdered monkfruit sweetener OR 1 cup regular monkfruit sweetener (we used Lakanto - but you can also use powdered stevia or even regular powdered sugar here if you prefer) 1 cup vegan chocolate chunks (we used this brand) 1/2 cup smooth peanut butter 1/4 cup vegan butter 1 teaspoon vanilla DIRECTIONS In a large bowl, measure and set aside the cereal. If you're using prepared powdered sugar, go on to the next step. If you've got regular monkfruit sweetener and need to make it in into powdered 'sugar', simply place 1 cup of sweetener into a blender or food processor and process for 1-2 minutes, until the sugar has pulverized into a finer, powered sugar. It should double in size using this method. Set aside. Using the double boiler method (or a microwave!), melt together the chocolate chips, peanut butter, vegan butter and vanilla until creamy, stirring consistently. Pour the melted chocolate mixture over the cereal and use a wooden spoon to gently toss and stir until the cereal is evenly coated. Pour the powdered sugar evenly over the mixture and continue to use the wooden spoon to toss and stir the mixture until the chocolate-coated chex are all evenly covered in a fine layer of powdered sugar. Enjoy or save in air-tight container on the counter or in the fridge for up to a week. Enjoy! NOTES If you prefer regular sugar here, go ahead and use it. If you find another sugar substitute you prefer, use that instead. I can't guarantee the quantity exchange will be 1:1, but a little taste test should help guide you if you're unsure. Serves 8-10. 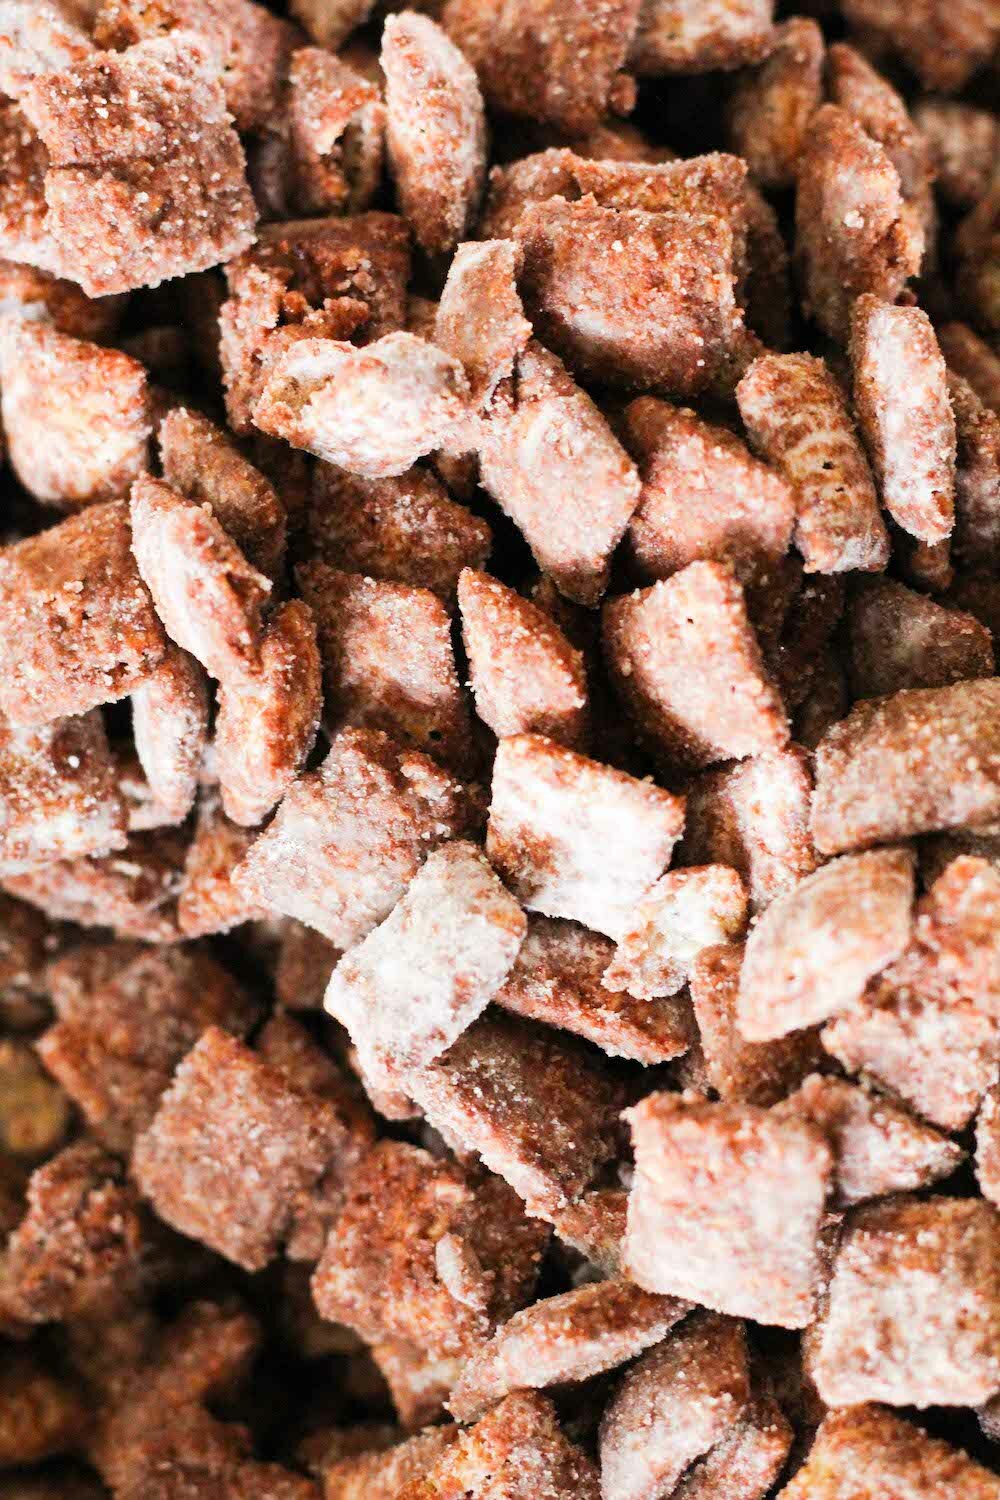
VEGAN PROTEIN WAFFLES
I was always a pancakes-kind-of-girl growing up. Every Sunday morning my family would pile into the car and drive to our local diner, Brownies, for some really greasy, disgustingly delicious brunch food. Picture the most quintessential diner heart attack food - now you're there! Haha. I would order a stack of flapjacks with butter and syrup and always got an extra side of syrup. I usually also got a side of corned been hash or bacon, and literally could almost finish it all - even at 10 years old. Yikes! These days, my kind of brunch usually involves much more of the color 'green', at least a few vegetables, and usually a mimosa or two. But sometimes, you just want to go back and have those childhood favorites - without the guilt or greasy food hangover. I prefer the snap of a crispy waffle now more a pile of soggy pancakes, so when I started craving sweet, maple syrup-smothered breakfasts, I knew there had to be a better option for me. I made tons of rounds of waffles and nothing bound together the batter AND gave the cooked waffles a crispy edge like adding in some protein powder. Plus, all of a sudden my waffles carried a protein content of over 20 grams. BONUS! Now they're not only a great breakfast addition, but the perfect post-workout snack, too. So what're we doing still talking about them?! Get out your waffle iron and let's get cooking!
INGREDIENTS
1 cup all-purpose or whole wheat flour (both work well!) 1/4 cup vegan protein powder* 2 teaspoons baking powder 1/2 teaspoon salt 1 1/4 cups water 2-3 drops vanilla stevia (optional, for a sweeter waffle) 1 tablespoon oil DIRECTIONS In a medium mixing bowl combine the flour, protein powder, baking powder and salt. Create a well in the center of the mixture, and pout into it the water, stevia and oil. Whisk the mixture together until the batter just comes together. Its okay if there are a few lumps! Do not mix until smooth - unless you want flat, chewy waffles. Ick! Let the mixture set for about 5-10 minutes, let scoop the appropriate amount of batter into your waffle iron and let it cook up until the waffle is perfectly fluffy with crispy edges. Keep it going until all your waffles are cooked up. Enjoy! (I like mine with butter and syrup or a bit of peanut butter and fruit!) Leftovers freeze and reheat really well - I highly recommend making a double batch and sticking some in the freezer for easy toaster breakfasts later! NOTES Makes 2-4 waffles, depending on the size of your waffle iron. *I use Sprouts brand Vegan Vanilla Protein Powder. It's pea protein based and has just 1 g of sugar per serving, which is how I am able to keep the sugar in these waffles nearly nonexistent. Use your favorite protein here, but account for textural differences if it is not pea protein. I usually use softened coconut oil here, but you can sub in any flavorless oil you like. |
tagsAll  RSS Feed RSS Feed
|