Lemon Sugar Cookie Cake
My favorite way to celebrate any holiday is with FOOD, and this 4th of July I wanted to crack into some of that summer nostalgia from when I was a kid with one of my favorite summertime treats! I finally called Mom to get the recipe she always used to make for us when we were kids; She would always make a giant cookie layer base, slather it in frosting and cover it in fresh fruit. Usually a summertime snack for it's portability and use of that fresh, seasonal fruit I’ve been craving this Lemon Sugar Cookie Cake ever since I made it a few weeks ago! I simplified and slightly health-ified her original recipe and got something I think is even better. Sorry Mom!
I shared the simplified recipe on IG when I made it, but wanted to share an easier-to-read, printable version for all my regular readers here, too. It really is the perfect, easy, crowd pleasing summer dessert! Would love to hear your thoughts if you try it - and my Mama would, too! Scroll on down for the recipe and some notes before you bake, too. Enjoy, babes!
INGREDIENTS:
COOKIE BASE RECIPE 2 1/4 cups AP flour 1/2 teaspoon baking soda 1/2 teaspoon baking powder 1/2 teaspoon salt 3/4 cup (non-dairy) butter 1/2 cup sugar 1/2 cup monk fruit sweetener* 1 egg (vegan if you prefer) 1 teaspoon vanilla 2 tablespoons lemon juice Zest of 1 lemon Strawberries, blueberries + raspberries for topping CREAM CHEESE FROSTING 8 oz. plain, non-dairy cream cheese 2-3 tablespoons lemon juice Zest of half a lemon 1 teaspoon of vanilla extract Maple syrup and/or monkfruit sweetener to taste DIRECTIONS: Preheat your oven to 375 degrees and line a round pan (or baking sheet) with parchment paper. In a large sized bowl combine the flour, baking soda, baking powder, and salt together. In a smaller, separate bowl combine the sugars, egg, vanilla, lemon juice + lemon zest. Add the wet ingredients to the dry, mixing completely. Once the dough has formed, roll it evenly into a round shape on the pan, about 1/4-1/2 inch thick. Bake for 10 minutes or until edges begin to brown, then let cool completely. While the cookie layer cools, mix the frosting and chop up the fruit. Once cool, frost the cookie like a pizza and top with fruit. Enjoy babes! NOTES: You can use real butter, eggs and milk here if you prefer. I adapted this recipe from my Mom's original which did in fact use the original versions with great success. Leftovers last up to 2 days on the counter and up to 4 days in the fridge, but - like most things in life - is best enjoyed fresh. *You can also sub the monk fruit sweetener for stevia or more real sugar.
3 Comments
Vanilla-Glazed Matcha Scones
Until recently, there was another Matcha Scone recipe on this site. It was from my gluten-free days that had mixed results when people made it. To be honest, I never really got the hang of baking with gluten-free flours, and it seemed like everyone that made the recipe got a different result. So, a few years later, I've decided to revisit the recipe and figure out what was going on. Except this time, I've ditched the GF free flours in favor of a more predictable wheat-based flour - I don't have any kind of wheat allergy - and had fantastic results!
I scrapped the old recipe entirely and started working from the proportions for a scone recipe from my Homestyle Vegan Cookbook and guys- they came out SO WELL! These scones are 1000x better than the first one were. They're sweet, fluffy, and moist inside - the PERFECT scone, especially if you like matcha! It's important to use a high-quality matcha powder to get a vibrant green color in your scones, too. The light drizzle of vanilla glaze sweetens them up just enough - they're perfect for breakfast AND dessert! Plus, we're only 2 months from St. Patrick's Day and they'd be PERFECT leprechaun-inspired fare for themed parties or as something to help soak up all the Guinness. 😝 Either way, LET'S EAT! Scroll down for the recipe, friends.
INGREDIENTS
Matcha Scones 2 cups whole wheat pastry flour 2 tablespoons matcha powder 1 tablespoon baking powder 1/2 teaspoon ginger 1/2 teaspoon salt 6 tablespoons cold vegan butter 3/4 cup mashed banana 1/4 cup almond milk 2 tablespoons maple syrup 1 teaspoon vanilla Vanilla Glaze 1/2 cup powdered sugar 1 tablespoon non-dairy milk 1/4 teaspoon vanilla DIRECTIONS Preheat the oven to 425ºF. Line a baking sheet with parchment paper. To make the scones, in a large mixing bowl, whisk together the flour, matcha powder, baking powder, ginger and salt. Using a pastry cutter or fork, cut in the cold vegan butter until small crumbs form. Pour in the mashed banana, almond milk, maple syrup and vanilla and stir together with wooden spoon until a sticky dough forms. Turn the dough onto a lightly floured surface and form a 1-inch thick disk. Cut the disk into 8 equal scone wedges, like a pizza. Place the scones on the prepared baking sheet and bake for 15-17 minutes, until golden. Place the scones on a wire rack to cool. While they cool, prepare the maple glaze by whisking together the powdered sugar, non-dairy milk and vanilla in a small bowl. Drizzle the glaze over completely cooled scones and enjoy! NOTES Makes 8 scones. Leftovers save well sealed in an airtight container on the counter for up to 3 days. Old Fashioned Cinnamon Rolls with Walnuts + Vanilla Bean Glaze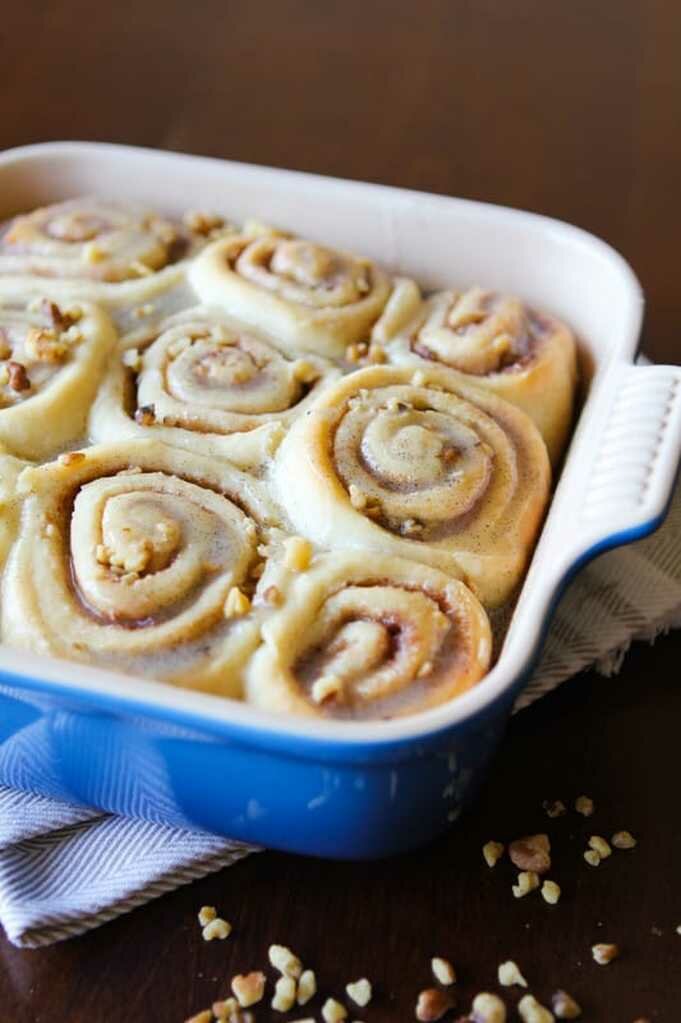
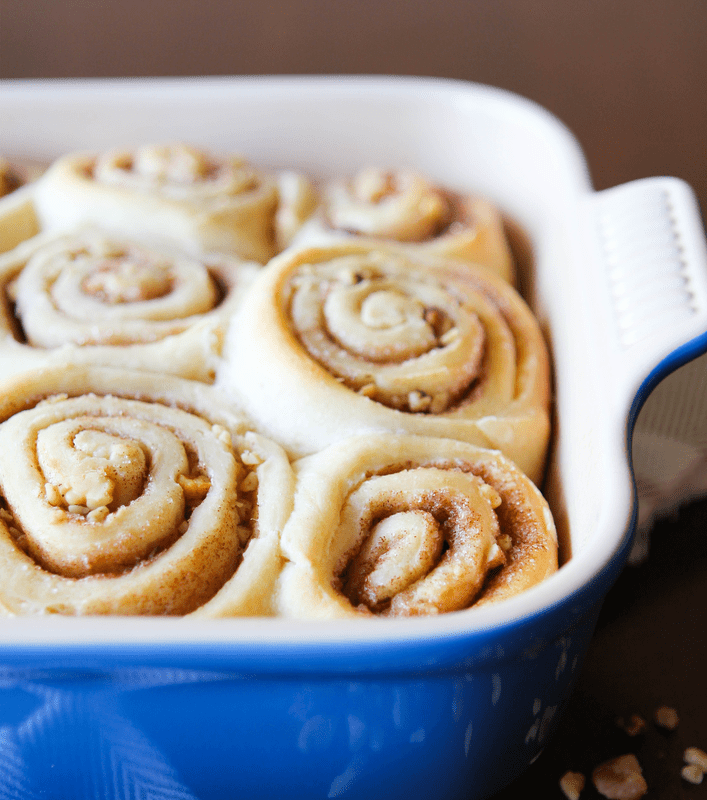
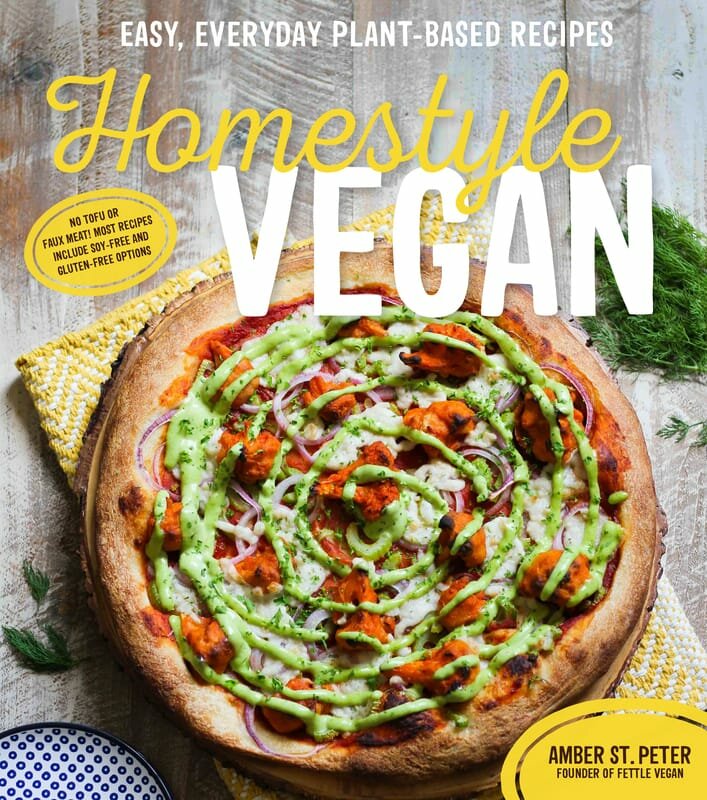
Nothing makes a better Christmas morning breakfast than one spent enjoying delicious food around the tree. Growing up, my dad always made biscuits and gravy and my mom would always make Pillsbury cinnamon rolls, and my sister and I would patiently wait and play with presents while they cooked. Those are some of my favorite Christmas morning memories now; you never remmeber what you got for gifts - except the year I got a purple beanbag chair. I'll always remember that excitement. Now that we don't live with Mom and Dad anymore, Alex and I have started working on our own traditions to make the Holiday special. Last year we made these Old Fashioned Cinnamon Rolls with Walnuts + Vanilla Bean Glaze for our own Christmas morning breakfast, and they wowed the extended family so much they made it into my Homestyle Vegan cookbook! We knew we had to share the recipe - everyone deserves a warm, sweet, cinnamon-filled tradition.
And whether it's the Holidays or not, there simply is nothing better for breakfast or brunch than a huge, ooey-gooey cinnamon roll dripping with icing and speckled with walnuts. This is the kind of breakfast that actually makes you WANT to get out of bed on a Saturday morning. And paired with homemade vanilla bean glaze? Girrrrrrrl! Go preheat your oven. BUT before you do, just one more thing - everything in our shop is still 10% OFF right now with the code FVHOLIDAYS, and once the merch is gone, it's NOT coming back! Shop here. Otherwise, scroll for ooey gooey goodness!
INGREDIENTS
Cinnamon Rolls: 1 cup (240 ml) unsweetened almond milk, room temperature 1/4 cup (60 g) vegan butter, melted 2 1/4 teaspoons (7 g) active dry yeast 3 cups (510 g) all purpose flour 1 tablespoon (12 g) sugar 1/4 teaspoon salt 1/4 cup (60 g) vegan butter, melted 1/4 cup (50 g) sugar 2 teaspoons (6 g) cinnamon 1/4 cup (55 g) chopped walnuts Vanilla Bean Glaze: 1 cup (175 g) powdered sugar 2 vanilla beans, scraped 2 tablespoons (30 ml) unsweetened almond milk chopped walnuts, for garnish DIRECTIONS Combine room temperature unsweetened almond milk and melted vegan butter in the bowl of a stand mixer. Pour in the yeast and let set to activate, about 5-10 minutes. Meanwhile combine the flour, sugar and salt in a medium mixing bowl. When the yeast mixture is ready, pour the flour mixture in about 1 cup at a time, stirring as you go. When the dough comes together, knead with a dough hook for about 1 minute, to form a loose, sticky ball. You can add a little bit of milk here, if needed, to keep the dough sticky. Move the dough ball to a lightly oiled bowl and cover with plastic wrap or a clean dish towel and leave in a warm place to double in size, about 1-2 hours. Turn risen dough onto a lightly floured surface and roll out to 1/4- inch thick rectangle. Brush the dough generously with the melted butter, then sprinkle the sugar, cinnamon and walnuts evenly all over the top. Starting on one side, roll the dough into one thick log. Using a serrated or very sharp knife, slice into 9 equal rolls. Place the rolls into a well greased 8x8 inch pan and cover with plastic wrap or a clean dishtowel by the oven to rise for about 30 more minutes. Preheat the oven to 350º. Bake the rolls for 25-30 minutes, until golden and fluffy. Once completely cooled, drizzle the vanilla bean glaze generously over the top and garnish with chopped walnuts. Enjoy! NOTES Makes 9 rolls. 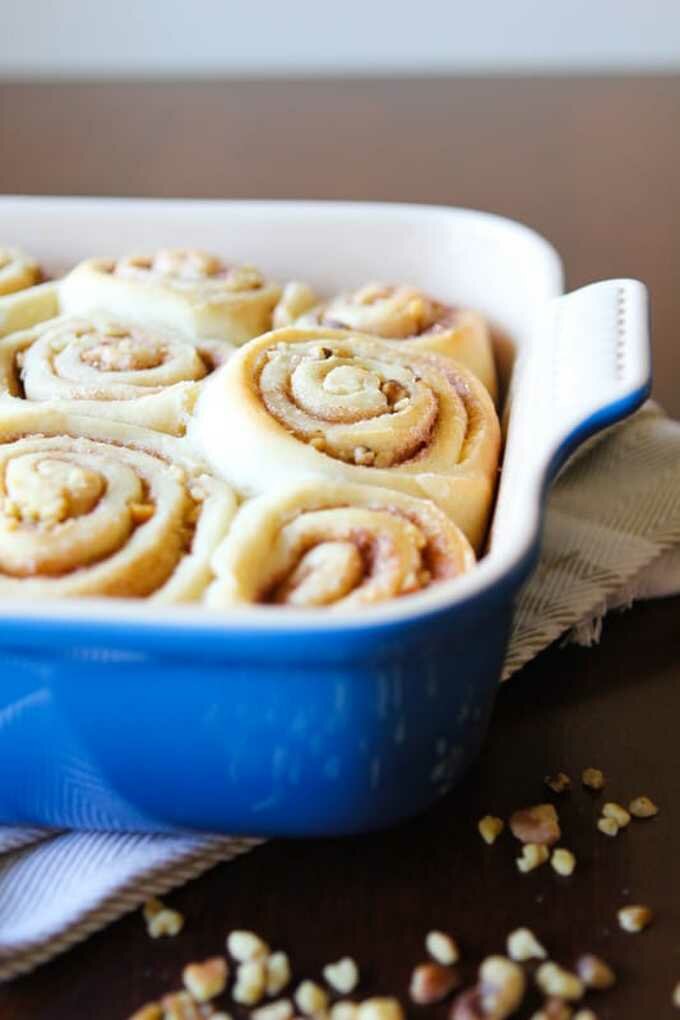
Kettle Corn Donuts
Kettle Corn is a pretty fantastic treat, on its own. That being said - what ISN'T better when you add donuts?! We adjusted our typical donut cake base to make a richer, brown sugar-sweetened donut, slathered it in rich butter glaze (yup, BUTTER GLAZE GUYS. I'm not messing around here.), and topped it with perfectly crunchy kettle corn. The kettle corn's combination of sweet and salty flavors was the inspiration for the whole combination. The sweet cake base slathered in thick, creamy butter glaze might be almost too rich without the addition of the popcorn, but with it becomes the perfect combo and sweet and salty! We used Pipcorn's Kettle Corn here because we love their simple, vegan-friendly ingredient list and that their kernels are smaller than normal kernels - perfect for topping donuts with!
They're super rich and delicious, which makes them perfect for sharing. Double the batch for a fun treat to share with friends or serve at a brunch, or make a single batch all for yourself! I would never judge when it comes to donut consumption. If you're looking for a creative new donut flavor, or just another excuse to squeeze a few more donuts into your day, these are definitely for you. So preheat your oven and let's get baking! Looking for more donut recipes? Try our Blood Orange Glazed Donuts or Baked Pumpkin Cinnamon Sugar Donuts! 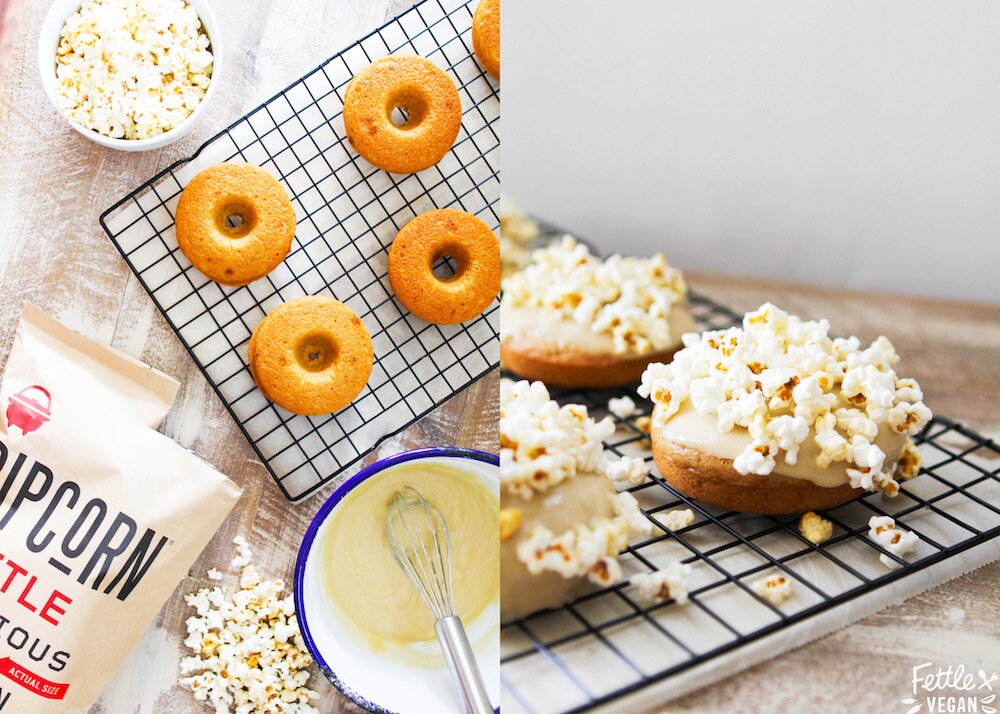
INGREDIENTS
Donuts: 1 cup all purpose flour 1 tablespoon baking powder 1/4 teaspoon salt 1/4 cup unsweetened almond milk 1 tablespoon apple cider vinegar 6 tablespoons aquafaba (liquid) 1/4 cup sugar 1/4 cup brown sugar 2 tablespoons vegetable oil Glaze + Topping: 1 cup powdered sugar 1/4 cup vegan butter, melted 1 teaspoon unsweteened almond milk 1-2 cups kettle corn (we used Pipcorn) DIRECTIONS Preheat the oven to 375º. Lightly grease a 6-ring donut pan and set it aside. In a large mixing bowl whisk together the flour, baking powder and salt. In a small bowl, combine the almond milk and cider vinegar to curdle. Set them aside. In a separate mixing bowl whisk together the aquafaba, sugar, brown sugar and vegetable oil. Pour in the curdled milk mixture and stir to combine. Pour the liquid ingredients into the dry ingredient mixture and mix until just combined. Let the batter rest 5-10 minutes. Fill the donut pan molds with equal amounts of batter, then bake the donuts for 13-15 minutes until they're golden and fluffy. While the donuts bake, make the glaze by simply whisking together the powdered sugar, melted butter and unsweetened almond milk. When the donuts finish baking, let them cool slightly before moving them to a cooling rack to cool completely. Once completely cooled, dip each donut into the glaze or drizzle a bit over each donut. Immediately top the donuts with kettle corn. Enjoy! NOTES Makes 6 donuts. Leftover donuts last in an airtight container on the counter up to 3 days. 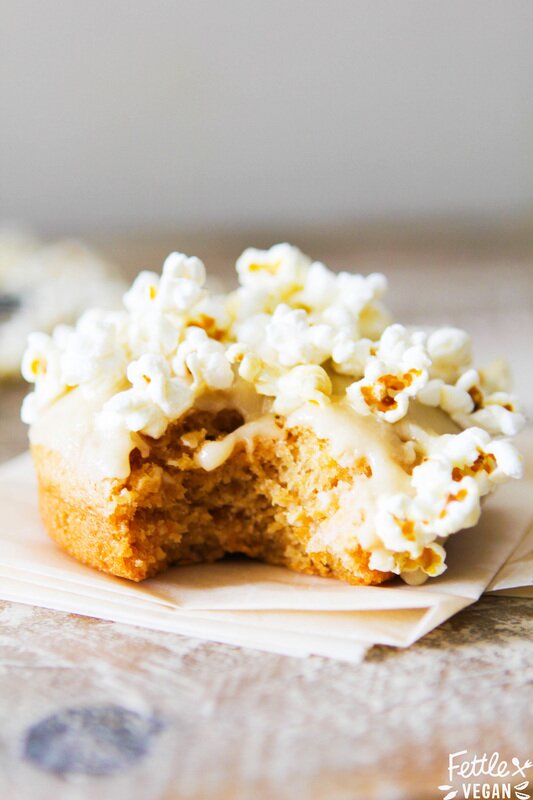
Blood Orange Glazed Donuts
That big romantic holiday that everyone loves to hate (or loves to love, depending on your couple status) is right around the corner! I actually think Valentine's Day can be pretty great, but I'm engaged, so maybe I'm biased? Because Alex and I have been together for 6 years, we don't celebrate by going out and fighting for a seat at a restaurant anymore. Instead, we make each other delicious treats and spend the evening snuggling on the couch, enjoying the treats together. This year I wanted to make Alex something a little less chocolate-centric and a little more in his wheelhouse. If he loves anything more than me, it just might be donuts. So I whipped up this batch of healthier baked donuts and covered them in sweet, seasonal blood orange glaze! The blood oranges gave the glaze a really lovely pink color and a light citrus taste. They're perfectly fluffy and the added flax means you can have two (or three...) instead of just one, because flax makes everything healthier, right? Seriously, these donuts come together from start to finish in about a half an hour - all you have to do is resist eating them all until your Valentine gets home! Let's get baking.
INGREDIENTS
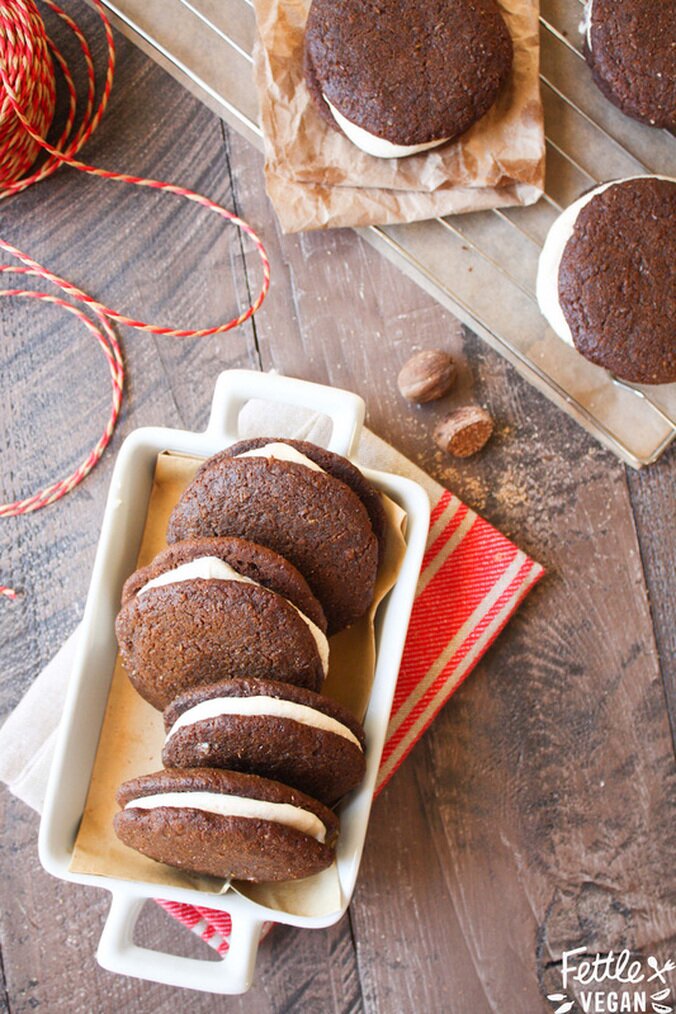
Donuts 2 tablespoons ground flax + 6 tablespoons warm water 1 cup all purpose flour 1 tablespoon baking powder 1/2 teaspoon ground ginger 1/4 teaspoon salt 1/2 cup sugar 1 teaspoon blood orange zest 1/4 cup unsweetened almond milk 2 tablespoons coconut oil, melted 1 tablespoon apple cider vinegar Blood Orange Glaze 1 cup powdered sugar 2 tablespoons blood orange juice 1 teaspoon blood orange zest 1 teaspoon vanilla extract DIRECTIONS Preheat the oven to 375 degrees. In a large mixing bowl combine the flour, baking powder, ground ginger and salt. Set aside. Whisk together the ground flax and warm water in a small dish to gelatinize, about 5 minutes. In a separate large bowl, mix together the sugar and orange zest until fragrant. Pour in the flax mixture, milk, coconut oil and apple cider vinegar. Mix the dry ingredients into the wet ingredients about a cup at a time, stirring until a batter forms. Let the batter set while you grease a 6-mold donut pan. Pour the batter equally between the 6 donut molds and bake for 15 minutes, or until an inserted toothpick comes clean. While the donuts bake, whisk together the powdered sugar, blood orange juice, blood orange zest and vanilla in a shallow bowl to make the glaze. When the donuts finish cooking, move them to a cooling rack for to cool slightly, then dip them generously in the glaze. Serve immediately! NOTES Leftovers last up to 3 days on the counter. Gingersnap Buttercream Cookie Sandwiches
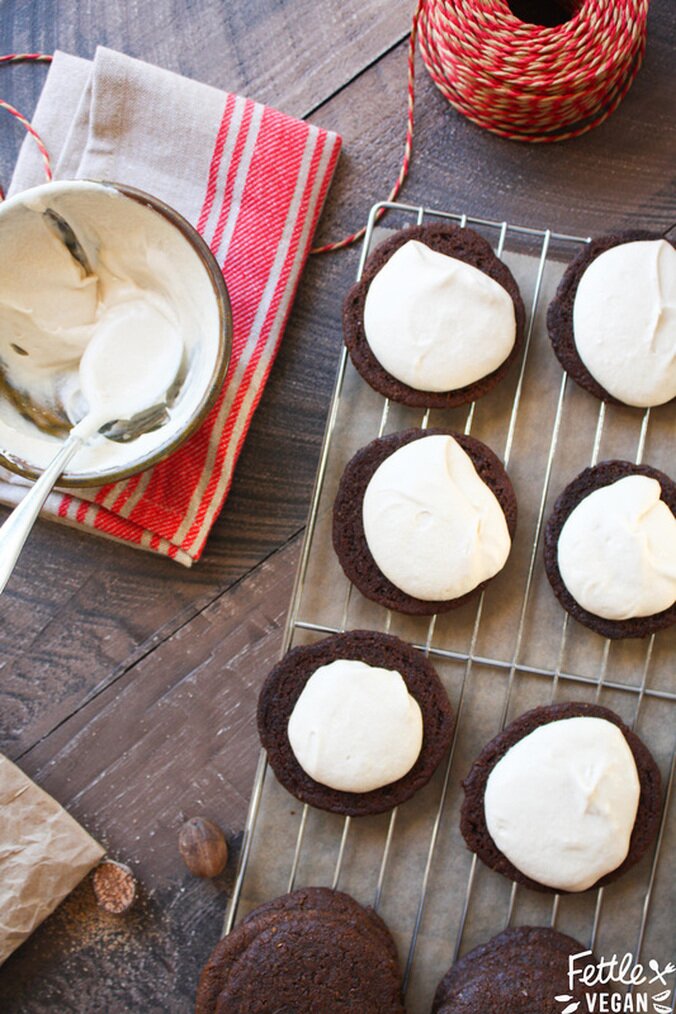
The holidays are in full-swing, which means we're baking like maniacs over here! Between the parties with friends and family, gifts for co-workers, and recipe testing for the cookbook (out Fall 2016!), our oven have been getting plenty of use and my waistline is feeling a little larger than usual. But that's okay, because there are only a few weeks left and by then we'll be so sick of cookies and baked goods we won't want anything to do with them for months. But for now, I'm all about that perfect chewy cookie. And these, my friends, are two perfectly chewy, spiced cookies sandwiching a rich buttercream frosting...and they are DAMN good! Using fresh ginger and nutmeg in these cookies really make the flavors rich and bright, and the molasses help keep 'em chewy - and adds some iron and calcium so you can pretend they're a health food. That's how that works, right?
My favorite part of these cookies is that I like them. I mean it! For years, I have avoided ginger and molasses cookies. I never like the weird sticky-sweet flavor of them and though they tasted kind of bland or too molasses-y. But these cookies? These are mind-changing, crowd-pleasing, are packed with spicy ginger flavor and just enough sweet molasses to balance out the bite of the ginger. Wanna cut the sugar? Skip the buttercream frosting and just eat the cookies as is, they're pretty darn delicious on their own! 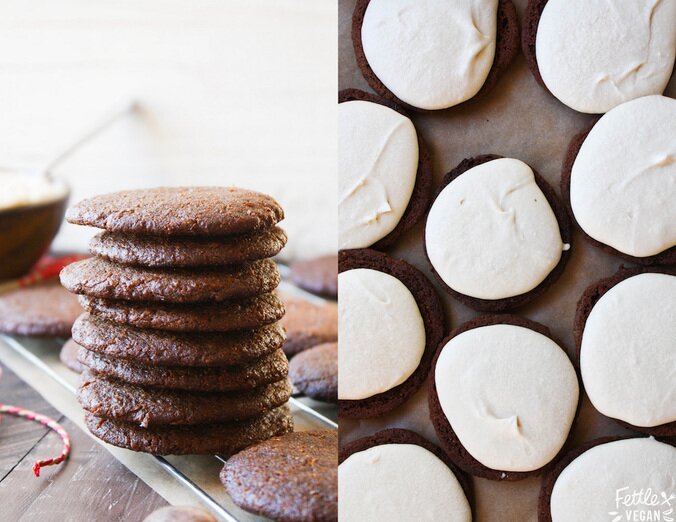
INGREDIENTS
Cookies: 1 1/4 cups all purpose flour 1 teaspoon baking soda 1/2 teaspoon baking powder 1/2 teaspoon salt 1/2 teaspoon cinnamon 1/4 teaspoon freshly grated nutmeg 3/4 cup packed brown sugar 1/2 cup coconut oil, solid (OR sub vegan butter) 3 tablespoons ground flax 3 tablespoons molasses 2 tablespoons fresh ginger, grated 1 teaspoon vanilla Buttercream filling: 2 cups powdered sugar 1/4 cup vegan butter 1 teaspoon vanilla 1-2 tablespoons unsweetened non-dairy milk fresh nutmeg, for garnish DIRECTIONS Preheat oven to 350 degrees. In a large mixing bowl combine flour, baking soda, baking powder, salt, cinnamon and nutmeg. In a separate bowl or stand mixer cream together the brown sugar and coconut oil. Stir in the ground flax, molasses, ginger, and vanilla until completely combined. Pour the dry ingredients into the wet about a cup at a time, stirring continuously, until the cookie dough comes together. Scoop 1-in balls of cookie dough onto a lined baking sheet and bake for 10-12 minutes, until edges are firm. Move the cookies to a wire rack to cool. While the cookies bake and cool, prepare the buttercream frosting by beating together the powdered sugar, butter, and vanilla. Add in milk a bit at a time, until the desired frosting texture is achieved. Spread the buttercream onto half of the cooled cookies, and move to the fridge or freezer for 10 minutes to firm the frosting before topping it with another cookie. Once the sandwiches have been assembled, grate fresh nutmeg over the sandwiches and gobble 'em up! NOTES Makes 20 cookies, or 10 cookie sandwiches. After the cookies cooled, we placed some of the frosting on top and then place them in the freezer for 10 minutes to set the frosting before placing the second cookie on top. Otherwise, the frosting tends to smoosh out the sides a bit. If you won;t be serving them immediately, I recommend keeping them in the fridge until just before serving. 
Carrot Cupcakes with Orange Vanilla Cream Frosting
Easter is on Sunday and whether you celebrate it or not, you deserve to eat cupcakes. Because, well, cupcakes! These are a the result of a recipe I've tweaked a couple times now and am happy to report: they're fucking delicious. Lots of fresh carrot to keep them moist and flavorful, and plenty of sweet orange vanilla cream frosting to keep 'em sweet and kid-friendly. I'm back on gluten for the time being, so I enjoyed using wheat flour in these, but you could certainly substitute your favorite GF mix in its place. These are easy to whip up and bake up light and sweet. Perfect for sharing after a strenuous Easter egg hunt or for munching while you Netflix-binge. Either way, they're the perfect carrot cupcake. Oh, and for a lower sugar frosting option, try our Lemon Cashew Cream or Maple Vanilla Icing. Let's eat!
INGREDIENTS:
Carrot Cupcakes 2 cups unbleached wheat flour 1 tablespoon baking powder 1 teaspoon baking soda 1 teaspoon salt 1/2 teaspoon ground ginger 1/2 teaspoon cinnamon 1/2 teaspoon nutmeg 1 cup coconut milk 1 cup organic sugar 1/2 cup mashed banana 1/2 cup melted coconut oil 2 tablespoon ground flax 2 teaspoons vanilla extract 2 cups grated carrots Orange Vanilla Cream Frosting 1/3 cup cold vegan butter (we used earth balance) or vegetable shortening 2 tablespoons orange juice 1 teaspoon orange zest 1 teaspoon vanilla extract 2-3 cups powdered sugar chopped walnuts, for garnish (optional) DIRECTIONS: Carrot Cupcakes Pre-heat oven to 350 degrees. In a medium bowl, sift together flour, baking powder, baking soda, salt, ginger, cinnamon, and nutmeg. In a large mixing bowl or electric mixer combine coconut milk, sugar, mashed banana, coconut oil, ground flax, and vanilla extract. Add in dry ingredients about a cup at a time, stirring continuously. Once batter comes together, fold in grated carrots. Pour batter into greased or lined cupcake pans until cups are about 3/4 of the way full. Bake for 25-30 minutes, or until an inserted toothpick comes out clean. Let cool completely while you whip up the frosting! Orange Vanilla Cream Frosting In a food processor or high speed blender combine cold vegan butter or shortening, orange juice, orange zest, and vanilla extract. Add in powdered sugar a cup at a time until it reaches your desired consistency. Refrigerate until cupcakes are completely cooled. (If you use butter, your cupcakes may need to be refrigerated to keep the frosting from melting. Shortening melts less, but still be wary of leaving them out on a warm day for too long!) When cupcakes have cooled, generously spread each one with a layer of creamy orange vanilla frosting. Makes 16 cupcakes!
Spiced Pumpkin Bread with Maple Vanilla Icing
Prepare yourselves: the weathers getting cooler and it's about to get all kinds of pumpkin up in here. After walking the aisles of Trader Joe's last week and seeing pumpkin-themed snacks EVERYWHERE, I was inspired. Last year at this time I was so sick of pumpkin. I'm not even sure we posted one pumpkin recipe on this site last fall. Lame, right?
This year, lucky (or maybe unlucky?) for you, I've jumped back on the pumpkin bandwagon. HARD. The next couple of weeks will be filled with pumpkin treats both sweet and savory...but mostly sweet. I promise not to overdo it. And I promise you will find at least one pumpkin goodie to love. In fact, we're calling it 'GREAT PUMPKIN WEEK' here this week. Use the handy pumpkin on the homepage sidebar to explore ALL of our pumpkin-filled recipes! Now, let's BAKE!
INGREDIENTS:
Spiced Pumpkin Bread 1- 15 oz. can pumpkin purée (about 1.5 cups) 1/3 cup softened coconut oil 1/2 cup organic sugar 1/2 cup non-dairy milk 1 teaspoon vanilla extract 1 teaspoon apple cider vinegar 2 cups whole wheat OR gluten-free flour blend 1/2 teaspoon baking soda 1/2 teaspoon baking powder 1/2 teaspoon salt 1/4 tsp ground cinnamon 1/8 tsp ground ginger Maple Vanilla Icing 1.5 cups raw cashews, soaked 3 tablespoons maple syrup 1.5 teaspoons vanilla extract 1/4 - 1/3 cup water DIRECTIONS: Preheat oven to 350 degrees. In a large mixing bowl, combine coconut oil, sugar, milk, vanilla, & vinegar. Let sit for 3-5 minutes. While you wait, grab a second mixing bowl & combine the flour, baking soda, baking powder, salt, cinnamon, and ginger. Once the wet ingredients are ready (slightly bubbly), slowly add in the dry ingredients and stir to combine. Once the two are completely combined and a batter has formed, add the pumpkin purée. Stir to combine. Pour batter into a greased, lined or non-stick loaf pan. [We used a non-stick pan with a little parchment paper, for easy removal.] Bake for 45-60 minutes, depending on your oven. Bread is finished when a toothpick comes clean. Remove from the oven and let cool at least 30 minutes before transferring to a wire cooling rack. While bread cools, whip us icing by combining soaked cashews, maple syrup, vanilla, and water in a food processor or high speed blender. Fill a piping bag or ziploc bag with a corner cut off with icing mixture and pipe icing over cooled loaf. Loaf lasts well on the counter or in the fridge for about a week, or can be frozen indefinitely. Enjoy!
Deep Dish Apple Cinnamon Skillet Cake
|
tagsAll  RSS Feed RSS Feed
|