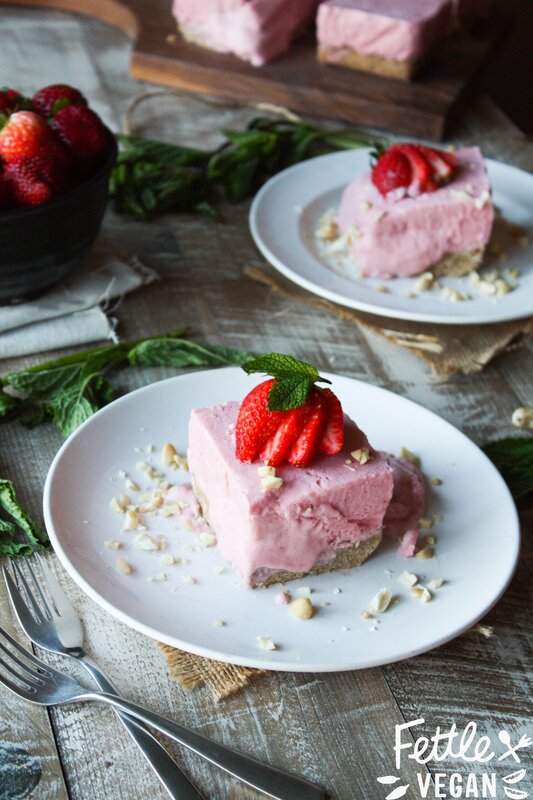
Strawberry Basil Hand Pies
These are maybe one of the yummiest things I’ve ever made. They take a little work, but they are SO SO worth it. Basically a healthier, adult-friendly pop tart, these sweet little guys are packed with fruit and drizzled in sweet vanilla glaze. They’re buttery, rich, and taste WAY BETTER than store-bought! That I can promise. These babes first debuted in my Homestyle Vegan Cookbook two years ago, but they've become a Sunday morning staple in our house ever since! They're easy to whip up, and are a total crowd pleaser. Who doesn't love pop tarts?!
My second cookbook, a collaborative effort titled 'Vegan Bible' will be out later this year, in October. Lots more fun new recipes coming your way! In the meantime, I thought I'd revisit one of my favorites in case you haven't gotten your copy of the cookbook yet. Seriously cannot wait to hear what you guys think when you try them. And know that if strawberries and basil together isn't your favorite flavor combo, you can always ditch the basil, sub out the strawberries for another fruit, or come up with your own flavor combination entirely! No matter what you decide, they're gonna be good. Let’s bake!
INGREDIENTS
Hand Pies: 1 heaping cup (210 g) fresh or frozen strawberries, sliced 1 tablespoon (15 ml) water (ONLY IF USING FRESH BERRIES) 1 tablespoon (3 g) fresh basil, finely chopped 1 teaspoon sugar 1 teaspoon cornstarch 2 cups (315 g) whole wheat pastry flour 1/8th teaspoon salt 2/3 cup (150 g) cold vegan butter 2-4 tablespoons (30-60 ml) ice water Vanilla Glaze: 6 tablespoons (48 g) powdered sugar 1/4 teaspoon vanilla 1-3 teaspoons (5-15 ml) unsweetened almond milk DIRECTIONS Preheat the oven to 375º. Line a baking sheet with parchment paper. Place the strawberries, water (ONLY IF USING FRESH BERRIES), basil, sugar and cornstarch in a small saucepan over medium heat. Cook for 5-8 minutes, stirring occasionally and smashing down the fruit as it cooks. Remove from heat and set aside. In a large bowl, mix together the flour and salt. Cut in the cold butter with a fork or pastry cutter until small crumbs form. Drizzle ice water over the mixture about a tablespoon at a time, mixing with a wooden spoon, until a dough begins to form. The dough should be moist but not sticky. Turn the dough onto a lightly floured surface and shape it into a disc. Use a rolling pin to roll the dough into a large, 1/4 in. thick rectangle. Use a sheet of plastic wrap over the dough to prevent cracking as you roll it out, if needed. Cut the rectangle into 12 equal squares (or rectangles) and move half of them to the lined baking sheet. Scoop about 1 tablespoon of filling onto the 6 laid squares, leaving about 1/4 inch of space around the edge. Using your finger, dab a bit of water around the edges to help seal them. Top each square with its matching other half, pressing around the edges with a fork to seal them. Use a toothpick to poke a poke a few small holes in the top, then bake for 20-25 minutes, or until golden brown. While they cook, prepare the glaze by mixing together the powdered sugar, vanilla and unsweetened almond milk. When the hand pies are finished, let them cool on a wire rack for 5-10 minutes before topping with glaze. TIPS Makes 6 hand pies. Leftover hand pies taste great cooled - no need for reheating! You can sub in any berries you prefer here and if basil isn’t for you, go ahead and leave it out. Prefer a lower sugar option? Ditch the glaze!
2 Comments
Hormone-Balancing Strawberry Maca Smoothie
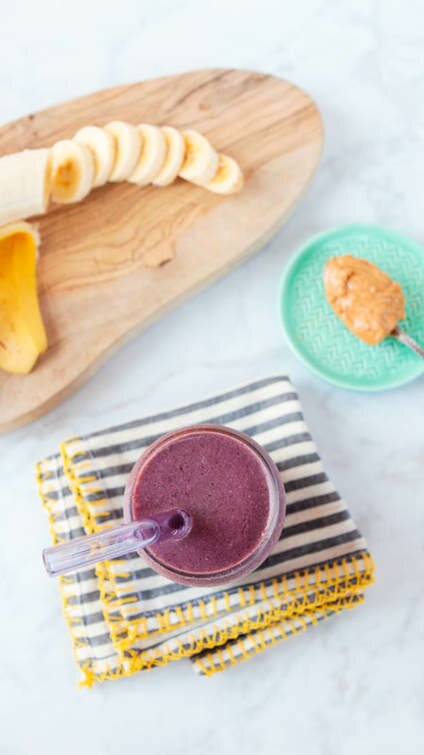
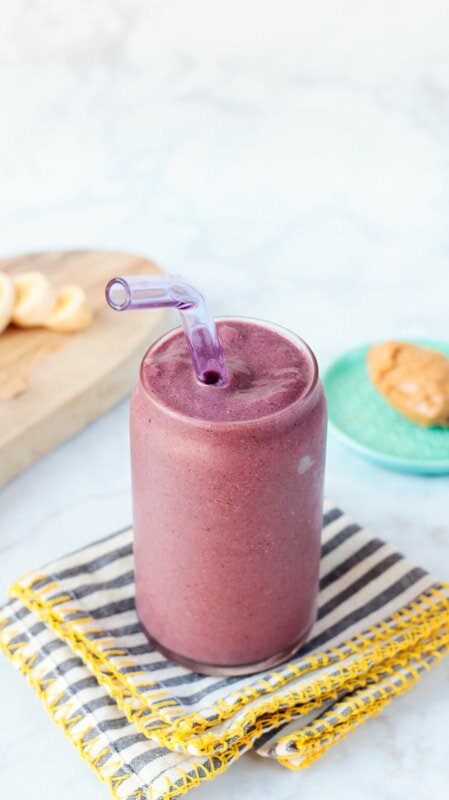
I love a good smoothie, but I love even more when I can drink something so packed full of good-for-me ingredients that I feel fuller and happier for the whole day! This smoothie does just that, friends. Packed with healthy, real food ingredients that pack an extra special, hormone helping punch - maca root! The older I get, the more I feel my hormones dragging me all over the place, and I'm just trying to add some regularity - and this smoothie really helps when you take it regularly.
I first tried a similar smoothie at the Whole Foods juice bar near me - and surprise, surprise - I had to recreate it at home! I knew I could make it cheaper, and whenever I wanted, if I learned to recreate it. I added a few ingredients to make it more than a sweet strawberry banana base and now I am officially obsessed and make it at least 3 mornings a week. Beyond the bunches of greens I've added, the maca root has some real benefits in balancing the body's hormones. Below we'll talk about different types of maca, how much to use, and how it helps your body!
When it comes to maca you can buy at the store, there are two types: gelatinized and raw, non-gelatinized. Raw maca that has been powdered from the dried, uncooked root, can be a little hard on the digestive system and may cause stomach upset in about 5-10% of the population. Gelatinization involves a steam process that makes the maca more digestible and also increases bioavailability of the nutrients. You can buy whatever you prefer, but note the difference in case you have a sensitive stomach. (Maca isn't going to be for everyone, so if you have stomach issues when you take it or you are following a low FODMAP diet, I recommend you avoid it all together.)
I always recommend buying organic when you can, especially since maca is a root and is grown directly in the soil. I have been loving this brand lately and it has added ashwaganda powder as well, but again, use whatever maca you prefer. High quality maca is usually grown in Peru - so look for that confirmation on the packaging. Other things to look for? Ideally, you want your maca sustainably grown and naturally harvested without the use of artificial fertilizers, pesticides, solvents, radiation or high heat. But don't worry babes - this info is usually on the packaging itself and always online! OH, and always keep your maca in the fridge - it can oxidize when exposed to air, heat and moisture.
So how does maca help and why take it? Well ladies (and gents!) there are some pretty great reasons, specifically hormone-balancing ones. Maca is rich in vitamins C and A as well as B2, B6 and Niacin and packed with minerals, including iron, zinc, iodine, calcium, copper, magnesium and potassium. It contains healthy fatty acids that help stabilize blood glucose levels and reduce inflammation in the body. It strengthens your bones and supports healthy liver and enzyme function.
Maca is one of the rare plants that can be classified as an ‘herbal adaptogen’. This means it can directly change the balance of your hormones to help you adapt to stress and illness. Unlike some herbs and phytoestrogens such as soy (which I'm actually super allergic to), maca does not try to mimic estrogen in your body. It is a hormone BALANCER, so it draws your hormones back to where they need to be rather than increase only one type of hormone and cause an imbalance. Many women report improved PMS, menopause, and PCOS symptoms as a result of regular maca usage during their cycle. Maca is also high in fibers like cellulose and lignins, which improve gut health. Fiber is also an effective tummy filler, which can reduce hunger between meals. Most maca powders also contain between 11% to 18% protein, which is a nice little boost in your morning smoothie, as well. On top of all those great reasons, maca is also a natural energy provider so you can use it to help kick the caffeine and ditch that afternoon slump! To break it down: -balanced mood -improved PMS -natural energy -improved fertility -higher libido -stronger bones -reduced menopause and PCOS symptoms So basically, it's a smoothie all of us can enjoy for different - or maybe all of the - reasons listed above! I'd love to hear about your experiences with maca in the comments below. I've only been using it regularly for about a year, but love and plan to keep using it. Let's get blending, babes!
INGREDIENTS
1 1/2 cups coconut water or unsweetened almond milk 1 frozen banana 1-2 cups fresh spinach 1 1/2 cups frozen (or fresh!) strawberries 1-2 teaspoons maca root powder 3-4 drops vanilla stevia (optional) Optional Add-In's 1 tablespoon flax powder 1 tablespoon chia seeds 1 tablespoon psyllium husk 1 tablespoon coconut or nut butter maple syrup, honey or agave DIRECTIONS Toss it all in a high-speed blender (we use a Vitamix) and blend until it is smoooooooth. Then pour it in a large glass - or two - and enjoy! NOTES Serves 2. Sub in what you need or what you’ve got to suit your preferences! If you use coconut water, the smoothie will be a bit lighter, whereas using almond milk will result in a thicker, creamier smoothie. I like them both! Wild Blueberry Overnight Oats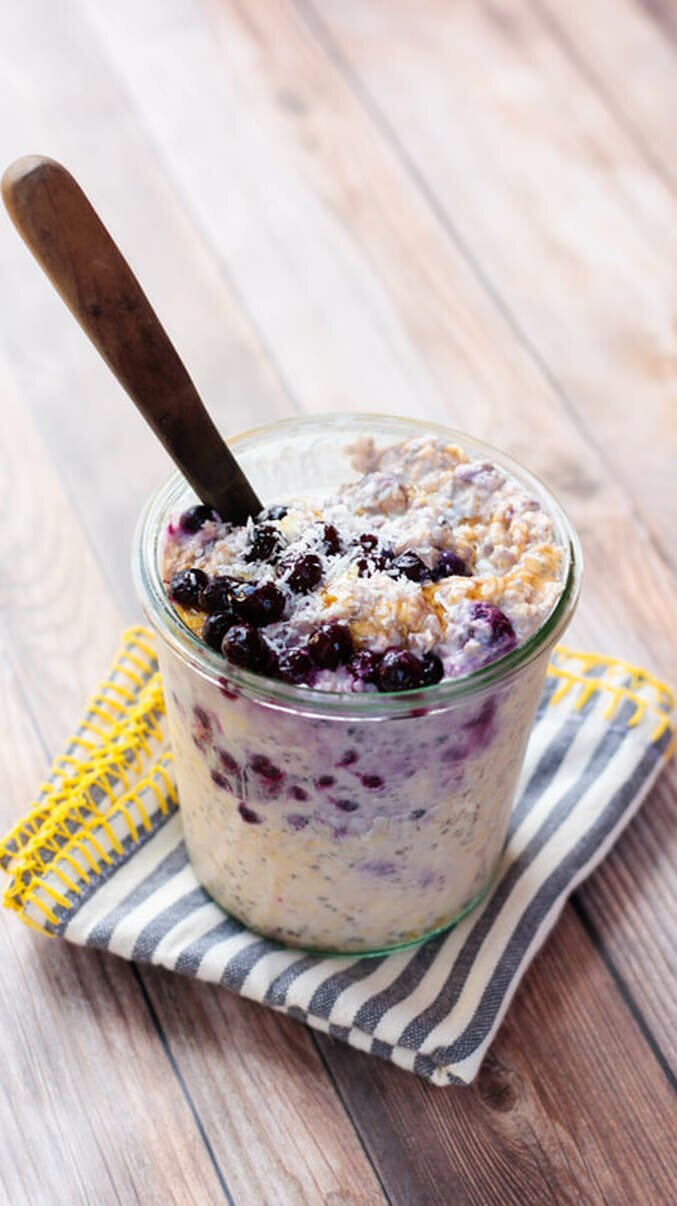
This is a super simple recipe, but sometimes those are the best recipes. I get into food moods all the time, and lately I've been super busy and hooked on easy, on-the-go breakfasts and lunches that pack some real nutrition and can keep me filled up when I have to teach back to back classes with no snack time in between. Being a Maine girl at heart my berries of choice were of the small, tart, and wild variety - but you can sub in whatever fruit or berries you prefer here, instead. The addition of coconut butter adds healthy, hearty, good-for-you fats that'll help keep you moving and the chia seeds add just a little extra texture (and a whole lotta omegas!) to the mix. All you'll need is a few simple ingredients that you probably already have on hand, a glass jar, and a serious appetite. Let's eat!
Before you make your way down to the recipe, a quick reminder that I'm currently teaching 4x a week at CorePower Yoga in Brea, if you're looking to get your sweat on - and soon will have my own yoga vids for you guys to access on my YouTube whenever you need to flow! Send me your flow requests and I'll try to make them happen. Alright - keep scrolling! 
INGREDIENTS:
1/2 cup almond milk 2 teaspoons chia seeds 1 tablespoon coconut butter (or nut butter of choice) 1 tablespoons maple syrup 1/2 cup (GF) rolled oats 1/2 - 1 cup wild blueberries (fresh or frozen) DIRECTIONS: In a mason jar or small bowl, combine the almond milk, chia seeds, coconut butter, and maple syrup and stir or shake to combine. The coconut butter doesn't need to be completely mixed with the almond milk - and you'll get swirls of coconut butter to enjoy the next day! Add the oats and blueberries and stir or shake a few more times. Make sure all of the oats are saturated in the wet mixture. Cover and place in the fridge overnight or for at least 6 hours to set. When ready, simply pull out the oats, give 'em a stir and enjoy! You can add extra fruit or toppings as desired. Enjoy! NOTES: Leftovers last in the fridge up to 2 days, but are best enjoyed within 24 hours. Serves 1, but recipe is easily doubled. 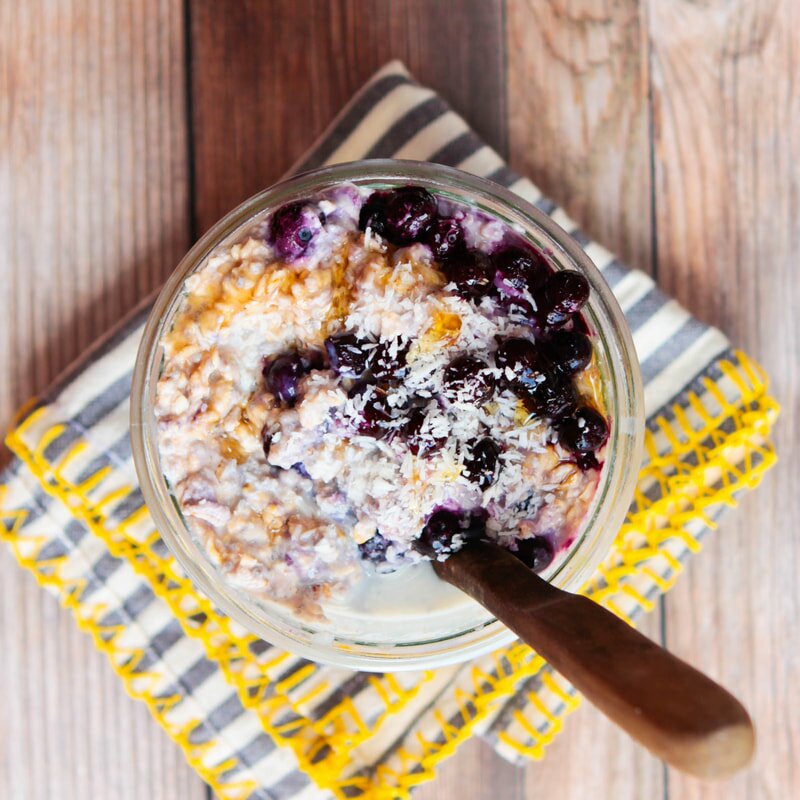
PB+J SMOOTHIE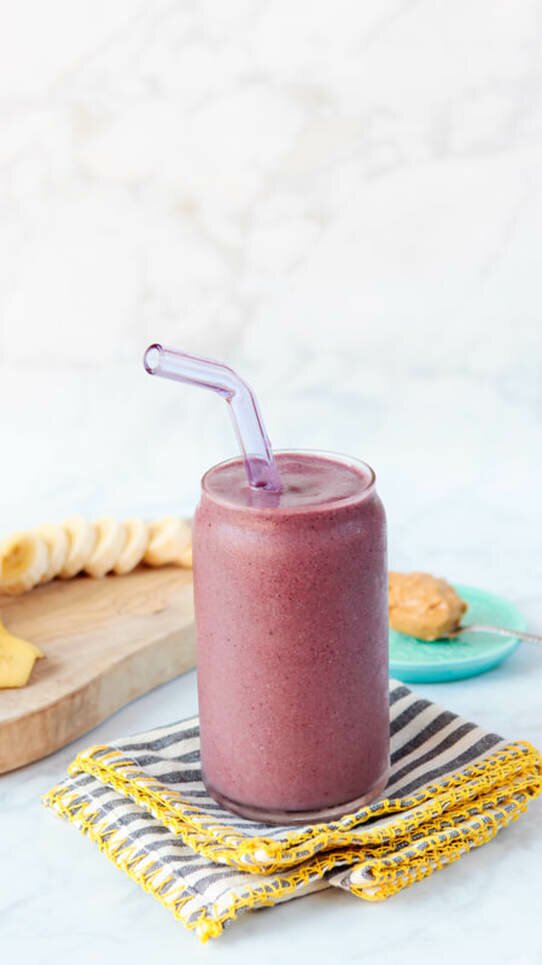
Good morning friends! I'm a serious sucker for smoothies, and a well-known regular at the Whole Foods juice bar. I even recreated one of my favorite smoothies from them - the Green + Glowing - and posted it here because I needed to stop spending $8 a day on a smoothie I could make myself. Well we're back! Kind of. This isn't a smoothie I found at Whole Foods, but I'm sure they've got one like it. I wouldn't know, because until recently I refused to have nut butter in a smoothie. I don't know why! Actually - I hate the chocolate and fruit combination, and I think I just assumed that since chocolate and peanut go so WELL together, that peanut butter and fruit would also be awful. Except deep down in my brain I knew that couldn't be true - because otherwise I wouldn't have eaten a PB+J nearly everyday from ages 4-8!
One morning recently I went to whip up my normal morning smoothie and realized I was out of two of the main ingredients - frozen mango and frozen pineapple. I emptied the bags the day before and had totally forgotten to replace them. Whoops! Luckily, I had seen frozen strawberries and blueberries in the freezer, so I grabbed them instead. I kept the smoothie base the same but after whipping it all together it was just missing something. It was too light and needed some thickness. I almost threw in some coconut in and then thought - welllll, I do have this mostly empty jar of peanut butter...should I try it? I'm so glad I did! It gave the smoothie more thickness, protein, and a ton of great flavor! This might be my new go-to morning fuel. It's packed with protein - seriously, kids will love it. Let's blend, babes!
INGREDIENTS
1 1/2 cups coconut water or unsweetened almond milk 1 frozen banana 1 cup frozen strawberries 1/2 cup frozen blueberries 1-2 cups fresh spinach 1 tablespoon peanut butter 1 tablespoon ground flax 1 tablespoon psyllium husk 1-3 teaspoons MCT coconut oil (optional - just what I add into mine for some healthy fats) DIRECTIONS Toss it all in a high-speed blender (we use a Vitamix) and blend until it is smoooooooth. Then pour it in a large glass and enjoy! NOTES Serves 2. Sub in what you need or what you’ve got to suit your preferences. Fresh fruit works great, but you may need to add some ice to get it nice and creamy. If you use coconut water, the smoothie will be a bit lighter, whereas using almond milk will result in a thicker, creamier smoothie. I like them both, but I actually prefer it with coconut water! 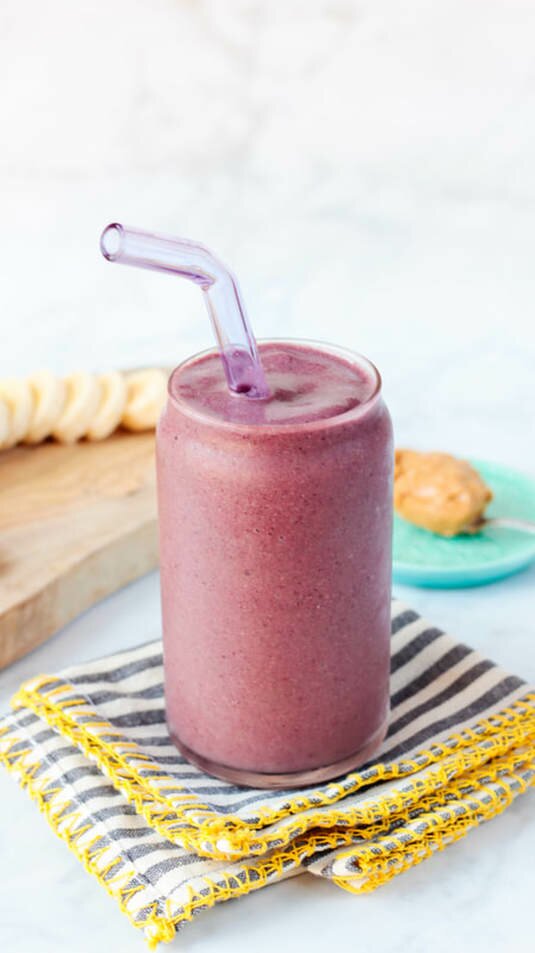
Strawberry Rhubarb Crumble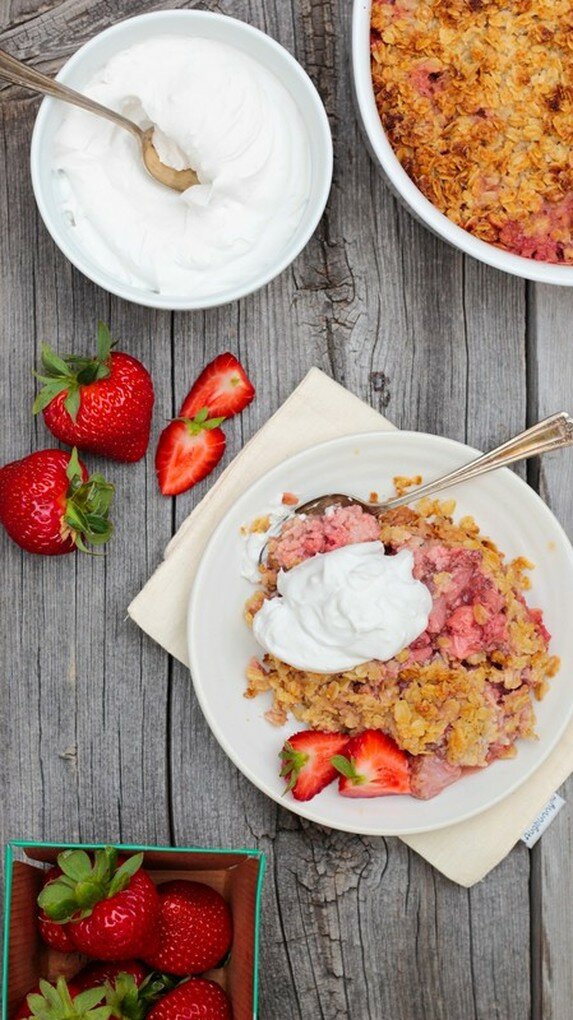
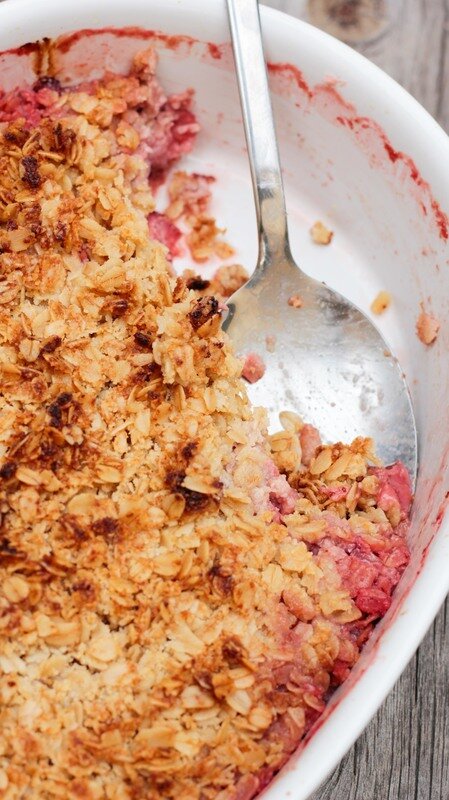
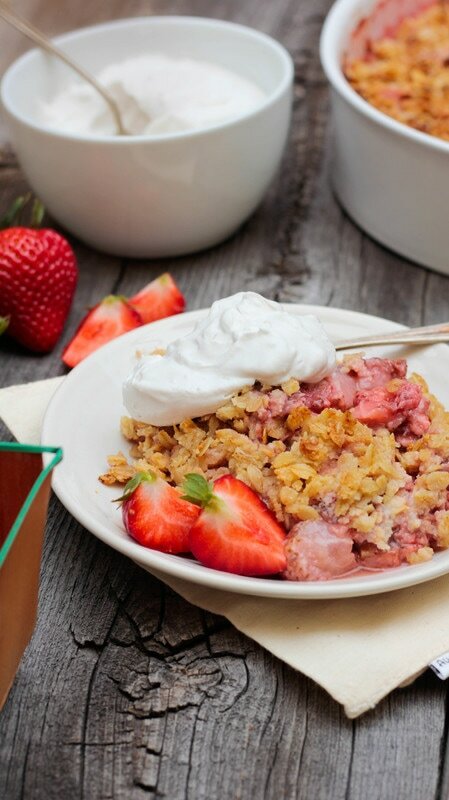
Guys! We're back up and running. ICYMI, the site was down for a couple of day because we're working on a transitioning the blog to a new name. You may've already seen the sneak peek on instagram, but if you haven't, we'll be soon be ditching the name Fettle Vegan and calling the blog Good Saint. More on that in my next post! If you're not already subscribed to our weekly newsletter, now might be a great time - so you don't miss a thing when we switch over! For now, I'm bringing you a sweet, seasonal treat: Strawberry Rhubarb Crumble. This crumble is the BEST. Is it yummy, it is sugar-free, and it is so simple it'll blow your mind. Oh, and did I mention gluten-free? And soy-free? It ticks those boxes too, babes. It's a baked good you can feel good about eating and will feel good about eating because it tastes damn delicious. I did good, guys. And I think you're gonna be really proud of me.
I needed a sweet, simple dessert. I've been BUSY lately! With the site changes and the wedding - posts on THAT coming soon, too! - plus the honeymoon, and now my 200-hour yoga teacher training at CorePower, I've been exhausted lately and playing constant catch-up. I just don't have time for 15-ingredient layer cakes these days! Just 10 ingredient crumbles. 😉 I worked hard to keep the ingredients simple and whole, because I'm all about eating real, wholesome foods these days. Nothing processed, no preservatives, no extra sweeteners. It's summer - you don't need that shit. Whether you pick your own sweet strawberries (I MISS doing that in Maine every year!) or just buy 'em on sale at the grocery store, the secret here is really the rhubarb. It gives such a great tart balance to this easy dish. I highly recommend adding a dollop of coconut whip before serving - it's the perfect topping. Recipe linked below - so let's get cooking!
INGREDIENTS:
Crumble 2 cups fresh rhubarb, sliced 4 heaping cups fresh strawberries, chopped 2 tablespoons lemon juice 1 tablespoon chia seeds 1 cup almond flour 2 cups GF oats 1/4 cup monk fruit sweetener (or sweetener of your choice - sugar works if you're into it, and the ratio is 1:1!) 1 teaspoon baking powder 1/4 teaspoon salt 1/2 cup softened coconut oil Coco Whip 2- 15 oz. cans whole fat coconut milk 1-3 tablespoons non-dairy milk 1-3 tablespoons monk fruit sweetener (again, use your fave sweetener here if you prefer!) 1 teaspoon vanilla DIRECTIONS: Preheat oven to 375 degrees. Grease a 9x13 inch glass baking dish and set it aside. In a large mixing bowl, toss your strawberries and rhubarb in the lemon juiced chia seeds until evenly coated. In a separate mixing bowl combine the almond flour, GF oats, flour, monk fruit sweetener, baking powder and salt. Add in the softened coconut oil and stir until crumbs begin to form. Pour the strawberry rhubarb mixture evenly into the greased glass baking dish. Top with the oat + almond flour crumble mixture, distributing evenly. Put the crumble into the oven and bake for 35-45 minutes, until crumble topping becomes golden and berry mixture bubbles. Remove from oven and let cool completely before serving. Or eat it straight from the pan while you watch the Bachelorette. I'm not here to judge! To prepare the coconut whip, simply scoop the firm solids from the cans of coconut milk into a large mixing bowl and toss in the sweetener, milk, and vanilla and whip with beaters until fluffy. Scoop onto your crumble and enjoy! TIPS: Leftovers - both the crumble and the ship - stay well, wrapped separately, in the fridge for up to a week. To reheat, cover with foil and reheat at 350 degrees for about 20-30 minutes, or until warm in the middle. 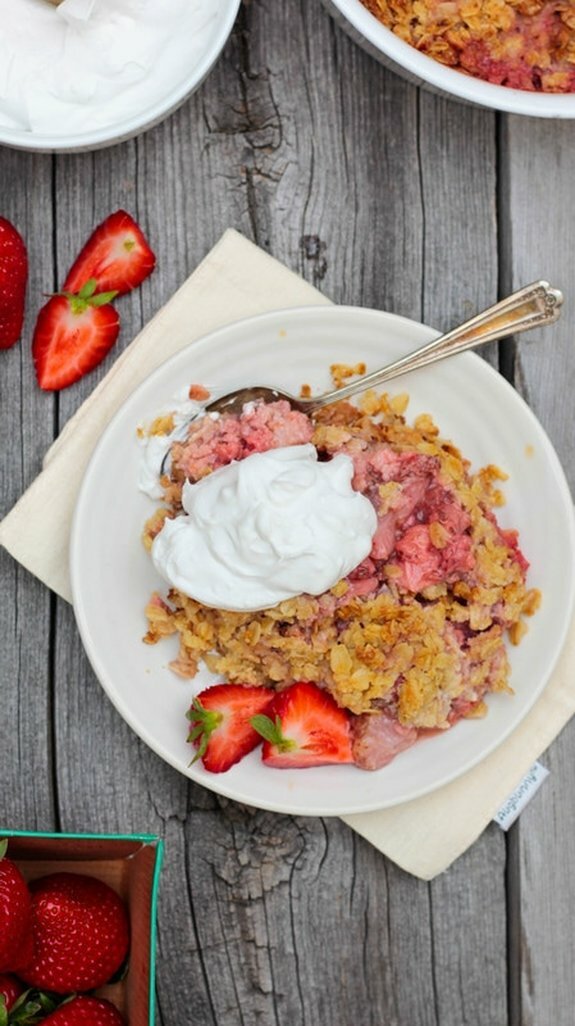
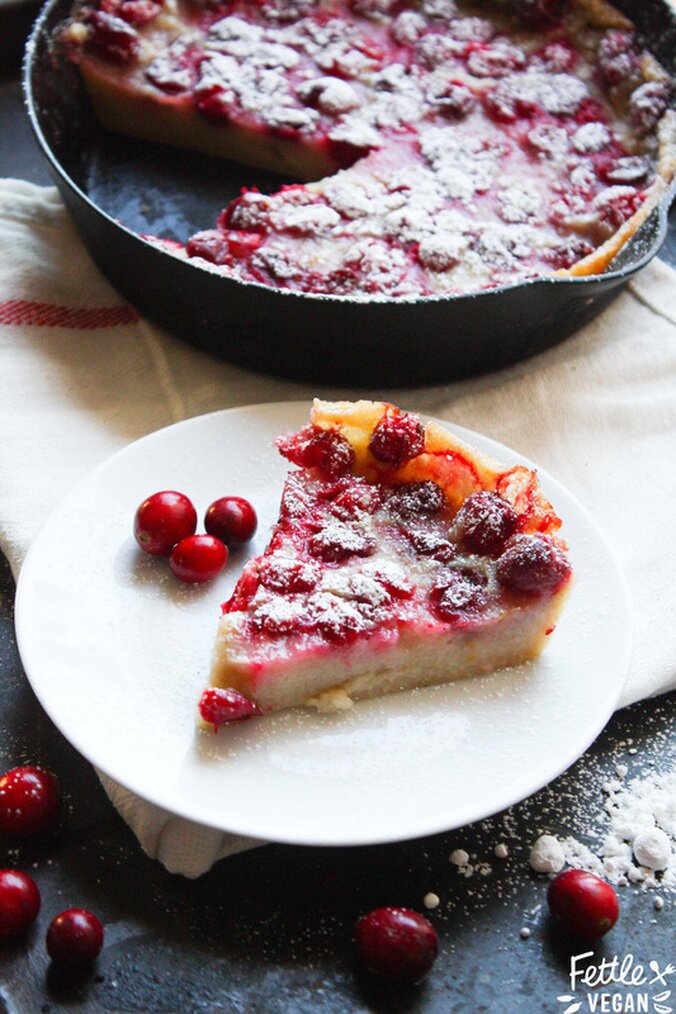
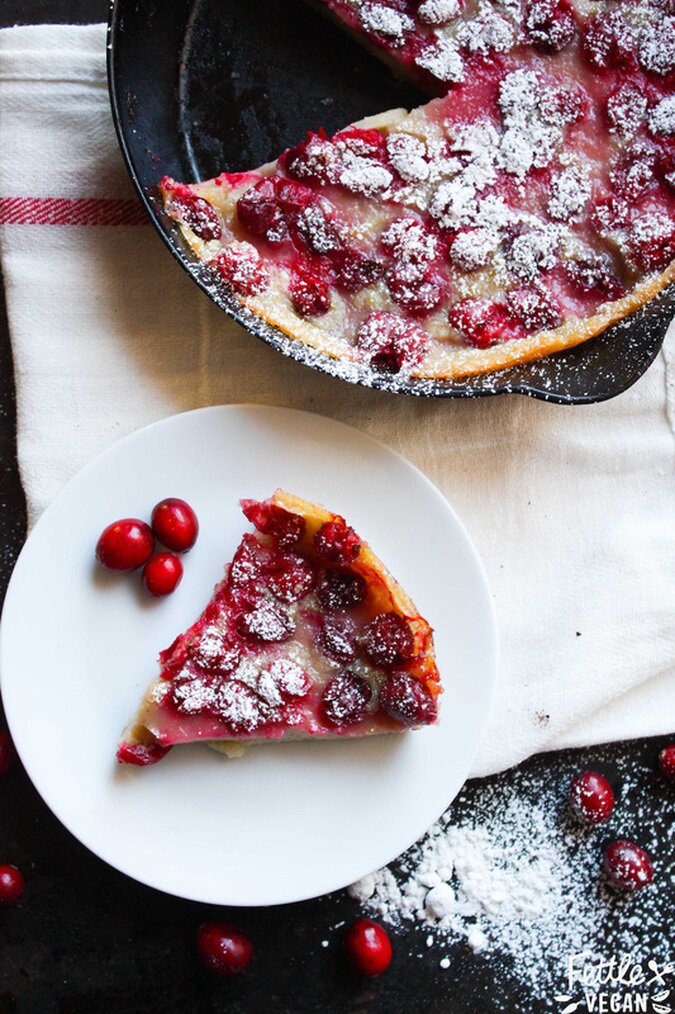
Cranberry Orange Clafoutis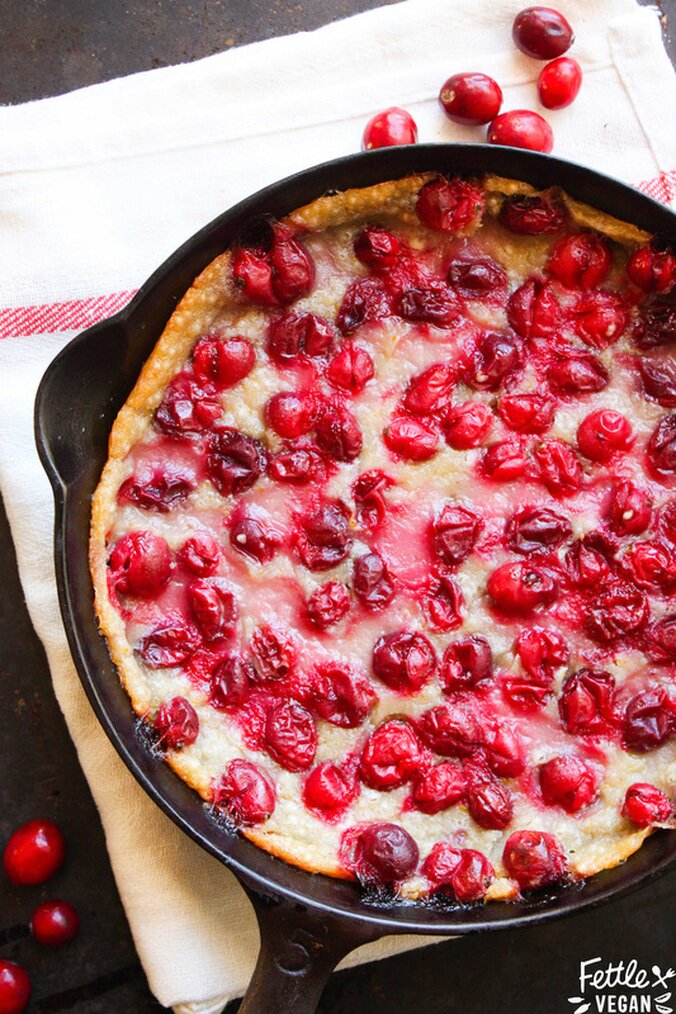
Clafoutis, pronounced KLA-FOO-TEE, is a French dessert that is custard-y in texture and studded with fruit. Cherries seem to be the traditionally paired flavor, but since cranberries are in season and have such a great tart flavor, we used them instead. They work nicely to balance out the sweet, eggy flavor and texture of the cake, and they taste all kinds of seasonal with a bit of added orange zest. It works as a breakfast dish or dessert, and is an impressive looking one, at that! This recipe is deceptively simple and makes you seem like a real chef, especially when you start throwing around words like 'clafoutis' and 'aquafaba'. If you haven't jumped on the aquafaba train, you can check out some more info on other recipes we've used it in, like our Easy Chickpeasy Breakfast Burritos + our Homemade Marshmallow Fluff. We used aquafaba in this dish because it so closely mimics the protein structure in baked goods that eggs do, and helped to almost perfectly mimic the texture of a traditional clafoutis. We considered using flax or chia eggs, but I just don't think it would've given the same texture, and like we said before, texture is key in this dish. Anyway, enough chatting. You get it. Fancy dessert, very little work. So what're you waiting for? Let's eat!
INGREDIENTS
1 cup unsweetened almond milk 1/2 cup + 1 tablespoon aquafaba 1/2 cup sugar 2 tablespoons melted vegan butter 2 teaspoons vanilla 1 teaspoon orange zest 1/2 cup all purpose flour 1 cup fresh cranberries powdered sugar, for garnish DIRECTIONS Preheat oven to 325 degrees. In a large mixing bowl combine almond milk, aquafaba, sugar, melted butter, vanilla and orange zest. Add in the flour, whisking until smooth. Pour the batter into a greased 8-inch cast iron pan or baking dish. Scatter the cranberries over the top and place the whole pan into the oven. Bake for 50-60 minutes, until dough is puffed and golden along the edges. Remove from the oven and let it sit at least 2 hours to set. The result should be very custard-like, a thick 'pancake' similar to flan. Sprinkle with powdered sugar + serve! NOTES Aquafaba is the magical liquid drained from a can of beans. Garbanzo or white beans work best. You can read more about that here. Texture is key in this dish. Don't dig in too early or the base won't set properly. It might seem undercooked or a little jiggly when you first pull it out of the oven, but I promise, that's what you want. However, if the sides haven't browned up, you'll want to keep it in a few extra minutes. Cranberries not your jam? Use your favorite berries or stone fruit here instead! ***We've gotten a LOT of questions about this recipe. I swear it is as easy as it looks BUT PLEASE read through the entire recipe completely before beginning. And yes, your pan should be greased...like its says. :) *** 
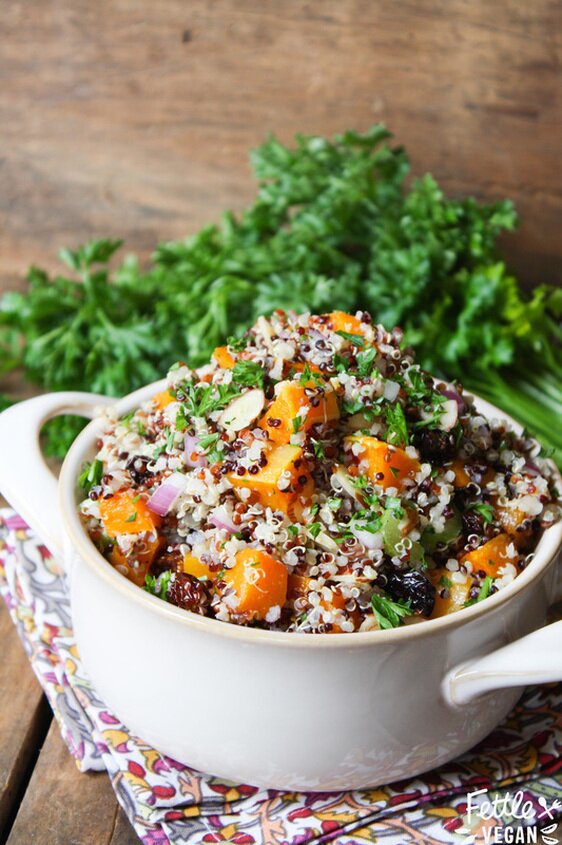
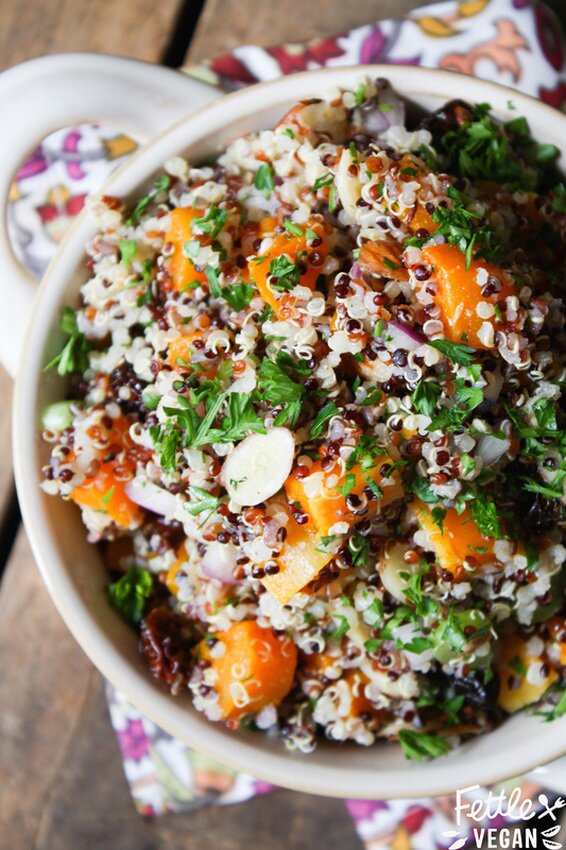
Winter Salad with Sweet Potatoes, Persimmon, Pomegranate,
|
tagsAll  RSS Feed RSS Feed
|