Comfort Food That Loves You Back:
|

|
|
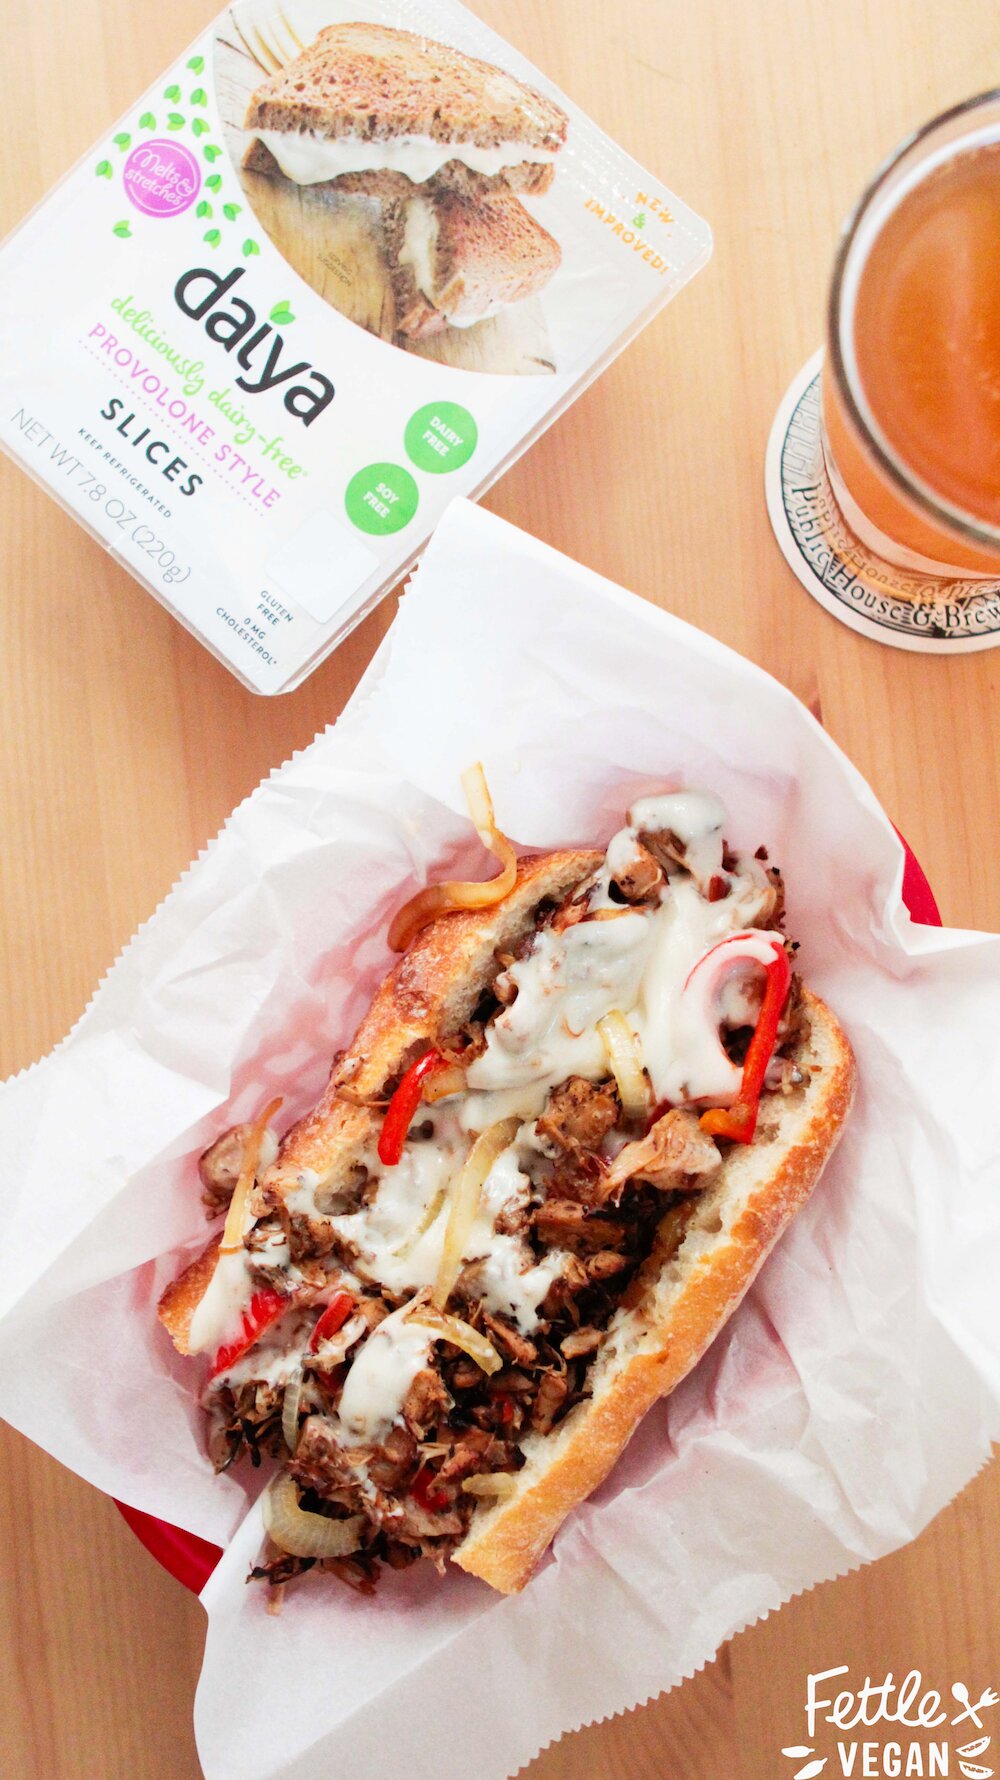
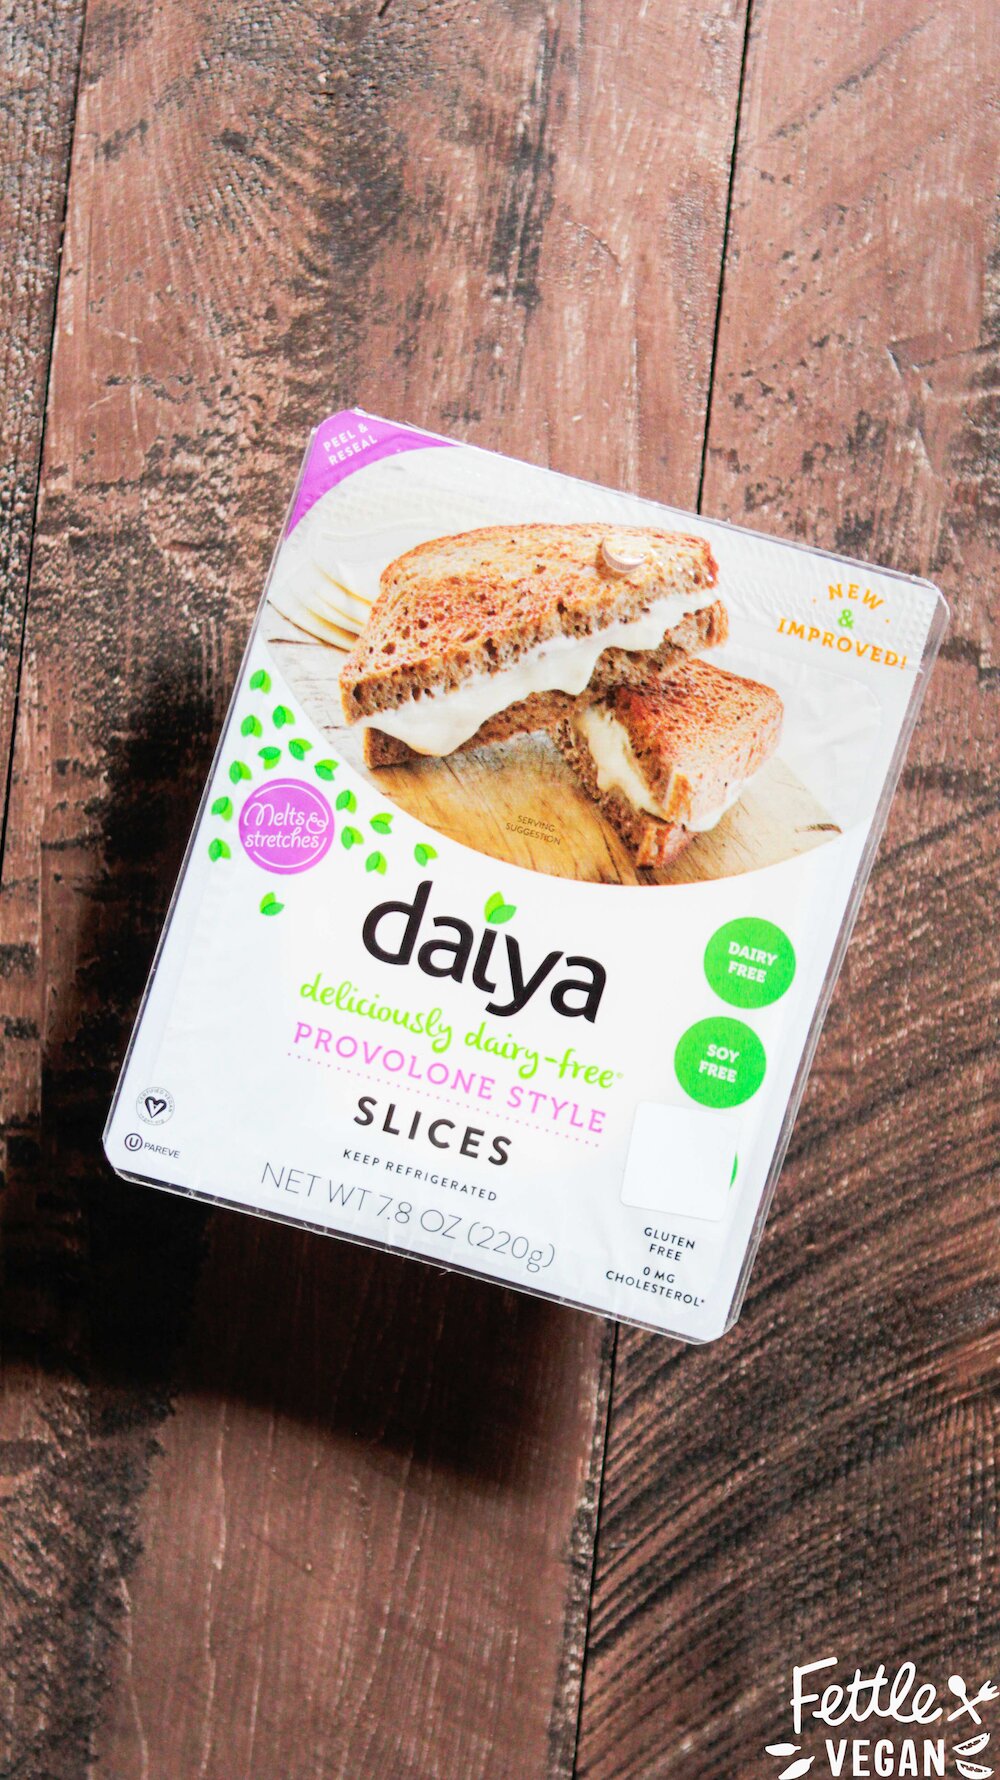
Daiya vegan provolone cheese slices
1 loaf Italian bread or 2 large sub rolls, sliced
1 teaspoon coconut oil
1 medium yellow onion, thinly sliced
1 red bell pepper, thinly sliced
1 teaspoon coconut oil
2 - 20 oz. cans jackfruit, drained and shredded
1/2 cup water
1 large clove of garlic, minced
1 teaspoon liquid smoke
1 teaspoon maple syrup
1 tablespoon white cooking wine
1/2 teaspoon smoked paprika
1/2 teaspoon onion powder
1/2 teaspoon soy sauce
salt + pepper to taste
DIRECTIONS
Place the Daiya slices and sub rolls to the side, you'll need them after the filling is prepared.
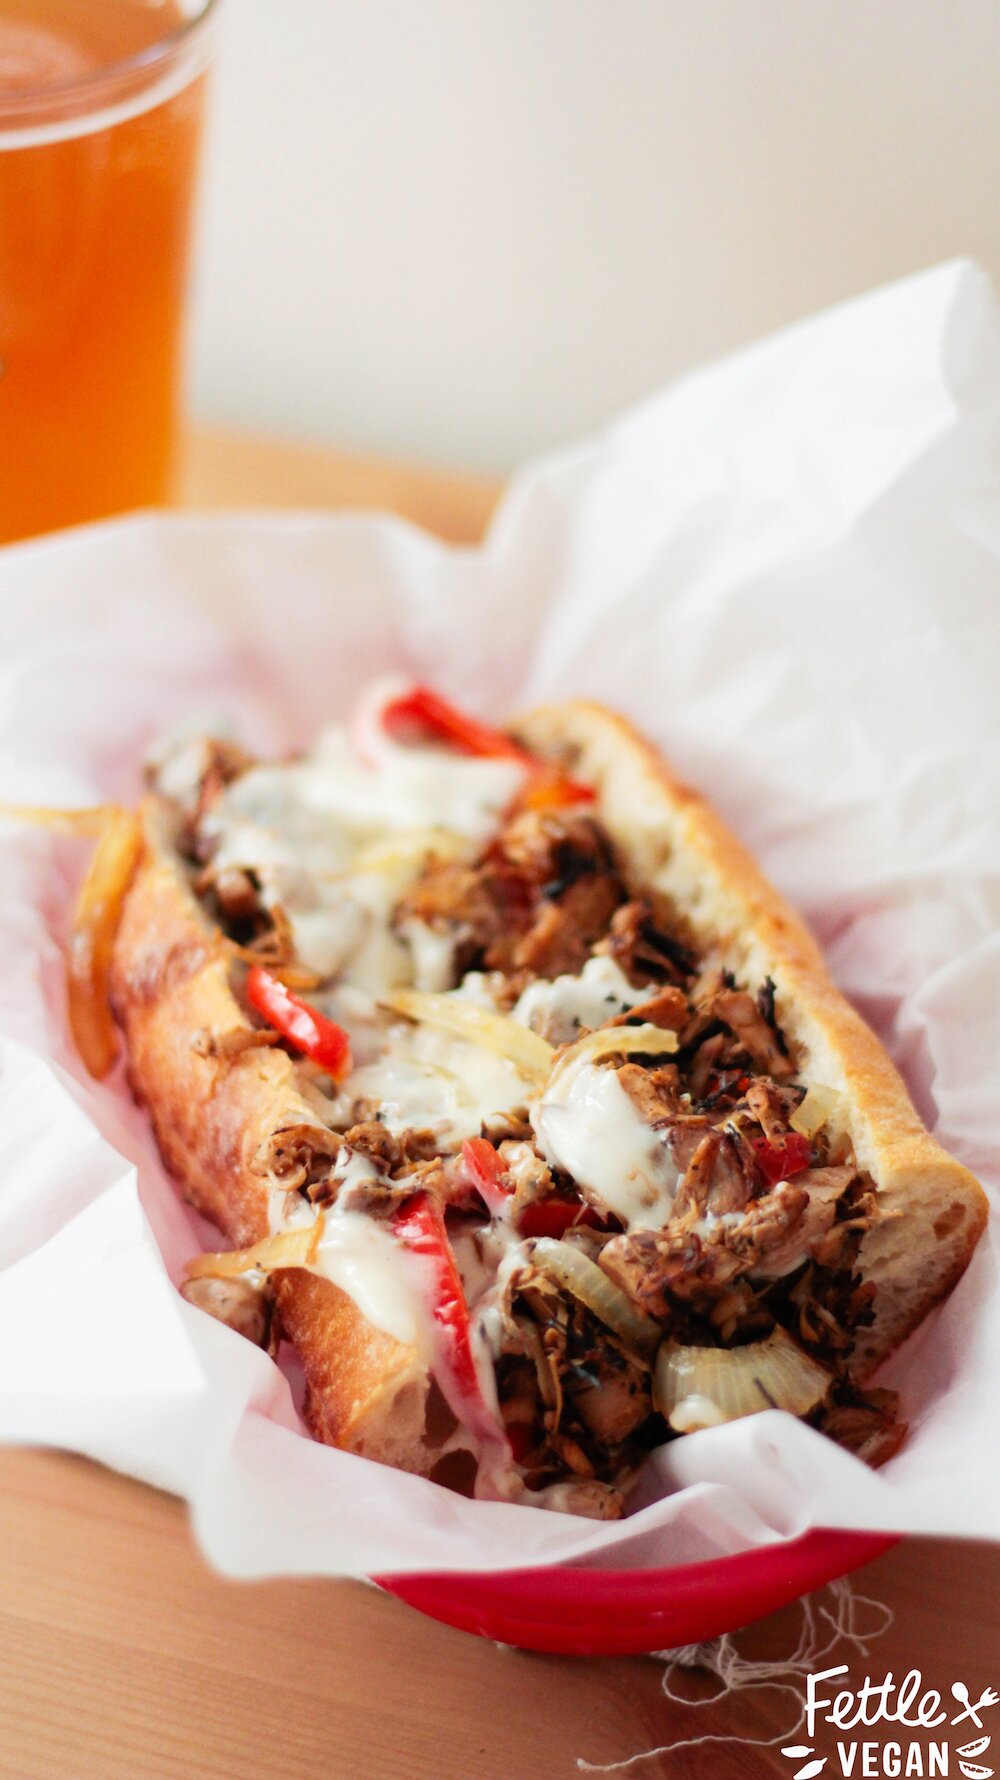
Heat coconut oil in a medium-sized pan over medium heat. Sauté the thinly sliced onions and peppers until softened, about 8-10 minutes. Remove from heat and set aside.
Begin heating the next bit of oil in a large skillet over medium heat. As it heats up, pour in the shredded jackfruit, water, minced garlic, liquid smoke, and maple syrup. Sauté until the liquid reduces to about half, then add the white cooking wine, smoked paprika, onion powder, soy sauce, salt and pepper. Stir to combine, and continue to cook over medium heat until the liquid has completely reduced and the jackfruit is beginning to brown.
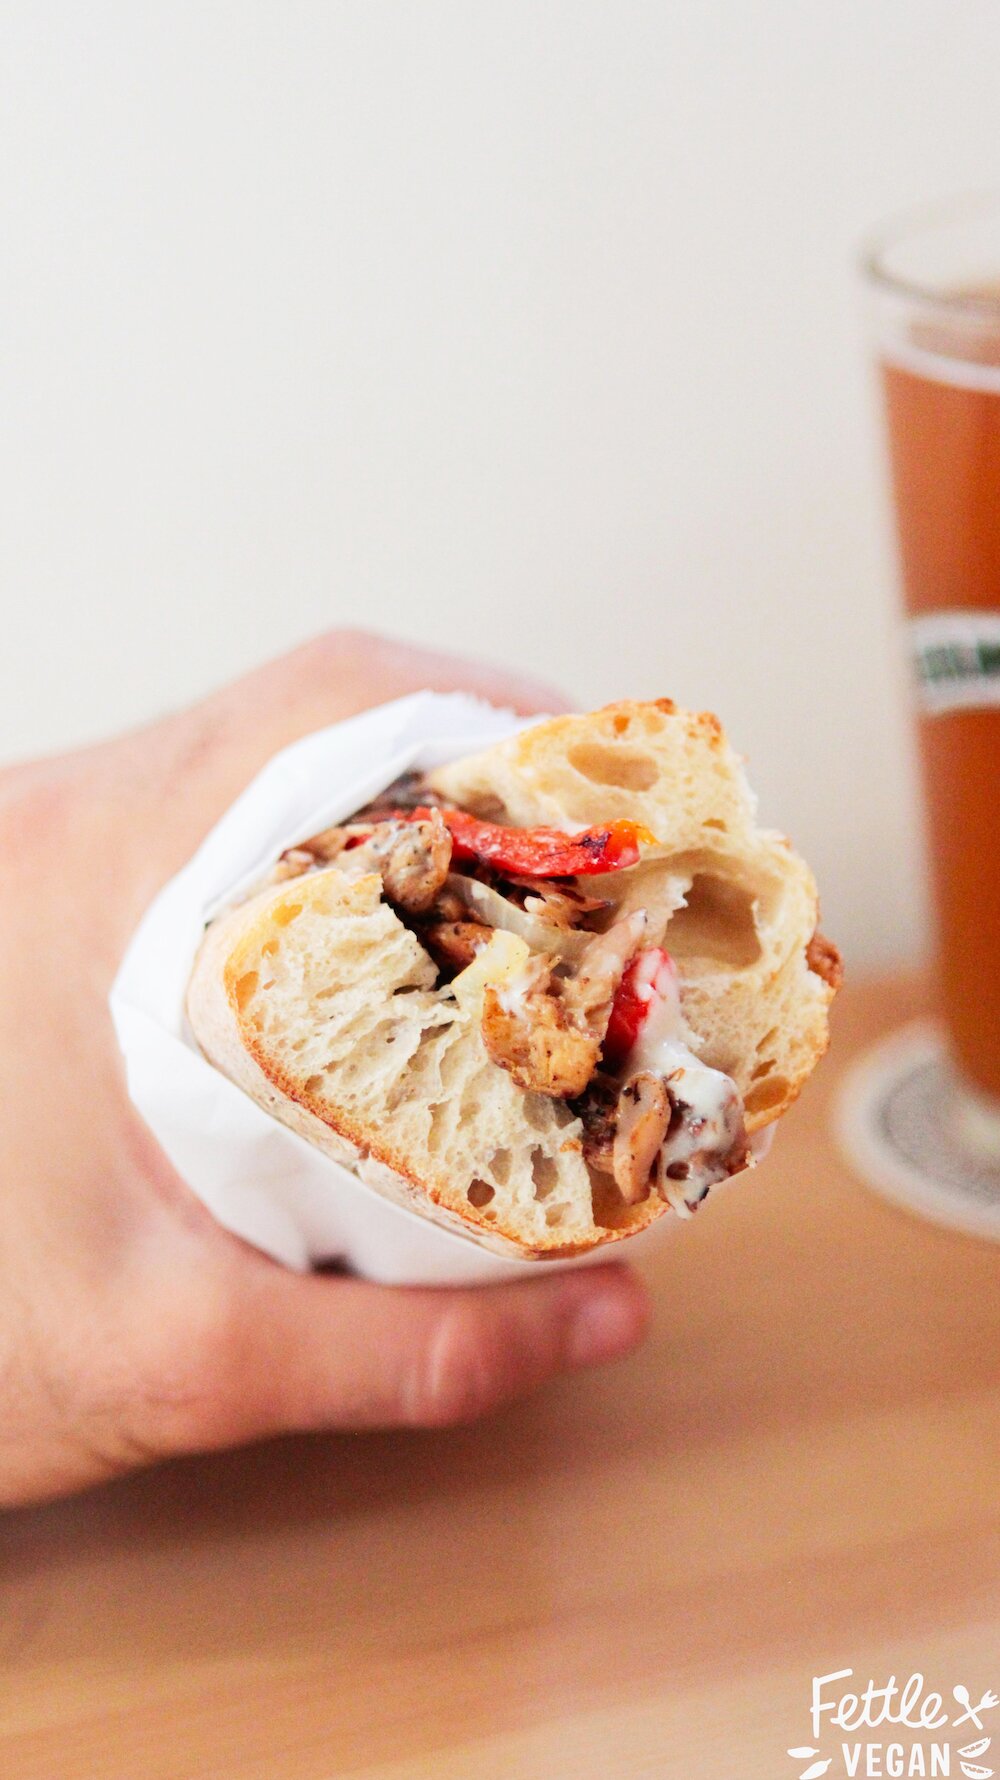
Throw the onions and peppers into the pan with the jackfruit and toss to combine. Line the mixture into a straight line across the middle of the pan. Place Daiya provolone slices onto the mixture (we used 2 per sandwich), then cover the pan with a lid for about 30 seconds to a minute, or until the cheese has become melty on top of the jackfruit mixture.
Use a spatula to scoop the mixture onto your sub rolls and enjoy!
NOTES
Leftover filling will last in the fridge, covered, for a few days.
Traditional cheesesteaks are served on soft bread, but all we could really find was a french baguette. While soft sub rolls are my recommendation, use what you can find.
Homemade Vegan Cheez-It Crackers
3/4 cup all purpose flour
1/4 cup cornmeal
2 tablespoons nutritional yeast
1 teaspoon salt
1/2 teaspoon garlic powder
1/4 teaspoon baking powder
1/8 teaspoon turmeric
5 tablespoons vegan butter
3-4 tablespoons cold water
DIRECTIONS
Preheat the oven to 350º and line a baking sheet with parchment paper.
Add the flour, cornmeal, nutritional yeast, salt, garlic powder, baking powder and turmeric to a food processor and process to thoroughly combine. Add the vegan butter and pulse until crumbly.
Add the cold water, a tablespoon at a time, until the dough comes together. Remove the dough from the food processor and form it into a disk. Place the disk onto a lightly floured surface. Lightly dust the top with flour and use a rolling pin to roll it to about 1/8th inch thick. Use a pizza cutter or knife to cut the dough into equal-sized square crackers.
Spread the crackers onto the prepared baking sheet. Bake them for 14-18 minutes or until crispy and golden brown. Makes 60-80 crackers. Save leftovers in an airtight container or bag on the counter up to a week.
Golden Beet Salad with Balsamic + Cashew Ricotta
1/2 cup walnuts, chopped
1 cup raw cashews, soaked in warm water
2 tablespoons water
1/4 teaspoon salt
4 medium golden beets
4 cups arugula
balsamic vinegar, as needed for serving
DIRECTIONS
Preheat the oven to 350º. Spread the chopped walnut onto a lined baking sheet. Bake for 8-10 minutes, stirring once. When finished, set aside to cool.
Soak the raw cashews in warm water for at least 30 minutes. Drain the nuts and pour them into a food processor. Pour in the water and salt and pulse until a fluffy, chunky texture is achieved (similar to ricotta cheese). Set aside.
Trim the ends of the beets, then place them into a medium-sized pot of water. Bring to a boil, then lower heat and cook over medium heat until fork tender, about 20-30 minutes. Drain the water and let cool slightly before using your fingers to slide the skins off. Toss the skins in the compost or trash and thinly slice the cooked beets.
Spread the arugula between two large plates and top with the toasted walnuts, a couple tablespoons of the cashew ricotta, sliced golden beets and a drizzle of balsamic vinegar. Serve immediately! (Or, just prep it and take it for lunch to work all week!)
NOTES
Serves 2.
Leftovers last up to a week in the fridge.
Party-Sized Jackfruit Nachos!
This is a dish you won't want to share - it is THAT good! Which is also why we supersized it, so maybe it'd make it juuuuust a little easier to share? No matter what team you're rooting for, you'll be glad you made these nachos to munch on...and so will your guests!
1 large bag of tortilla chips
1- 15 ounce can black beans, drained
2- 20 ounce cans of jackfruit (in brine), prepared and cooked to our Jack Asada recipe instructions
1-2 cups homemade queso cheese (or sub whatever dairy-free cheese you prefer), warmed
1/2 cup red onion, chopped small
1/2 cup black olives, sliced
1/4 cup fresh cilantro, chopped
the BEST guacamole, for serving
limes, for garnish
DIRECTIONS
Preheat the oven to 375 degrees. Line a baking sheet with parchment paper (or aluminum foil).
Spread the tortilla chips evenly over the baking sheet and scatter the drained black beans over the top. Layer the seasoned, cooked jackfruit evenly over the top, then place the baking sheet in the oven for 10 minutes heat the chips, beans and jackfruit together.
When finished, pull the baking sheet from the oven and immediately top with the queso cheese, chopped red onion, black olives, cilantro and guacamole. Serve immediately!
NOTES
Save time by preparing the jackfruit and queso a day ahead, then just reheat as necessary!
If you use a different cheese (daiya, for example) we would recommend adding the cheese layer BEFORE baking so it melts while in the oven.
Add whatever other toppings you like! Some suggestions? Cabbage, salsa, hot sauce, green onions, jalapeños, tomatoes!

Potato Leek Gratin
Looking for more with potatoes? Try our super popular Potato Leek Soup, Celeriac Mashed Potatoes, or Classic Backyard Potato Salad!
2 lbs. gold potatoes, thinly sliced
2 tablespoons coconut oil
4 large leeks, trimmed and thinly sliced
4 cloves garlic, minced
3 sprigs fresh rosemary
1 teaspoon salt
1/2 teaspoon pepper
1 cup unsweetened almond milk
1 - 14 oz. can full-fat coconut milk
1/2 cup nutritional yeast
3 tablespoons corn starch
2 tablespoons fresh rosemary, chopped
1/2 teaspoon salt
1/4 teaspoon pepper
1/4 cup homemade parmesan cheeze, to garnish the top
DIRECTIONS
Preheat oven to 375 degrees.
Thinly slice potatoes and layer them into a greased 9x13 inch baking dish.
Heat the coconut oil in a large cast iron pan over medium heat. When melted, sauté the leeks, garlic, and fresh rosemary over medium heat. Season with the salt and pepper and cook until softened and fragrant, about 5 minutes. [Take care NOT to burn the garlic + leeks- they don't taste good.] Remove the pan from heat, toss the rosemary stems, and pour the garlic leek mixture over the sliced potatoes in the casserole dish.
In the same pan you used to cook the leeks and garlic, whisk together the almond + coconut milks, nutritional yeast, corn starch, fresh chopped rosemary, salt and pepper. Cook over medium heat, stirring occasionally, until the mixture thickens - about 5 minutes. Pour this mixture over the leek and potatoes in the casserole dish and use a spoon to gently smooth it over the top, letting it fill the crevices between the veggies.
Sprinkle parmesan cheeze over the top and bake for 30-35 minutes, until the mixture is golden and bubbling. Serve + enjoy!
NOTES
Serves 8.
Leftovers save well in an airtight container in the fridge up to a week.
Savory Stuffed Mushrooms
Anyway, a friend brought some stuffed mushrooms to that holiday party a few years ago, I tried them, and before I knew it I was popping button mushrooms in my mouth like they were going out of style. I was hooked! But that was over two years ago, and this is the first time I've made a stuffed mushroom recipe since that is just so out of this world I had to share it with you guys. I know there are tons of recipes for this dish online, but I promise this one is really good. And pretty easy, too! It's packed with flavor, the filling has great texture, and the homemade parmesan cheese on top adds some fanciness and helps keep the filling moist. The whole things comes together in your mouth like WOAH. This is a recipe worthy of sharing at your next Holiday party - it's a serious crowd-pleaser! Let's get cookin'.
Stuffed Mushrooms:
24 ounces cremini mushrooms, stems removed
2 tablespoons coconut oil
4 cloves garlic, minced
2 shallots, chopped
4 cups fresh spinach
1 cup wild rice, cooked
1/2 cup roasted red peppers, chopped
1/2 cup walnuts, finely chopped
1/2 cup bread crumbs
1/2 cup fresh parsley, chopped
1 tablespoon + 2 teaspoons balsamic vinegar
1 teaspoon salt
1/2 teaspoon pepper
fresh chopped parsley, for garnish
Parmesan Cheeze:
1 cup cashews
1/4 cup nutritional yeast
3/4 teaspoon salt
1/4 teaspoon garlic powder
DIRECTIONS
Preheat oven to 375 degrees.
Gently wash the mushrooms and remove the stems. Place them cap down onto a lined baking sheet and set aside.
In a large cast iron pan, melt the coconut oil over medium heat. Sauté the garlic and shallots until soft and fragrant, about 5 minutes. Add the spinach, stirring continuously until it has wilted.
Remove the pan from heat and pour the cooked veggies into a large mixing bowl. Stir in the wild rice, roasted red peppers, walnuts, bread crumbs, parsley, balsamic vinegar, salt and pepper. Toss the mixture together and set it aside to cool for a few minutes.
While the mixture cools, you can prepare the parmesan cheeze by placing all of the ingredients into a food processor and pulsing until the mixture becomes a fine meal. Save some (about 1/4-1/2 cup) to sprinkle over the mushrooms and save the rest in an airtight container in the fridge up to 2 weeks.
When the mixture has cooled enough to handle, use a spoon, ice cream scoop, or your fingers to scoop the mixture into the cap of each mushroom. The amount you use will vary depending on the size of the mushroom cap. Once all the caps are filled, sprinkle the reserved parmesan cheeze over the top.
Bake the stuffed mushrooms for 20-25 minutes, until tender. Remove from the oven, let cool slightly, and serve immediately!
NOTES
It was hard to come up with just how many people this serves since it really depends on how big the shrooms are, how many people are around, and how many each person eats BUT this recipe gave me 1 packed baking sheet full of stuffed mushrooms.
Leftovers can be saved in the fridge up to 3 days. They are best reheated in a microwave or in an oven at about 350 degrees for 10-15 minutes, though they may get slightly softer after reheating.
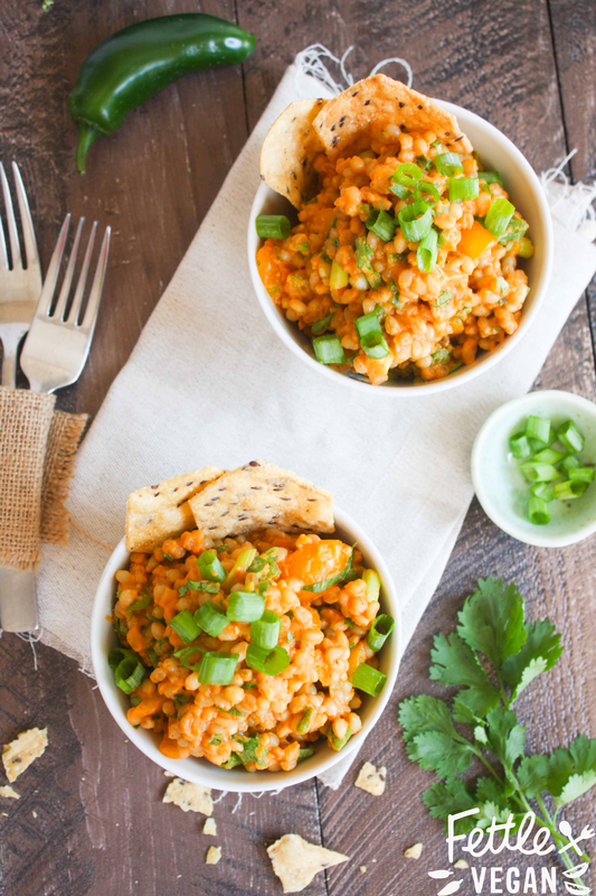
Mexican Wheat Berry Salad
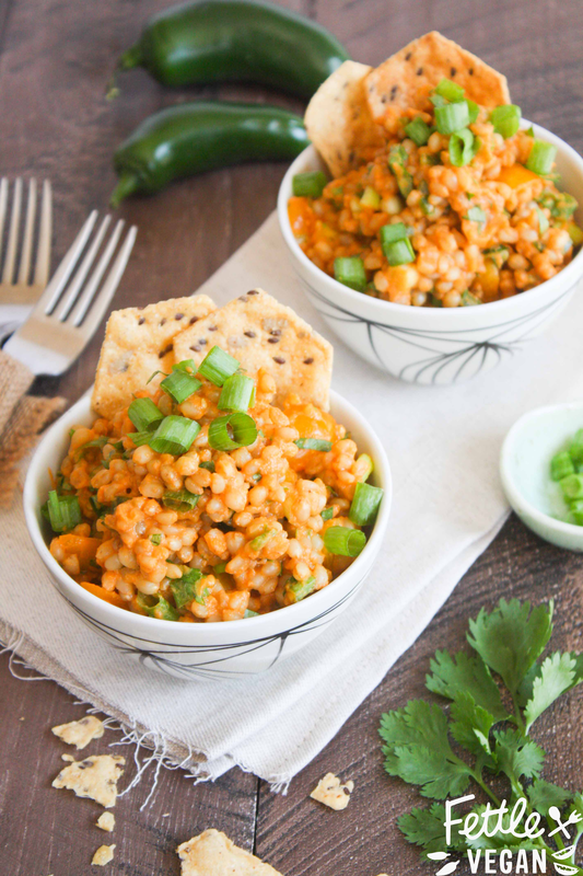

3/4 cup hard wheat berries
3 cups water
1/2 cup Queso Cheeze
1-2 tablespoons jalapéno, chopped
1/2 cup tomatoes, diced (we used yellow tomatoes from the garden!)
1/2 cup green onion, sliced
2-3 tablespoons chopped cilantro
juice of 1 lime
chips for scooping (optional)
DIRECTIONS:
In a medium sized pot, boil wheat berries in water for about an hour, until the berries become soft enough to eat. Drain the water, and set the wheat berries aside to cool.
If you haven't prepped the queso cheese, go ahead and do that. If you have, move on to the next step.
Prep jalapeños, tomatoes, green onion, and cilantro.
When wheat berries have cooled, mix in queso cheeze, jalapeños, tomatoes, green onion (save a little for garnish, if you like), chopped cilantro, and the juice squeezed from 1 lime. Mix with a wooden spoon to combine, garnish with remaining green onion, and serve with chips! Makes about 2 cups, serves 4. This dish will save well in the fridge for up to a week. Enjoy!
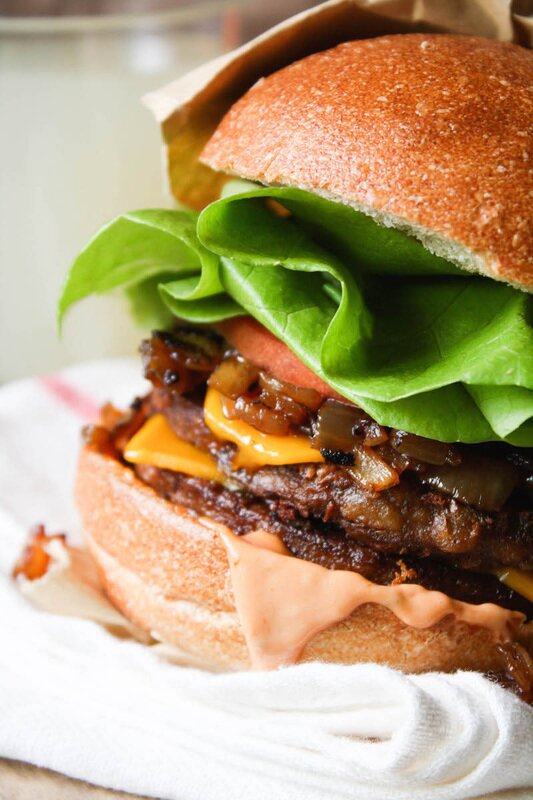
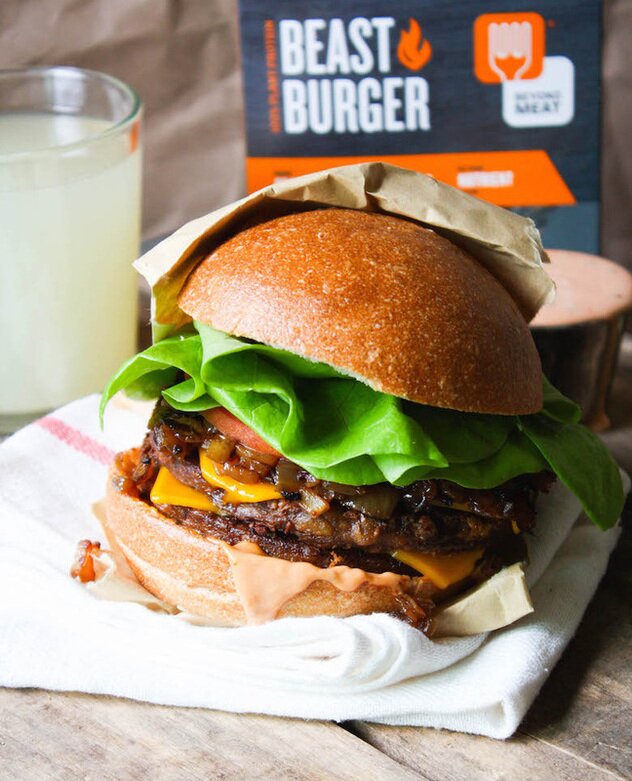
In-n-Out Copycat Recipe:
Double Double NO Animal Style!
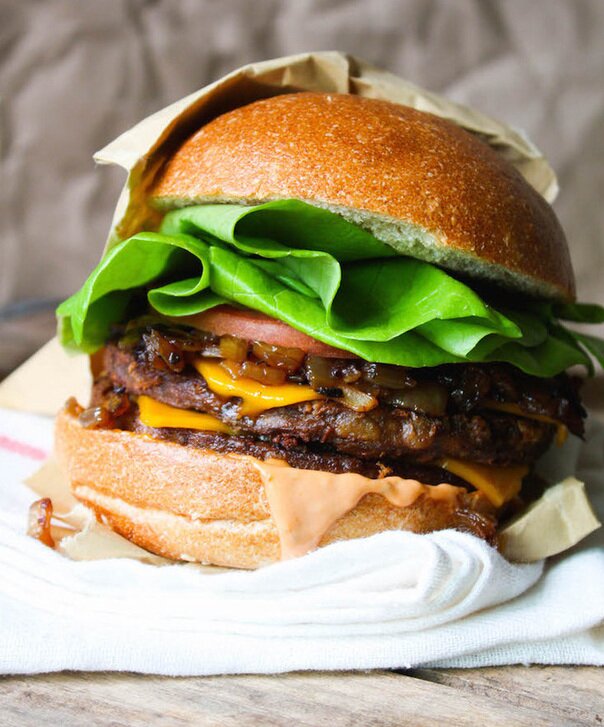
As the base for this burger, we used the amazingly meaty new patty from Beyond Meat, the BEAST BURGER. Yup. The beast burger. Its totally beastly, and would totally fool even the most regular of beef burger eaters. And it was the perfect substitute in this burger. It kept the flavorful, umami taste of a normal In-n-Out burger, but doesn't leave you feel guilty after eating a double stack. We slathered it in homemade 'sauce' and topped it with fresh slices of tomato and lettuce. Craving a juicy burger? Let's do this!
Spread
1/2 cup vegan mayo
2 tablespoons ketchup
2 tablespoons relish
2 tablespoons white or apple cider vinegar
1 teasoon lemon juice
salt + pepper to taste
Onions
1 tablespoon oil
1/2 large white onion, diced
1/4 each salt + pepper
4-5 tablespoons cold water
Burgers
1 teaspoon oil
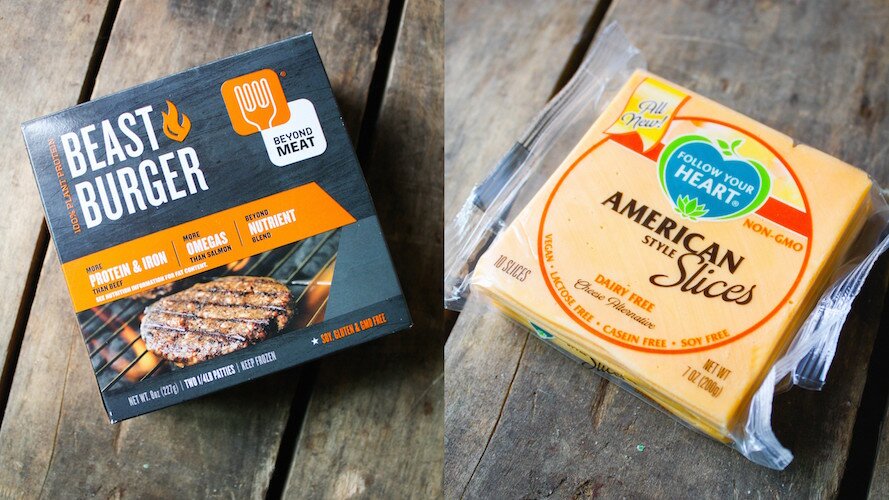
2 Beyond Meat Beast Burger patties
2 slices vegan american cheese (we used Follow Your Heart slices)
2 tablespoons mustard
4 dill pickle slices (optional)
2 seedless burger buns
DIRECTIONS
Spread
In a small mixing bowl combine mayo, ketchup, relish, vinegar, lemon juice, salt and pepper. Mix well to combine. Set aside.
Onions
Heat oil in a medium cast iron pan over medium heat. Add diced onion, salt, and pepper. Cook, stirring occasionally, adding 1 tablespoon of water each time onions begin to dry out. Repeat this process until onions are dark brown, soft, and caramelized. Keep warm on low heat or set aside.
Burgers
In the same or another large frying pan, heat oil over medium heat. Place two patties on the pan, and slather the top of each patty with 1 tablespoon mustard. Cook about 2 minutes on now side, until the patty is beginning to brown and crisp. Flip, add a slice of cheese to each patty, and fry patties in the mustard for another 2 minutes or so, until cheese is melted. While burgers cook, place buns bottom side down in a greased frying pan and heat about 1 minute on each side, until edges just begin to crisp.
Remove from heat, and top with spread, pickles, burgers, onions, tomato and lettuce. Then EAT!
tags
All
Acai
Alcohol
Almond Cream
Almonds
Apple
Aquafaba
Artichoke
Arugula
Avocado
Bacon
Baked
Balls
Balsamic
Banana
Bars
Basil
Bbq
Beans
Beets
Berries
Biscuits
Blondies
Blood Orange
Blueberries
Bok Choy
Bowls
Bread
Breakfast
Broccoli
Broccoli Slaw
Brownies
Bruschetta
Brussels Sprouts
Buffalo
Burger
Burrito
Buttercream
Butternut Squash
Cabbage
Cacao
Cajun
Cajun Spice
Cake
Candy
Caprese
Cardamom
Carob
Carrot
Cashew Creme
Cashews
Cauliflower
CBD
Celeriac
Celery
Cereal
Champagne
Charcoal
Cheese
Cheesecake
Cheesesteak
Cheeze
Cherimoya
Cherries
Chia Pudding
Chia Seeds
Chicken
Chickpeas
Chili
Chips
Chocolate
Cider
Cilantro
Cinnamon
Clafoutis
Coconut
Coconut Milk
Coconut Water
Coffee Cake
Cookie Bars
Cookie Butter
Cookie Cake
Cookies
Cooking Tips
Crackers
Cranberries
Cream Cheese
Crumble
Cucumber
Cupcakes
Dates
Dill
Dinner
Dip
Donuts
Dough
Dressing
Drinks
Easter Eggs
Falafel
Faux Cheese
Faux Meat
Figs
Flatbread
Flax
Fluff
Fondant
French Toast
Fried
Fries
Frosting
Fruit
Fudge
Galette
Garam Masala
Garlic
Ginger
Gingersnaps
Glaze
Gluten Free
Goji Berries
Golden Berries
Golden Milk
Grain Free
Gratin
Gravy
Green Tea
Grinder
Guacamole
Halloween
Hazlenuts
Hearts Of Palm
Hemp Milk
Hemp Seeds
Hemp-seeds
Holidays
Homemade
Honey
Hormone-balancing
Hot Sauce
Hummus
Ice-cream
Jackfruit
Jalapenos
Jam
Jicama
Juice
Kale
Kettle Corn
Kimchi
Kung Pao
Lasagna
Latte
Lavender
Leeks
Leftovers
Lemon
Lettuce Wraps
Lime
Low Sugar
Macadamia Nuts
Mango
Maple
Maple Syrup
Marshmallow
Masa Harina
Matcha
Mayo
Meals
Mediterranean
Milkshake
Mint
Miso
Molasses
Monk Fruit Sweetener
Muffins
Mushrooms
Nachos
Noodles
Not Vegan
Nut Butter
Nutmeg
Nutritional Yeast
Oatmeal
Oats
Olives
Onions
Orange
Pancakes
Panini
Parsley
Pasta
Peaches
Peanut Butter
Pears
Peas
Pecan
Pepitas
Peppermint
Peppers
Persimmon
Pesto
Phyllo
Pickled
Pie
Pilaf
Pineapple
Pine Nuts
Pita
Pizza
Polenta
Pomegranate
Popcorn
Potatoes
Protein
Pudding
Pumpkin
Queso
Quinoa
Radish
Rasins
Raspberries
Raw
Red Bean
Rhubarb
Rice
Ricotta
Rightrice
Roasted
Rolls
Romanesco
Rosemary
Sage
Salad
Sandwich
Sangria
Sauce
Savory
Scones
Seitan
Sesame
Shallot
Shoshito Peppers
Side Dish
Slaw
Sliders
Smoky
Smoothies
S'mores
Snacks
Soba
Soup
Spicy
Spinach
Spread
Squares
Squash
Sriracha
Stevia
Stone-fruit
Strawberry
Streusel
Strudel
Stuffed Peppers
Stuffing
Sugar Cookies
Sugar Free
Sunbutter
Sweet Potato
Sweets
Tacos
Tahini
Tart
Tea
Tempeh
Thumbprint
Thyme
Tigernuts
Tofu
Tomato
Tomatoes
Tortillas
Turmeric
Vanilla
Veganized
Vegetarian
Vegg- The Vegan Egg Yolk
Vinaigrette
Vinegar
Waffles
Walnuts
Wheat Berries
Whiskey
White Chocolate
Wrap
Yeast
Yogurt
Zucchini
 RSS Feed