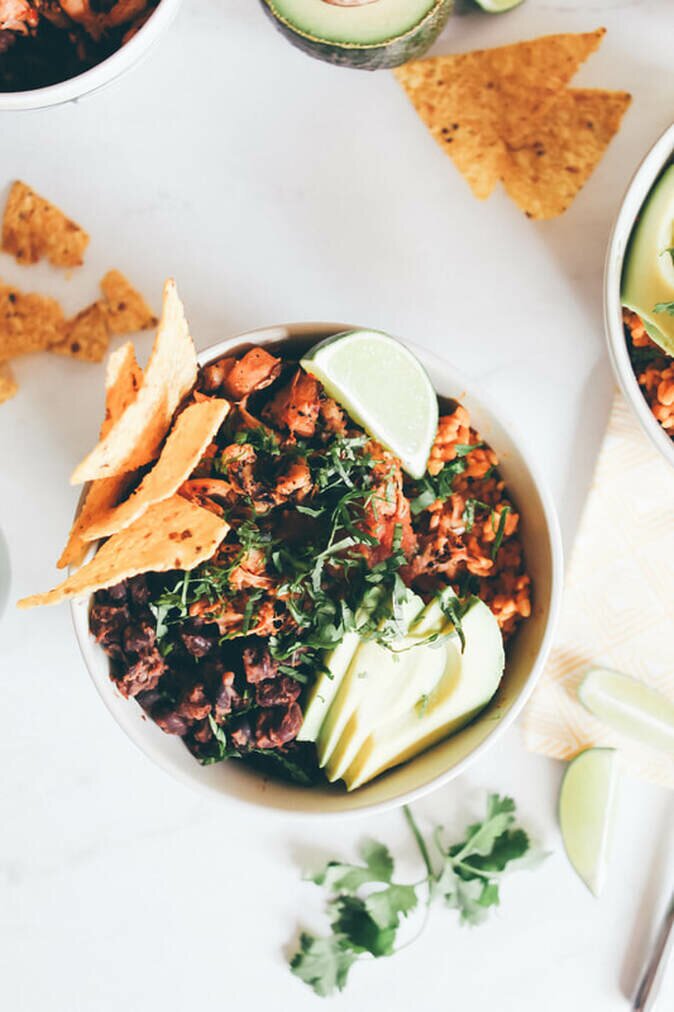
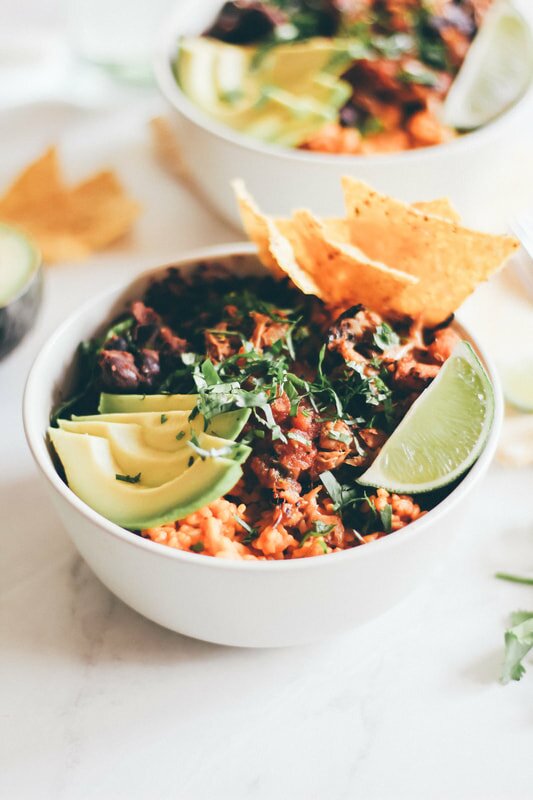
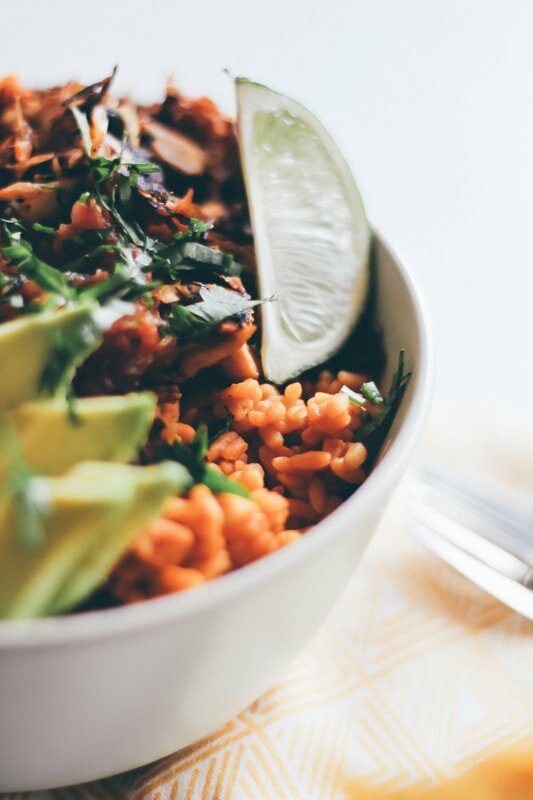
Jackfruit Burrito Bowls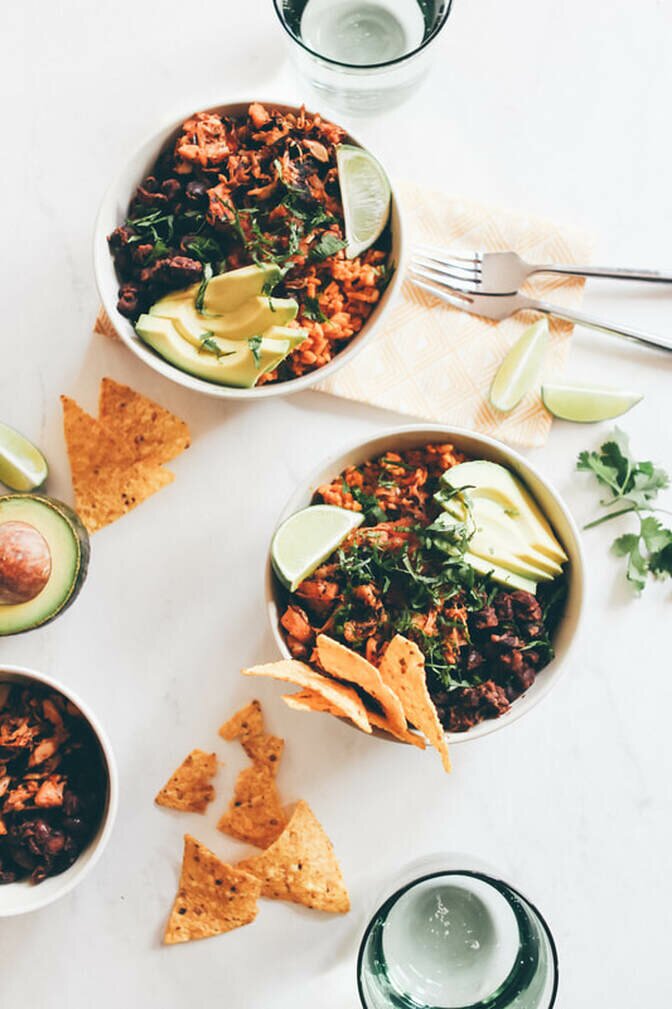
I didn't eat a ton of Mexican-inspired dishes growing up on the East Coast, and when I did they involved a lot of weird things like black olives and shredded mozzarella cheese. Eep. Now that I've been a California resident for officially a decade, I have a much finer appreciation for traditional Mexican dishes - and a serious love for hot hot salsa. When I want something a little spicy, my go-to is almost always tacos; but sometimes, you just need to mix it up - or in this case, you just happen to be out of tortillas! Which is fine, because even bowl style with crunchy corn tortilla chips and jackfruit instead of carne asada, these bowls are still so so much better and - dare I say - much closer to the original. I took all my favorite ingredients and tucked them into one bowl, and it's a simple one to toss together, too. The jackfruit is a great option for meat-free friends or meatless Monday meal inspiration, and the addition of RightRice as a protein / carb base elevates the flavor and takes the nutritional punch of the dish to the next level. Plus, it's easy to make for two or to pack half for lunch leftovers!
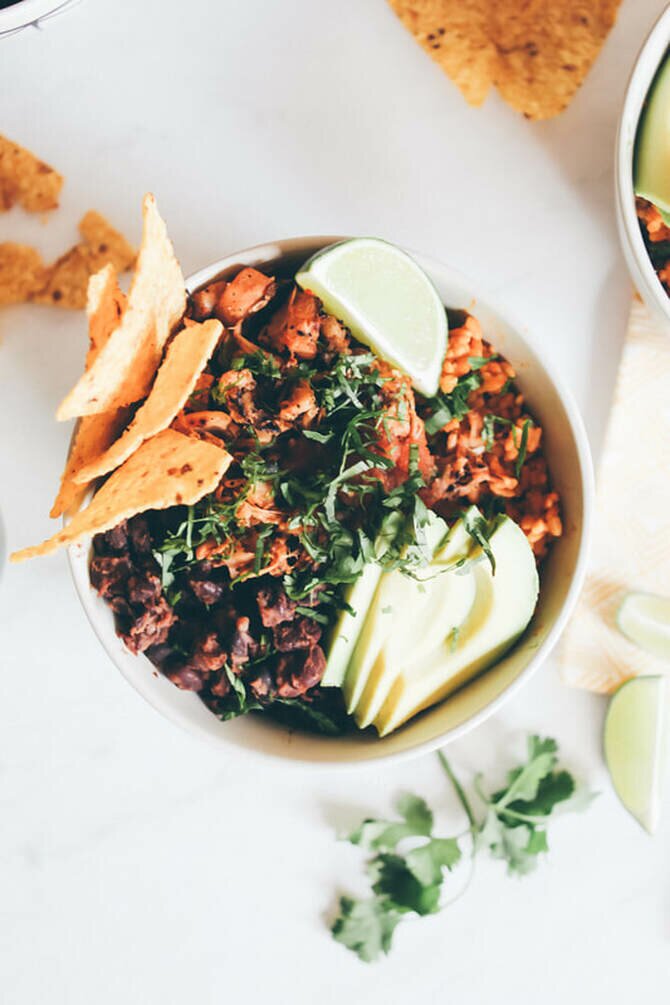
The big key here is really keep your ingredients as fresh as possible. There's just something about limp, wilted cilantro and browning avocados that makes any meal look sad and like it should've been served up days earlier. Plus, little customizable add-on's to the dish like corn chips, lime slices, and hot sauce can take your bowl from chipotle-style to personal chef status realllll quick. And THAT means meal prep for the week just got a lot more exciting. Get it, girl. Recipe below!
Ingredients:
-1 bag of Spanish RightRice (or use brown rice here for another healthy option) -1 10 oz package of Upton’s Chili Lime Jackfruit (or buy and season your own) -1 15 oz. (445 ml) can black beans -1 tablespoon lime juice -1 teaspoon salt -1 teaspoon chili powder -1 teaspoon cumin -avocado, cilantro, salsa, tortilla chips and limes for topping Directions: Prepare the Spanish Right Rice according to the instructions on the package, then set aside. Sauté the jackfruit in a medium-sized cast iron or frying pan until the edges brown, and set that aside while you cook the black beans. To cook the beans, pour them into a second, smaller pan and add the lime juice, salt, chili powder, and cumin. Add a splash of water and cook over medium heat, stirring occasionally, until heated through. When your beans are done, it’s time to construct the bowls! To prep the bowls, layer in Spanish Right Rice, jackfruit, and black beans. Top with avocado slices, chopped cilantro, and salsa. Serve tortilla chips and limes on the side for garnish and flavor. Serves 2. Enjoy! 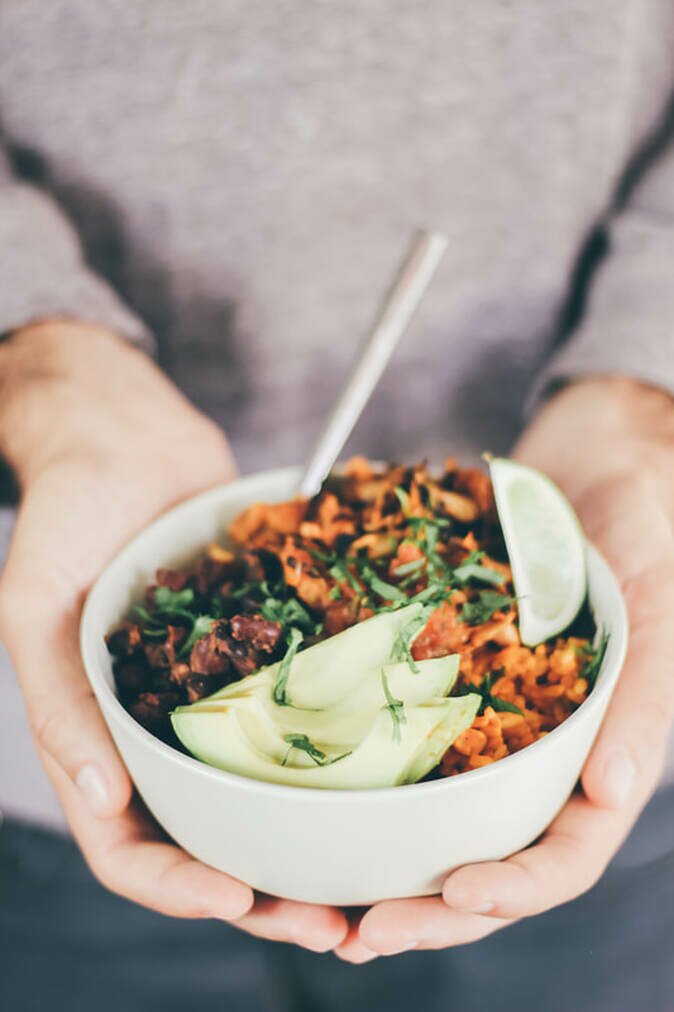
Dang - I LOVE a good bowl, and this is a really great bowl! I can't wait to hear what you think, especially if you try it with the RightRice - I have been loving it as a sub for regular rice a few times a week for something different and a little more well rounded nutritionally, especially now that I'm working out so much more often. What are your favorite healthy food / snack subs?? Would love to hear how you switch it up in the comments below. Enjoy, babes!
0 Comments
Comfort Food That Loves You Back:
|
|
|
|
1. Don't over-handle the dough! Keep your handling of the dough to a minimum until you're ready to stretch it out, and even then don't fold the dough in on itself after separating into two doughs, even though it's tempting. You want your dough to have some lightness and air or you'll have a stiff, too chewy crust.
2. Bake your pizza at 450 degrees F or more. The higher the temperature, the better. Seriously - if your oven gets to 700 degrees, go for it. You'll adjust cooking times properly, so start with about 10 mins and go from there. When the crust is golden to preference and lifts in one solid piece from the pan, you're ready to eat.
3. Shred your cheese, or break in into smaller pieces to ensure even melting - especially if you're using vegan cheese, which tends to be less melty. Our favorite brand to use is Miyoko's Vegan Mozzarella.
4. Once your crust is tossed and spread onto your baking surface, use a fork to poke small holes evenly around the crust to reduce air bubbles forming in the crust.
5. Use a high-quality baking surface. We use a large steel pizza pan, but anything that will heat and cook evenly will work great! We use flour to prevent the dough sticking to the pan.
Now, let's EAT! Scroll on for my dough recipe - there's a printable there version, too!
INGREDIENTS
2 1/4 teaspoons (7 g) active dry yeast
1 1/2 cups (360 ml) warm water
3 1/2 cups (525 g) all purpose flour, plus more as needed
2 teaspoons (6 g) salt
1 teaspoon sugar
2 tablespoons (30 ml) olive oil, plus more for greasing
DIRECTIONS
Pour the yeast and warm water into a small bowl and stir. Set aside for 5 minutes.
In a stand mixer combine the flour, salt and sugar. Pour in the yeast mixture and the olive oil and using the bread hook attachment, knead the mixture together until it comes together and forms a ball. If the dough seems too sticky, add flour as needed. If it’s too dry, add a bit of water.
Move the dough to a lightly floured surface and knead into a smooth, firm, ball. Grease the inside of the mixing bowl lightly and place the dough back inside. Cover with plastic wrap or a clean dishtowel and place in a warm place to double in size, about 1-2 hours.
When ready, turn the dough to a lightly floured surface and, handling as little as possible, cut the dough into 2 equal pieces. Let them rest for 10 minutes before tossing and stretching for pizza!
NOTES
Makes 2 doughs.
Dough can be refrigerated up to two days or frozen indefinitely.
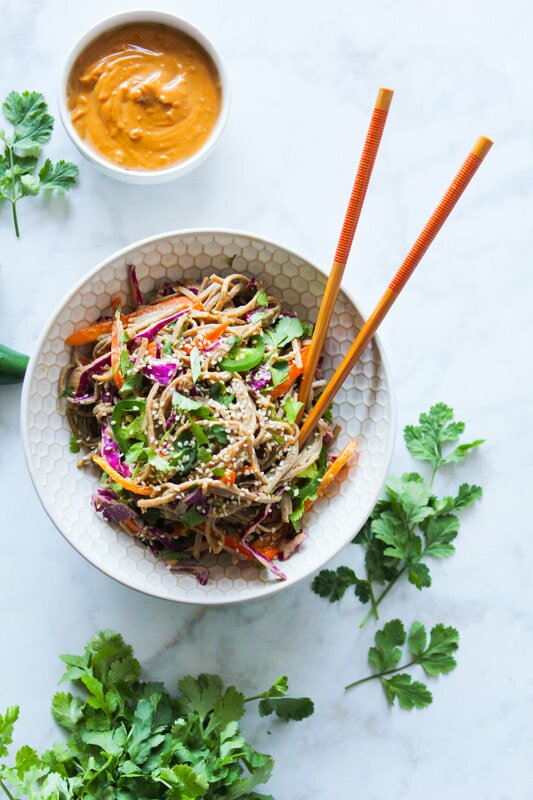
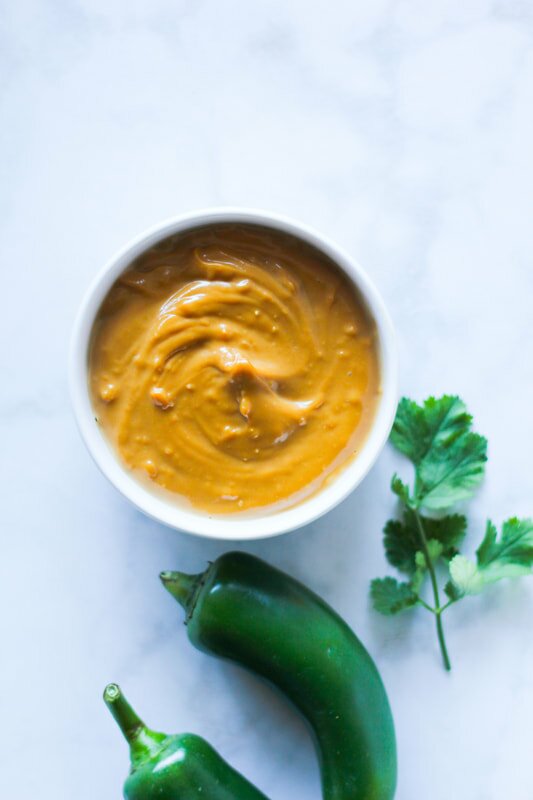
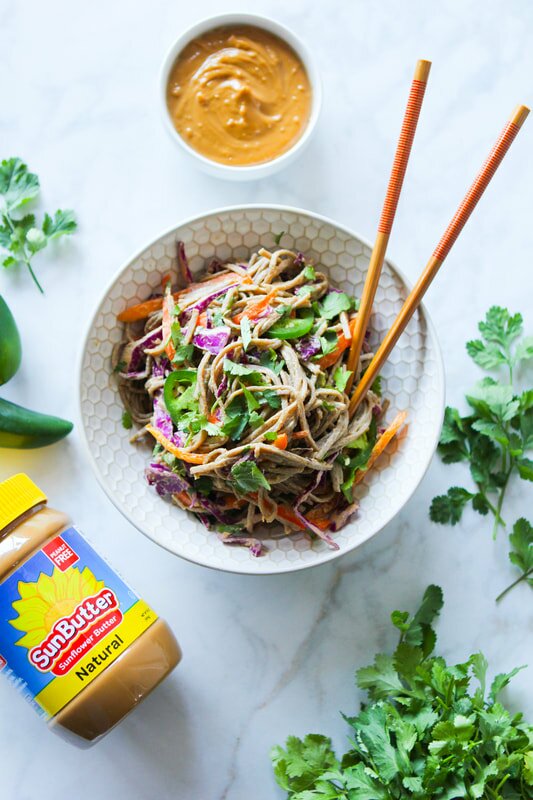
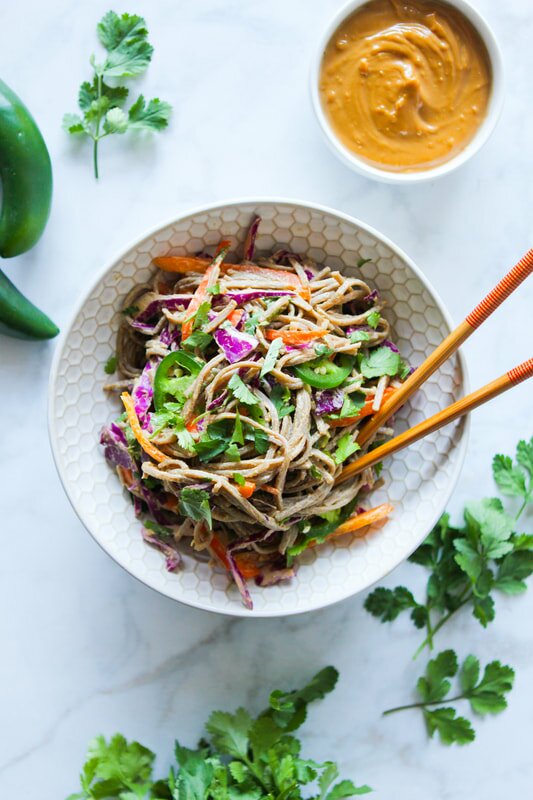
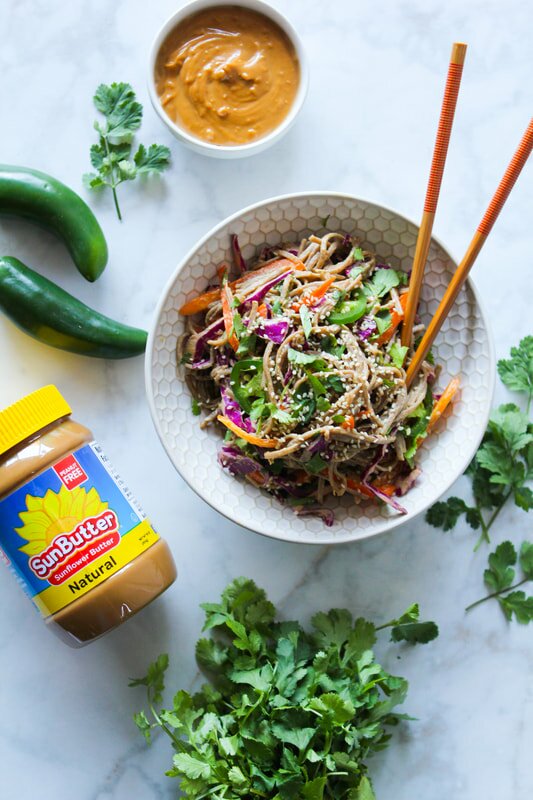
Chilled SOBA NOODLE SALAD WITH SUNBUTTER SAUCE
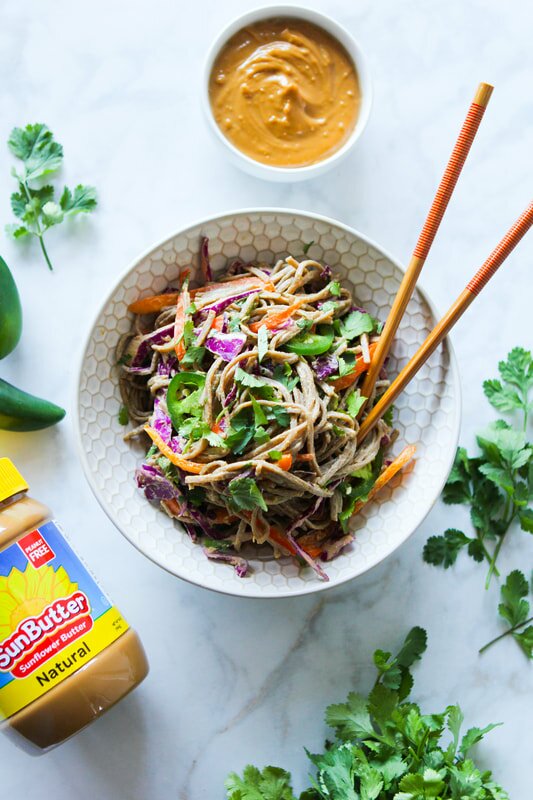
One of my favorite cold salad options is a soba noodle salad. I had my first one years ago and have loved the simplicity ever since. Cold, sturdy, wheat-based soba noodles boiled to perfection and chilled, then tossed with a sweet, tangy peanut sauce and fresh, crisp veggies - the perfect lunch or dinner! However, as someone with a few food allergies herself, I get that those delicious peanut sauces aren’t especially delicious or functional for people with nut allergies. So I’ve partnered with my pals over at SunButter to create a totally nut-free version of one of my favorite dishes - simplified and paired down to the easiest version BUT that still tastes like the traditional version - so you can be eating in no time!
|
|
To get started, all you’ll need is your favorite jar of SunButter, some quality soba noodles, and your favorite uncooked veggies. Let’s get cooking!
|
|
SunButter Sauce:
1/2 cup Natural SunButter
2 tablespoons fresh lime juice
1 tablespoon coconut aminos
1/2 teaspoon maple syrup
1/4 teaspoon sesame oil
1 1/2 teaspoons fresh ginger, grated
2 cloves garlic, minced
3-6 tablespoons water
Soba Noodle Bowl:
6 oz whole wheat soba noodles
2 cups red cabbage, thinly sliced
1 1/2 cup bell pepper, thinly sliced
1 cup carrot, thinly sliced
1 jalapeño, thinly sliced
1/4-1/2 cup cilantro, roughly chopped
sesame seeds, for garnish
DIRECTIONS:
In a small bowl, whisk together the SunButter, lime juice, coconut aminos, maple syrup, sesame oil, fresh ginger, and garlic. Once combined completely, begin adding in water 1 tablespoon at a time, until mixture becomes smooth and creamy. Add water until the sauce is your preferred texture. Set aside.
Cook the soba noodles to directions on package. Remove from heat, strain, and run under cold water until the noodles are no longer hot to the touch. Place the noodles into a bowl and into the fridge to chill while you prep the veggies.
Thinly slice your cabbage, bell pepper, carrot, jalapeño and cilantro and toss them into a large mixing bowl. Pour your SunButter Sauce over the veggies and toss to combine. Throw in the chilled soba noodles and gently toss again to combine. Top with a little extra chopped cilantro and sesame seeds for garnish and enjoy immediately!
NOTES:
Serves 4-6.
Leftovers last 3 days in the fridge.
Sub in whichever favorite veggies you prefer!
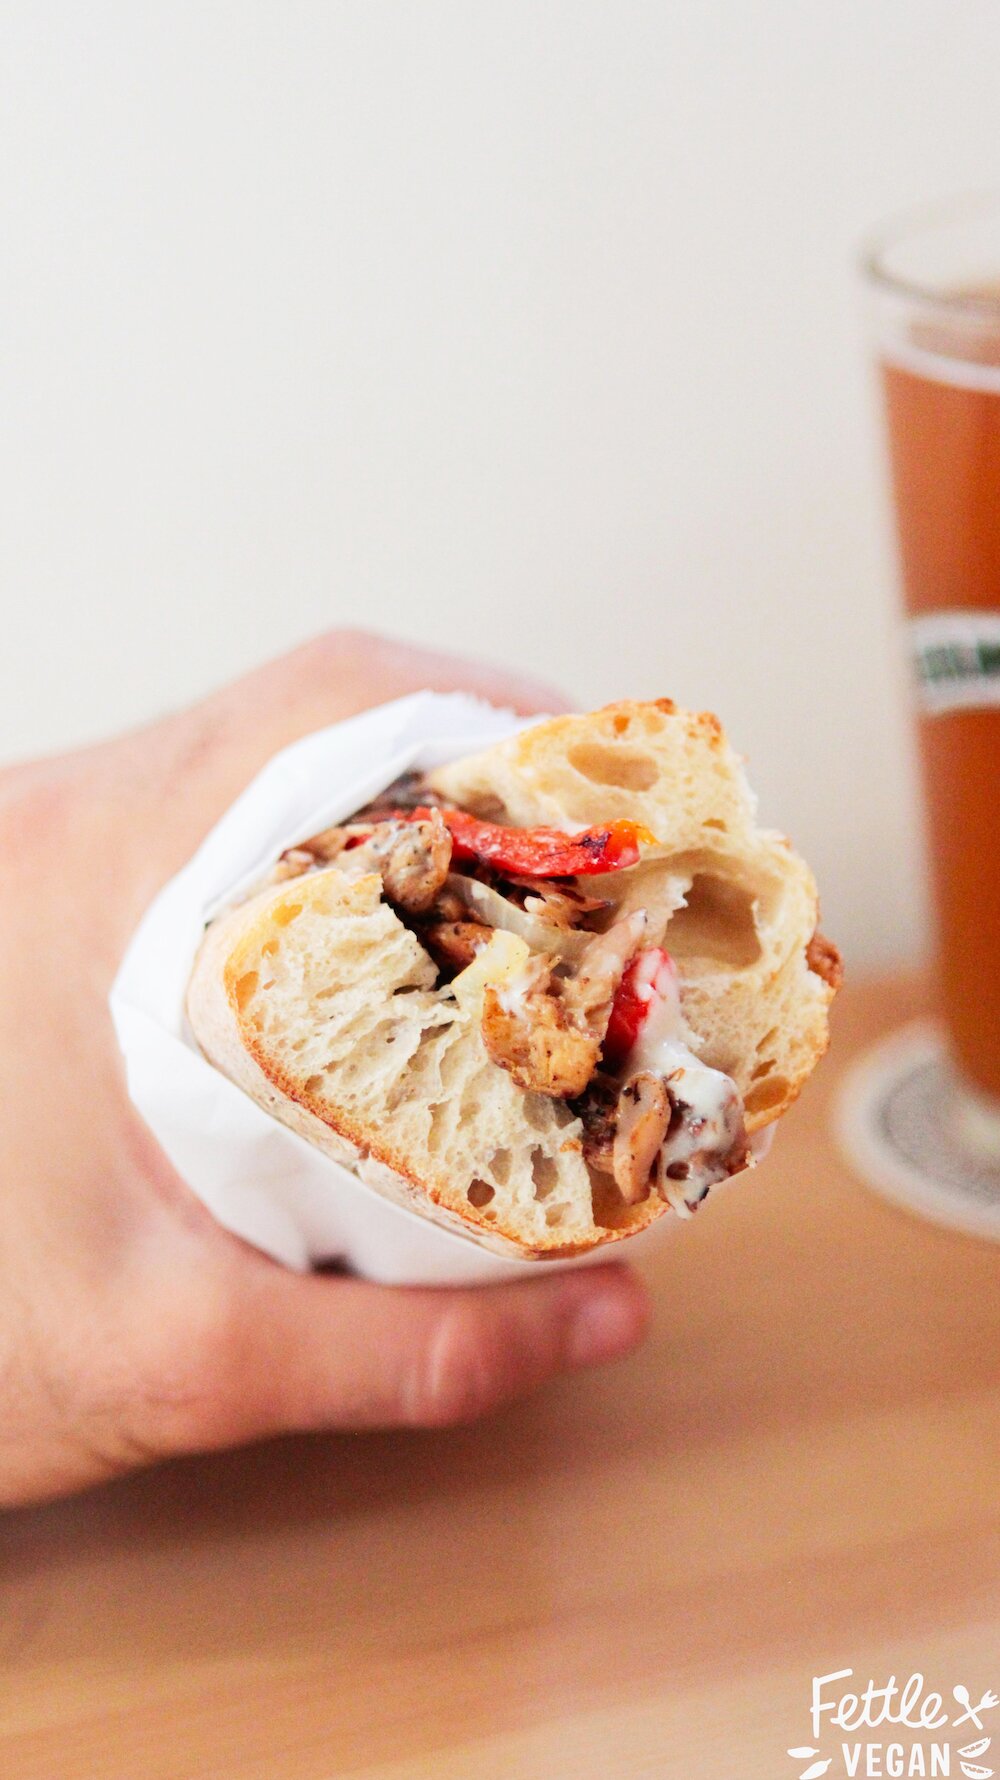
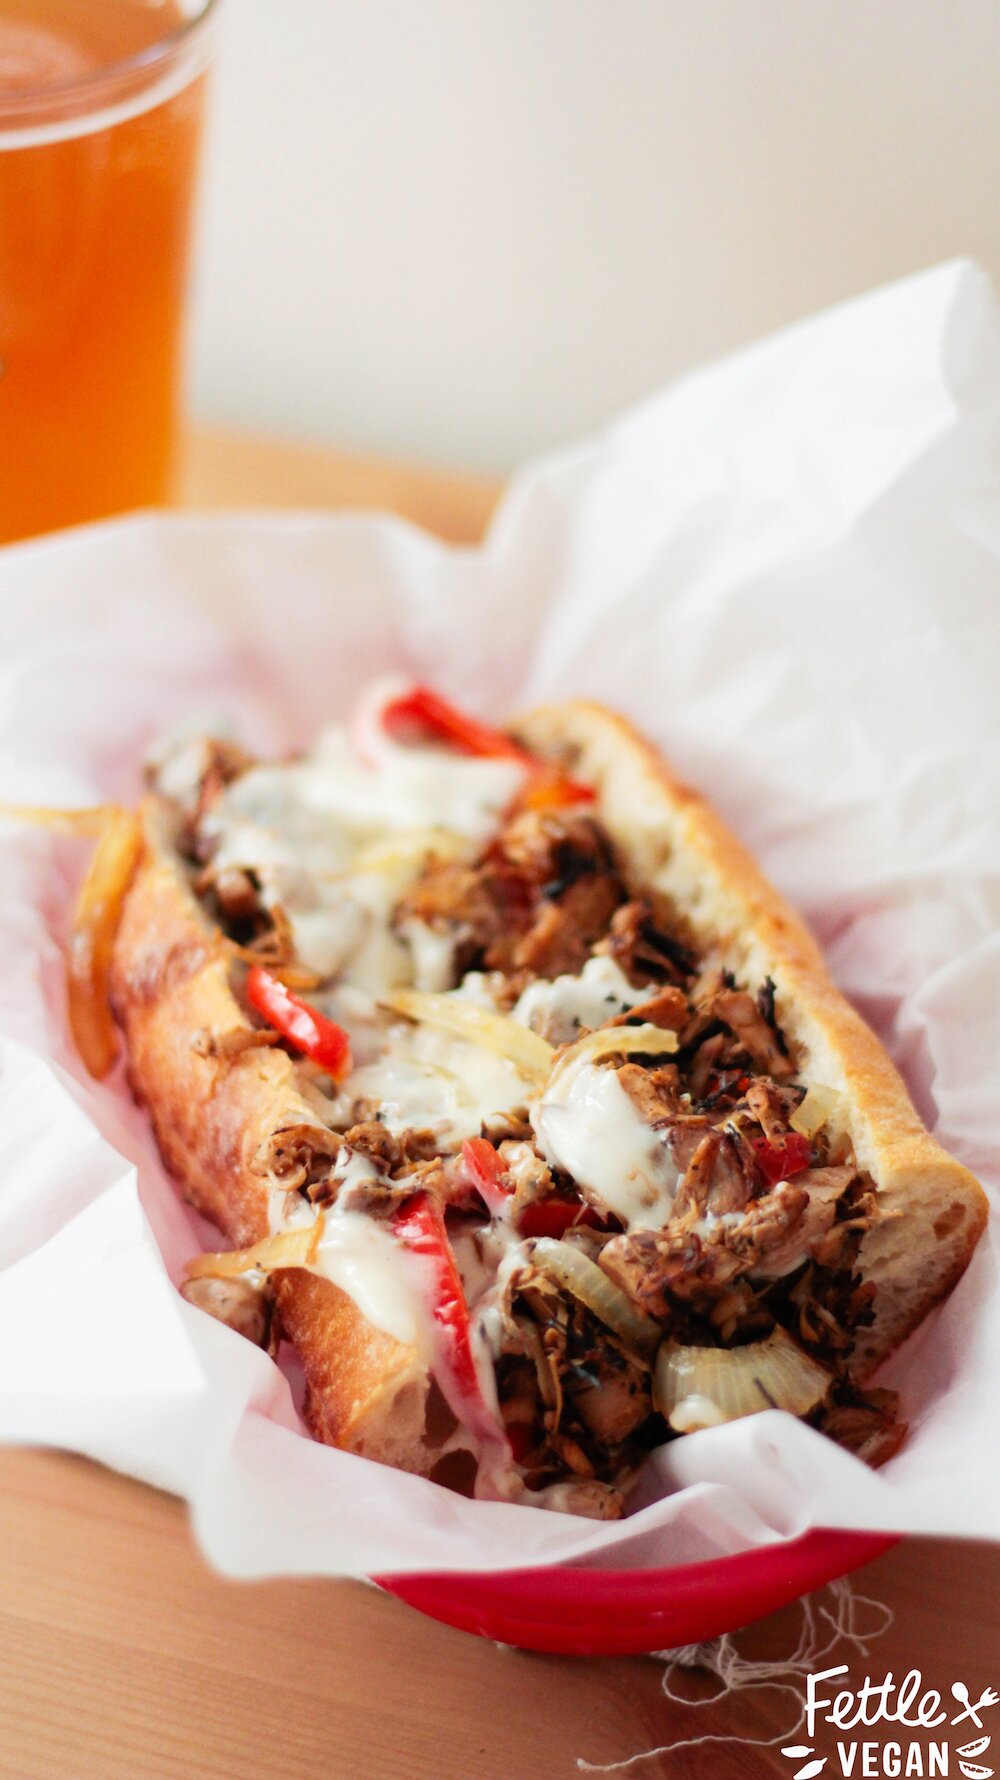
Jackfruit Philly Cheesesteaks
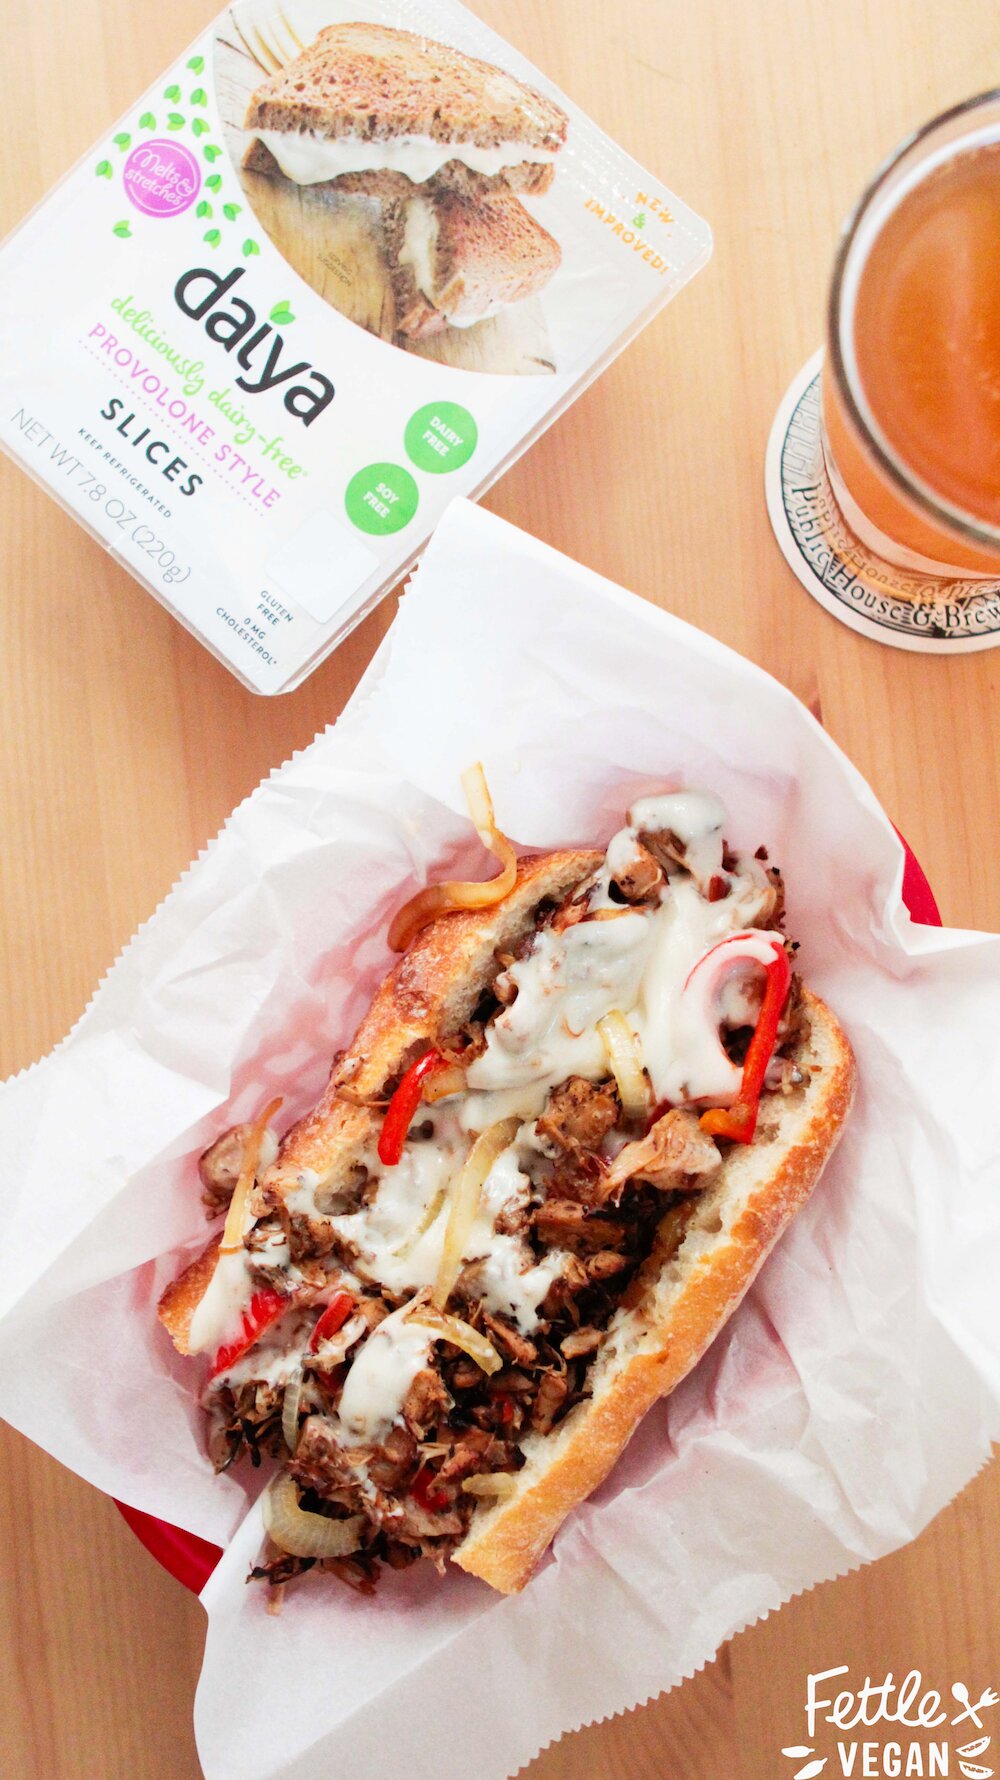
The jackfruit makes the perfect substitute for a shaved steak, and was super like the original once we got a little char on the jackfruit. Our best tip is to cook in cast iron if you can - you'll get nice, crispy edges on the jackfruit. Once you get the jackfruit cooked up you toss in the grilled veggies and cheese, and voila! You've got yourself a super yummy, way healthier Jackfruit Philly Cheesesteak Sub! These sandwiches are so yummy served up fresh, but can be easily wrapped in paper and taken along on a picnic. Either way, do yourself a favor and cook these up for yourself. The recipe makes enough for two, so you can make one for someone you really like or have leftovers for day two. Oh, and people usually ask - we find our jackfruit at local Asian markets, but you can usually find it, though overpriced, at Whole Foods as well. Enjoy!

|
|
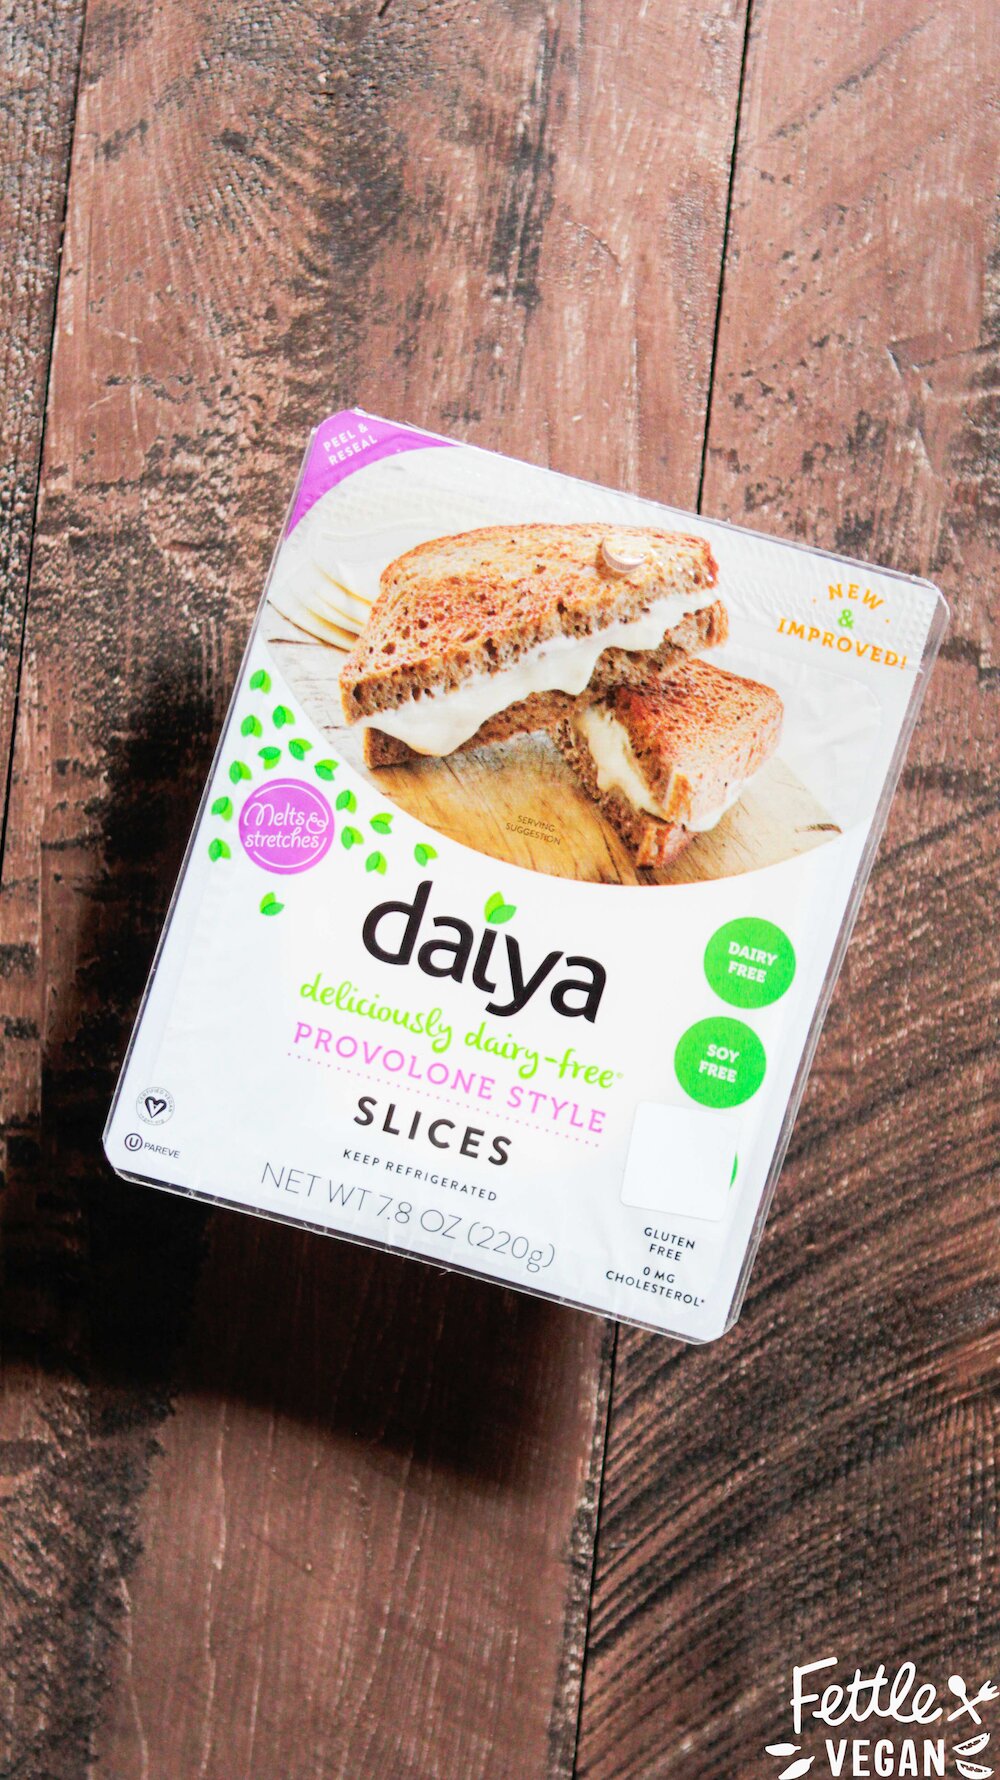
Daiya vegan provolone cheese slices
1 loaf Italian bread or 2 large sub rolls, sliced
1 teaspoon coconut oil
1 medium yellow onion, thinly sliced
1 red bell pepper, thinly sliced
1 teaspoon coconut oil
2 - 20 oz. cans jackfruit, drained and shredded
1/2 cup water
1 large clove of garlic, minced
1 teaspoon liquid smoke
1 teaspoon maple syrup
1 tablespoon white cooking wine
1/2 teaspoon smoked paprika
1/2 teaspoon onion powder
1/2 teaspoon soy sauce
salt + pepper to taste
DIRECTIONS
Place the Daiya slices and sub rolls to the side, you'll need them after the filling is prepared.
Heat coconut oil in a medium-sized pan over medium heat. Sauté the thinly sliced onions and peppers until softened, about 8-10 minutes. Remove from heat and set aside.
Begin heating the next bit of oil in a large skillet over medium heat. As it heats up, pour in the shredded jackfruit, water, minced garlic, liquid smoke, and maple syrup. Sauté until the liquid reduces to about half, then add the white cooking wine, smoked paprika, onion powder, soy sauce, salt and pepper. Stir to combine, and continue to cook over medium heat until the liquid has completely reduced and the jackfruit is beginning to brown.
Throw the onions and peppers into the pan with the jackfruit and toss to combine. Line the mixture into a straight line across the middle of the pan. Place Daiya provolone slices onto the mixture (we used 2 per sandwich), then cover the pan with a lid for about 30 seconds to a minute, or until the cheese has become melty on top of the jackfruit mixture.
Use a spatula to scoop the mixture onto your sub rolls and enjoy!
NOTES
Leftover filling will last in the fridge, covered, for a few days.
Traditional cheesesteaks are served on soft bread, but all we could really find was a french baguette. While soft sub rolls are my recommendation, use what you can find.
Buffalo Cauliflower Grinders
1 teaspoon coconut oil
4 heaping cups cauliflower (about 1 large head cauliflower), chopped into bite-sized florets
1 cup hot sauce (we used Frank's Red Hot)
2 cups broccoli slaw (store bought OR just shredded broccoli, carrots + red cabbage)
1 tablespoon olive oil
1 tablespoon lemon juice
pinch of salt
4 demi baguettes or ciabatta rolls
1/2 cup vegan chive cream cheese (we used Kite Hill)
green leaf lettuce, enough for 4 sandwiches
DIRECTIONS
Heat the coconut oil in a frying pan over medium heat. Chop the cauliflower florets and toss them in a pan with hot sauce. Cook them together over medium heat, tossing to coat, for about 12-15 minutes or until softened.
While the cauliflower cooks, pour the broccoli slaw mixture into a mixing bowl with the olive oil, lemon juice and pinch of salt. Toss to coat everything evenly and set aside.
Slice the ciabatta rolls or baguettes and smear about 2 tablespoons of cream cheese onto one side. Wash and dry the lettuce and set it aside.
When the cauliflower is done and cools slightly, scoop it onto the rolls and top with the slaw, leaf lettuce, and other half of the bun. Serve immediately or wrap in paper and take 'em along on a picnic lunch. Either way, enjoy!
NOTES
Serves 4.
Leftover cauliflower stays good in the fridge for up to a week.
Shredded Kale + Brussels Salad
Looking for other salad inspiration? Try our Golden Beet Salad with Balsamic + Cashew Ricotta, Strawberry Walnut Kale Salad with Creamy Champagne Vinaigrette, or Mexican Wheat Berry Salad!
Salad:
5 ounces (135 g) lacinato kale, rolled and thinly sliced
5 ounces (150 g) brussels sprouts, trimmed and shredded
3/4 cup (50 g) green onions, thinly sliced
1/2 cup (70 g) pine nuts
Champagne Vinaigrette:
1/4 cup (60 ml) olive oil
1 small garlic clove
2 tablespoons (30 ml) champagne vinegar
1 tablespoon (15 ml) maple syrup
1 1/2 teaspoons (8 ml) lemon juice
3/4 teaspoon dijon mustard
pinch each of salt + pepper
DIRECTIONS
Place prepared kale, brussels, green onions and pine nuts in a large bowl and toss to combine.
Prepare the dressing by blending olive oil, garlic, champagne vinegar, maple syrup, lemon juice, dijon mustard, salt and pepper in a high-speed blender or food processor until creamy.
Drizzle the dressing over the salad and toss to coat. Enjoy immediately!
NOTES
Don’t have any champagne vinegar? Use whatever vinegar you have on hand, instead!
You can prepare the veggies and dressing separately ahead and dress as needed.
Serves 4.
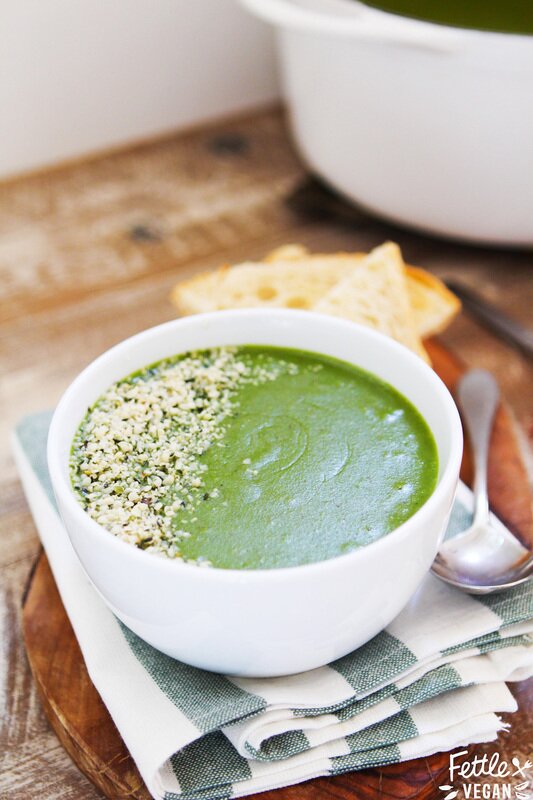
Smoky Kale + Butter Bean Soup

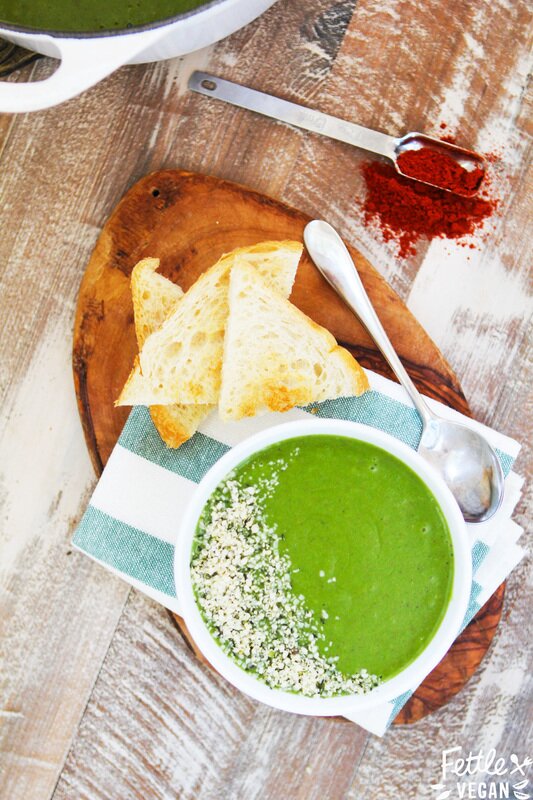
1 tablespoon olive or coconut oil
2 cloves garlic, minced
1 medium yellow onion, chopped
2 cups red potatoes, cut into 1-inch cubes
4 cups vegetable broth
2 teaspoons smoked paprika
1 teaspoon salt
1/4 teaspoon black pepper
2 1/2 cups cooked butter (lima) beans
3 packed cups kale, stems removed
hemp seeds, for garnish
DIRECTIONS
Heat the oil in a large pot or dutch oven over medium heat. Sauté the garlic and onions together until fragrant, 3-5 minutes.
Pour in the potatoes, vegetable broth, smoked paprika, salt and pepper. Continue cooking over low-medium heat about 20-30 minutes, until the potatoes are fork tender.
Add in the beans, reserving a 1/2 cup to the side, and the kale. Stir to combine, and cook 5-10 more minutes. Remove from heat.
Blend the soup with an immersion blender or in batches in a high-speed blender until smooth. Pour in the remaining butter beans and stir. Serve immediately with a garnish of hemp seeds or crackers!
NOTES
Serves 6.
Butter beans are also known as lima beans, so use whichever. You can also sub white beans here.
Leftovers last about a week in the fridge or in the freezer indefinitely.

Golden Beet Salad with Balsamic + Cashew Ricotta
1/2 cup walnuts, chopped
1 cup raw cashews, soaked in warm water
2 tablespoons water
1/4 teaspoon salt
4 medium golden beets
4 cups arugula
balsamic vinegar, as needed for serving
DIRECTIONS
Preheat the oven to 350º. Spread the chopped walnut onto a lined baking sheet. Bake for 8-10 minutes, stirring once. When finished, set aside to cool.
Soak the raw cashews in warm water for at least 30 minutes. Drain the nuts and pour them into a food processor. Pour in the water and salt and pulse until a fluffy, chunky texture is achieved (similar to ricotta cheese). Set aside.
Trim the ends of the beets, then place them into a medium-sized pot of water. Bring to a boil, then lower heat and cook over medium heat until fork tender, about 20-30 minutes. Drain the water and let cool slightly before using your fingers to slide the skins off. Toss the skins in the compost or trash and thinly slice the cooked beets.
Spread the arugula between two large plates and top with the toasted walnuts, a couple tablespoons of the cashew ricotta, sliced golden beets and a drizzle of balsamic vinegar. Serve immediately! (Or, just prep it and take it for lunch to work all week!)
NOTES
Serves 2.
Leftovers last up to a week in the fridge.
BBQ Cauliflower Bites
Even if you're not into watching football this Sunday, you should still make these. 'Cause they are really fricken delicious. I made a pretty big batch last weekend and Alex and I finished it together, no problem. They don't need any dipping sauce since they're slathered in any BBQ sauce, but if you're into ranch dip, it might be a delicious addition. We also have a great recipe for crunchy coated cauliflower nuggets if that's more your style. Oh and this sriracha buffalo hummus? PERFECT with all that beer. Let's eat!
1 1/2 cups unsweetened almond milk
1 cup all-purpose OR whole wheat flour
2 teaspoons garlic powder
1 1/2 teaspoons smoked paprika
1/4 teaspoon salt
1/4 teaspoon pepper
1 large head (about 6 cups) of cauliflower, cut into florets
1 1/2 cups BBQ Sauce
DIRECTIONS
Preheat the oven to 450º. Line a baking sheet with parchment paper and set aside.
In a medium-sized mixing bowl, whisk together the unsweetened almond milk, flour, garlic powder, smoked paprika, salt, and pepper.
Dip the cauliflower florets into the mixture, coating evenly. Tap off any excess batter and place the florets onto the baking sheet. Bake for about 20 minutes, flipping halfway through.
While the cauliflower bites cook, heat the BBQ sauce in a small saucepan, stirring occasionally, until heated through. When the cauliflower bites have cooked, pull them from the oven and using tongs, carefully dip each floret completely into the bbq sauce mixture and place it back onto the baking sheet. Continue this until all the florets have been dipped. Bake for 25-30 more minutes, again flipping about halfway through. When they’re finished, serve immediately!
NOTES
Leftovers don't reheat very well. These are best eaten fresh!
tags
All
Acai
Alcohol
Almond Cream
Almonds
Apple
Aquafaba
Artichoke
Arugula
Avocado
Bacon
Baked
Balls
Balsamic
Banana
Bars
Basil
Bbq
Beans
Beets
Berries
Biscuits
Blondies
Blood Orange
Blueberries
Bok Choy
Bowls
Bread
Breakfast
Broccoli
Broccoli Slaw
Brownies
Bruschetta
Brussels Sprouts
Buffalo
Burger
Burrito
Buttercream
Butternut Squash
Cabbage
Cacao
Cajun
Cajun Spice
Cake
Candy
Caprese
Cardamom
Carob
Carrot
Cashew Creme
Cashews
Cauliflower
CBD
Celeriac
Celery
Cereal
Champagne
Charcoal
Cheese
Cheesecake
Cheesesteak
Cheeze
Cherimoya
Cherries
Chia Pudding
Chia Seeds
Chicken
Chickpeas
Chili
Chips
Chocolate
Cider
Cilantro
Cinnamon
Clafoutis
Coconut
Coconut Milk
Coconut Water
Coffee Cake
Cookie Bars
Cookie Butter
Cookie Cake
Cookies
Cooking Tips
Crackers
Cranberries
Cream Cheese
Crumble
Cucumber
Cupcakes
Dates
Dill
Dinner
Dip
Donuts
Dough
Dressing
Drinks
Easter Eggs
Falafel
Faux Cheese
Faux Meat
Figs
Flatbread
Flax
Fluff
Fondant
French Toast
Fried
Fries
Frosting
Fruit
Fudge
Galette
Garam Masala
Garlic
Ginger
Gingersnaps
Glaze
Gluten Free
Goji Berries
Golden Berries
Golden Milk
Grain Free
Gratin
Gravy
Green Tea
Grinder
Guacamole
Halloween
Hazlenuts
Hearts Of Palm
Hemp Milk
Hemp Seeds
Hemp-seeds
Holidays
Homemade
Honey
Hormone-balancing
Hot Sauce
Hummus
Ice-cream
Jackfruit
Jalapenos
Jam
Jicama
Juice
Kale
Kettle Corn
Kimchi
Kung Pao
Lasagna
Latte
Lavender
Leeks
Leftovers
Lemon
Lettuce Wraps
Lime
Low Sugar
Macadamia Nuts
Mango
Maple
Maple Syrup
Marshmallow
Masa Harina
Matcha
Mayo
Meals
Mediterranean
Milkshake
Mint
Miso
Molasses
Monk Fruit Sweetener
Muffins
Mushrooms
Nachos
Noodles
Not Vegan
Nut Butter
Nutmeg
Nutritional Yeast
Oatmeal
Oats
Olives
Onions
Orange
Pancakes
Panini
Parsley
Pasta
Peaches
Peanut Butter
Pears
Peas
Pecan
Pepitas
Peppermint
Peppers
Persimmon
Pesto
Phyllo
Pickled
Pie
Pilaf
Pineapple
Pine Nuts
Pita
Pizza
Polenta
Pomegranate
Popcorn
Potatoes
Protein
Pudding
Pumpkin
Queso
Quinoa
Radish
Rasins
Raspberries
Raw
Red Bean
Rhubarb
Rice
Ricotta
Rightrice
Roasted
Rolls
Romanesco
Rosemary
Sage
Salad
Sandwich
Sangria
Sauce
Savory
Scones
Seitan
Sesame
Shallot
Shoshito Peppers
Side Dish
Slaw
Sliders
Smoky
Smoothies
S'mores
Snacks
Soba
Soup
Spicy
Spinach
Spread
Squares
Squash
Sriracha
Stevia
Stone-fruit
Strawberry
Streusel
Strudel
Stuffed Peppers
Stuffing
Sugar Cookies
Sugar Free
Sunbutter
Sweet Potato
Sweets
Tacos
Tahini
Tart
Tea
Tempeh
Thumbprint
Thyme
Tigernuts
Tofu
Tomato
Tomatoes
Tortillas
Turmeric
Vanilla
Veganized
Vegetarian
Vegg- The Vegan Egg Yolk
Vinaigrette
Vinegar
Waffles
Walnuts
Wheat Berries
Whiskey
White Chocolate
Wrap
Yeast
Yogurt
Zucchini
 RSS Feed