Chilled SOBA NOODLE SALAD WITH SUNBUTTER SAUCE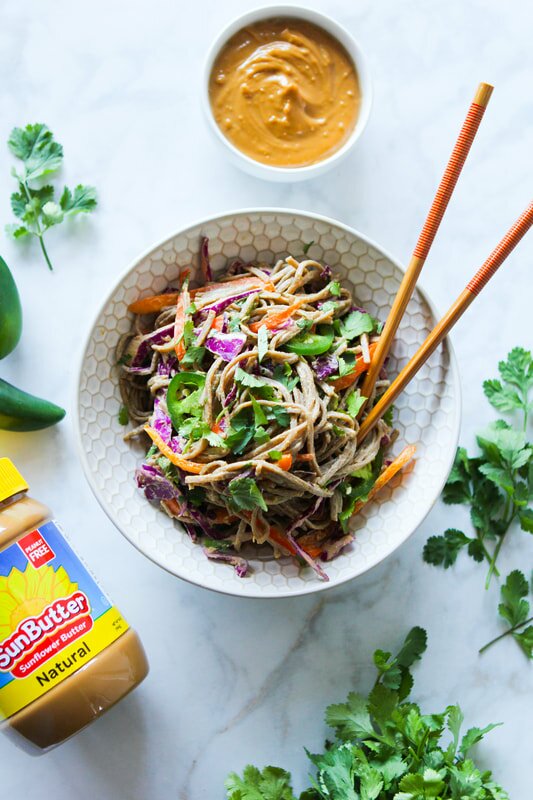
I’ve been really grooving on quick, healthy, on-the-go meals lately. They never go out of style, make running out the sorry and to the studio much easier, and are a great way to make sure you’re packing some real food and real nutrition into your busy days.
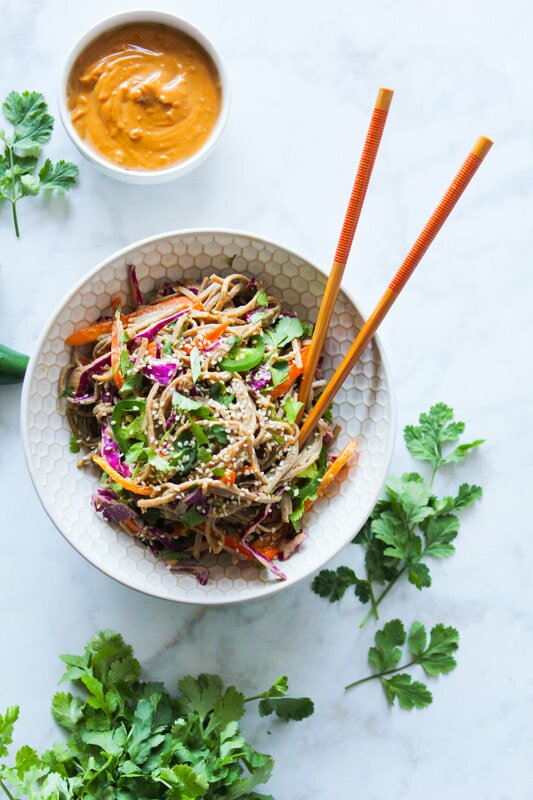
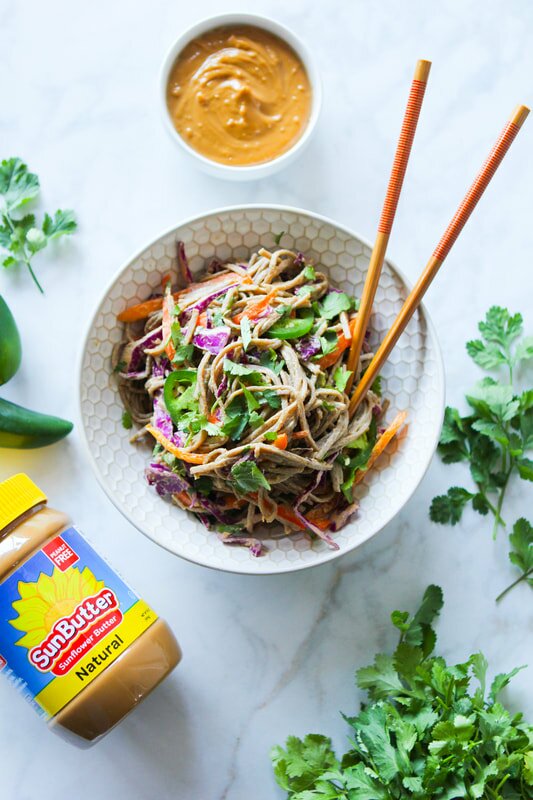
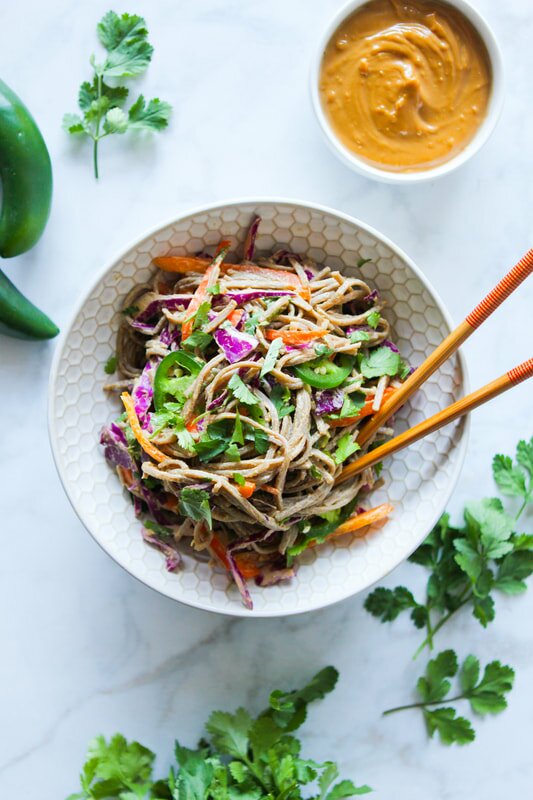
One of my favorite cold salad options is a soba noodle salad. I had my first one years ago and have loved the simplicity ever since. Cold, sturdy, wheat-based soba noodles boiled to perfection and chilled, then tossed with a sweet, tangy peanut sauce and fresh, crisp veggies - the perfect lunch or dinner! However, as someone with a few food allergies herself, I get that those delicious peanut sauces aren’t especially delicious or functional for people with nut allergies. So I’ve partnered with my pals over at SunButter to create a totally nut-free version of one of my favorite dishes - simplified and paired down to the easiest version BUT that still tastes like the traditional version - so you can be eating in no time!
SunButter makes the best sunflower seed butter option on the market - and it’s totally free of the top 8 food allergens! A serving packs just as much protein as traditional nut butter, but more magnesium, vitamin E and iron - and less saturated fat, too. It makes a great snack on it’s own, but you are going to fall in love with it as the main sauce ingredient in this satisfying bowl. Since it is allergen-free, SunButter also makes a great option for kid’s lunches and is available at major grocers and food stores all over the US!
To get started, all you’ll need is your favorite jar of SunButter, some quality soba noodles, and your favorite uncooked veggies. Let’s get cooking!
INGREDIENTS:
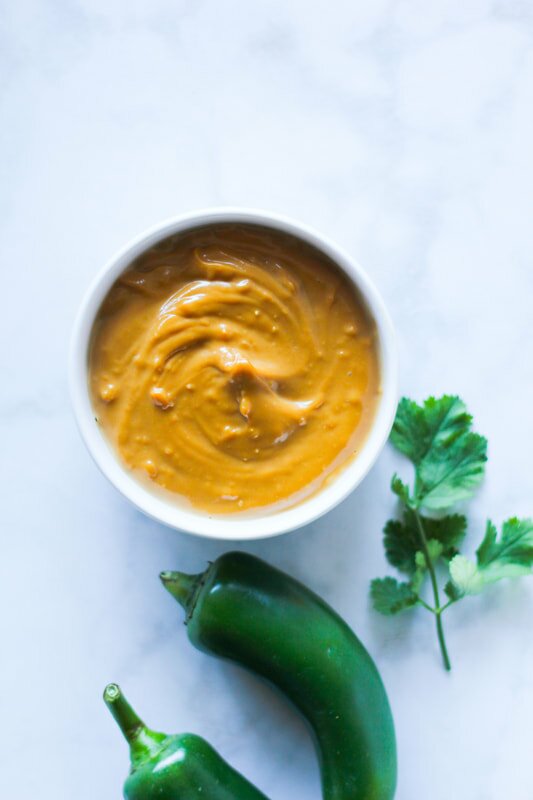
SunButter Sauce: 1/2 cup Natural SunButter 2 tablespoons fresh lime juice 1 tablespoon coconut aminos 1/2 teaspoon maple syrup 1/4 teaspoon sesame oil 1 1/2 teaspoons fresh ginger, grated 2 cloves garlic, minced 3-6 tablespoons water Soba Noodle Bowl: 6 oz whole wheat soba noodles 2 cups red cabbage, thinly sliced 1 1/2 cup bell pepper, thinly sliced 1 cup carrot, thinly sliced 1 jalapeño, thinly sliced 1/4-1/2 cup cilantro, roughly chopped sesame seeds, for garnish DIRECTIONS: In a small bowl, whisk together the SunButter, lime juice, coconut aminos, maple syrup, sesame oil, fresh ginger, and garlic. Once combined completely, begin adding in water 1 tablespoon at a time, until mixture becomes smooth and creamy. Add water until the sauce is your preferred texture. Set aside. Cook the soba noodles to directions on package. Remove from heat, strain, and run under cold water until the noodles are no longer hot to the touch. Place the noodles into a bowl and into the fridge to chill while you prep the veggies. Thinly slice your cabbage, bell pepper, carrot, jalapeño and cilantro and toss them into a large mixing bowl. Pour your SunButter Sauce over the veggies and toss to combine. Throw in the chilled soba noodles and gently toss again to combine. Top with a little extra chopped cilantro and sesame seeds for garnish and enjoy immediately! NOTES: Serves 4-6. Leftovers last 3 days in the fridge. Sub in whichever favorite veggies you prefer! 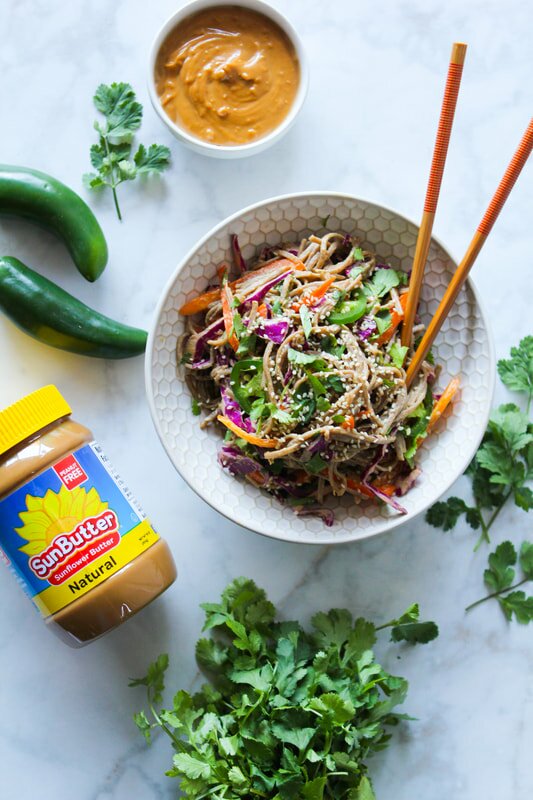
3 Comments
Nearly Sugar-Free Muddy Buddies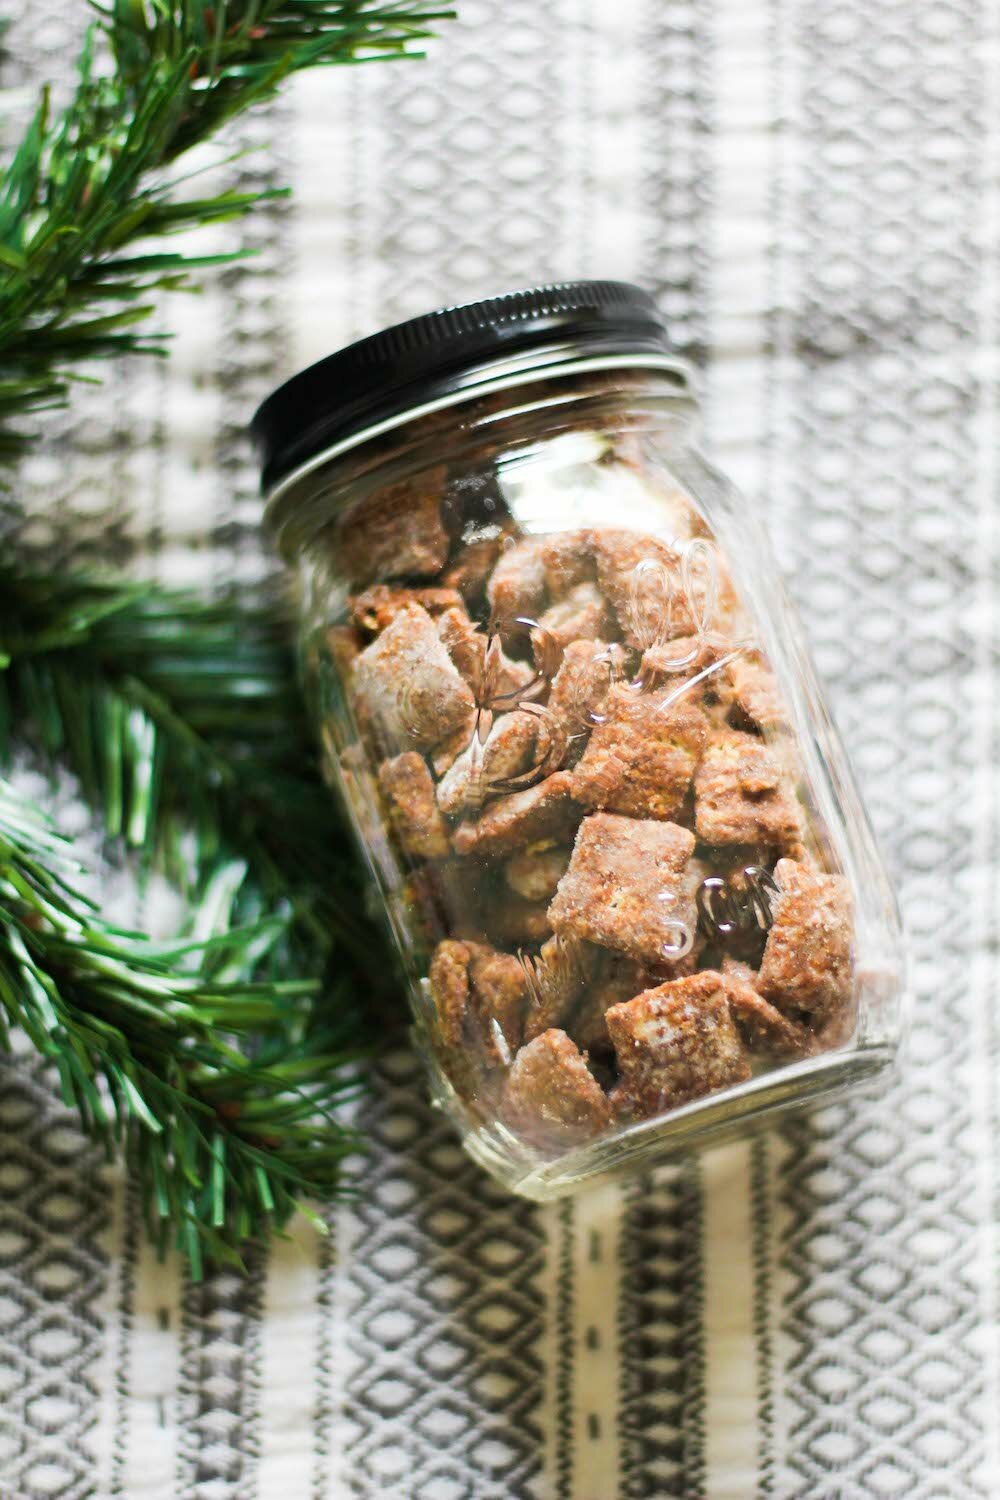
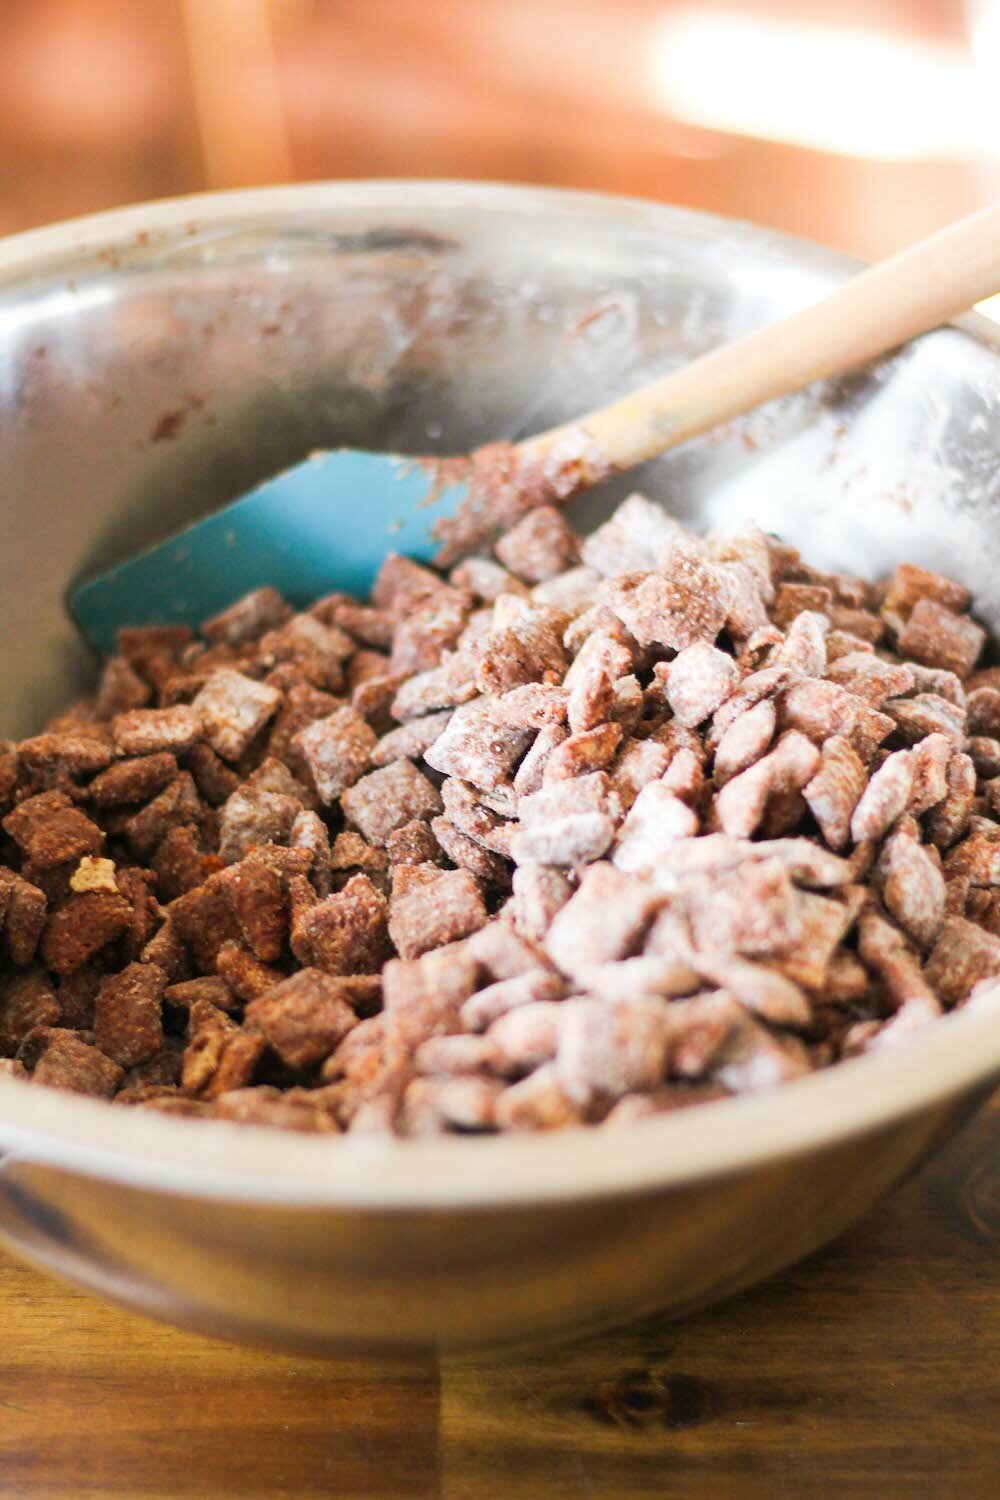
The Holidays are in full swing and I've been feeling ALL the stress! Between present buying, prepping for the New Year - and my Husband's 30th birthday immediately after, writing my 2nd cookbook manuscript and preparing for yoga auditions at my favorite studio just after the New Year - I've been busy! But we all are this time of year. Wrapping up everything in 2017 up nicely before tearing into the giant gift that is 2018!
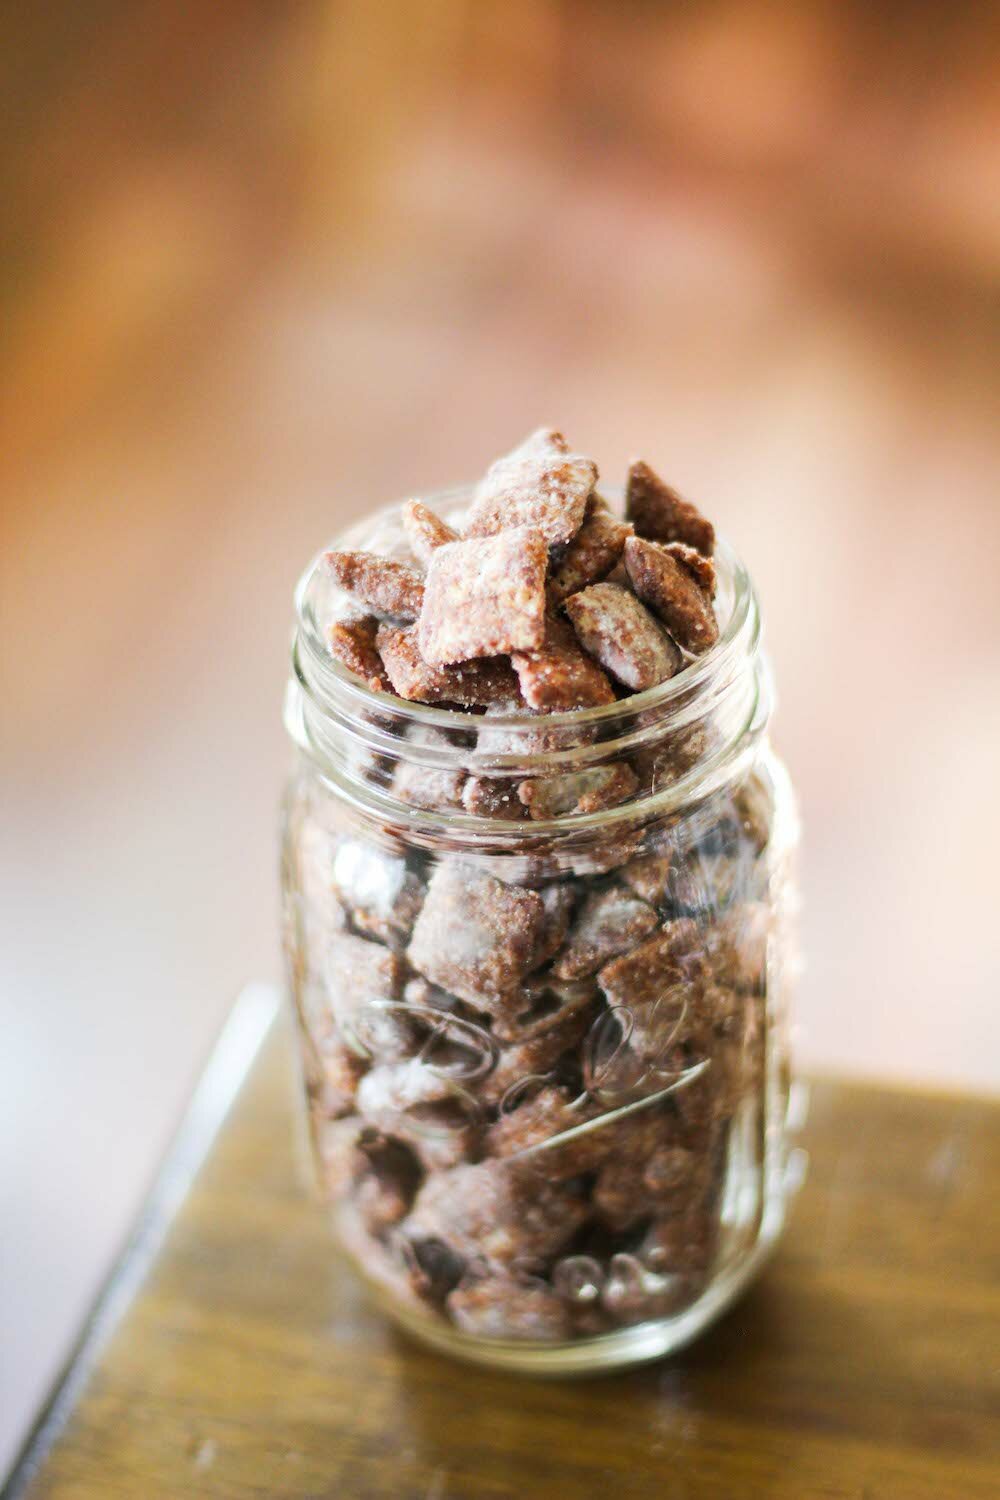
Because I'm a totally stress eater, I try to help myself out during this crazy time of year by NOT having tons of sweet treats around to pick at. It's only trouble if I do! That said, it just isn't the Holidays if there isn't some type of snackable chocolate something on the counter! This year I decided to reform my normal chocolate Muddy Buddies recipe and make them something I could snack on - guilt and nearly sugar-free - through Christmas. So I subbed out the powdered sugar for a homemade, sugar-free, monkfruit version, instead! Muddy Buddies are a totally Holiday classic in this house and one of my Husband's favorite things to snack on while watching Christmas movies. The only sugar in these babies are the trace amounts in the cereal and dark chocolate chunks we melted down for coating! We used EnjoyLife's Mega Chocolate Chunks for this recipe since they're allergen-free (and I have all the allergies), but you can use whatever chocolate makes your heart happy. Let's make some muddy buddies!
INGREDIENTS
9 cups Rice Chex (they're vegan - but you can use whatever kind or brand you prefer!) 2 cups powdered monkfruit sweetener OR 1 cup regular monkfruit sweetener (we used Lakanto - but you can also use powdered stevia or even regular powdered sugar here if you prefer) 1 cup vegan chocolate chunks (we used this brand) 1/2 cup smooth peanut butter 1/4 cup vegan butter 1 teaspoon vanilla DIRECTIONS In a large bowl, measure and set aside the cereal. If you're using prepared powdered sugar, go on to the next step. If you've got regular monkfruit sweetener and need to make it in into powdered 'sugar', simply place 1 cup of sweetener into a blender or food processor and process for 1-2 minutes, until the sugar has pulverized into a finer, powered sugar. It should double in size using this method. Set aside. Using the double boiler method (or a microwave!), melt together the chocolate chips, peanut butter, vegan butter and vanilla until creamy, stirring consistently. Pour the melted chocolate mixture over the cereal and use a wooden spoon to gently toss and stir until the cereal is evenly coated. Pour the powdered sugar evenly over the mixture and continue to use the wooden spoon to toss and stir the mixture until the chocolate-coated chex are all evenly covered in a fine layer of powdered sugar. Enjoy or save in air-tight container on the counter or in the fridge for up to a week. Enjoy! NOTES If you prefer regular sugar here, go ahead and use it. If you find another sugar substitute you prefer, use that instead. I can't guarantee the quantity exchange will be 1:1, but a little taste test should help guide you if you're unsure. Serves 8-10. 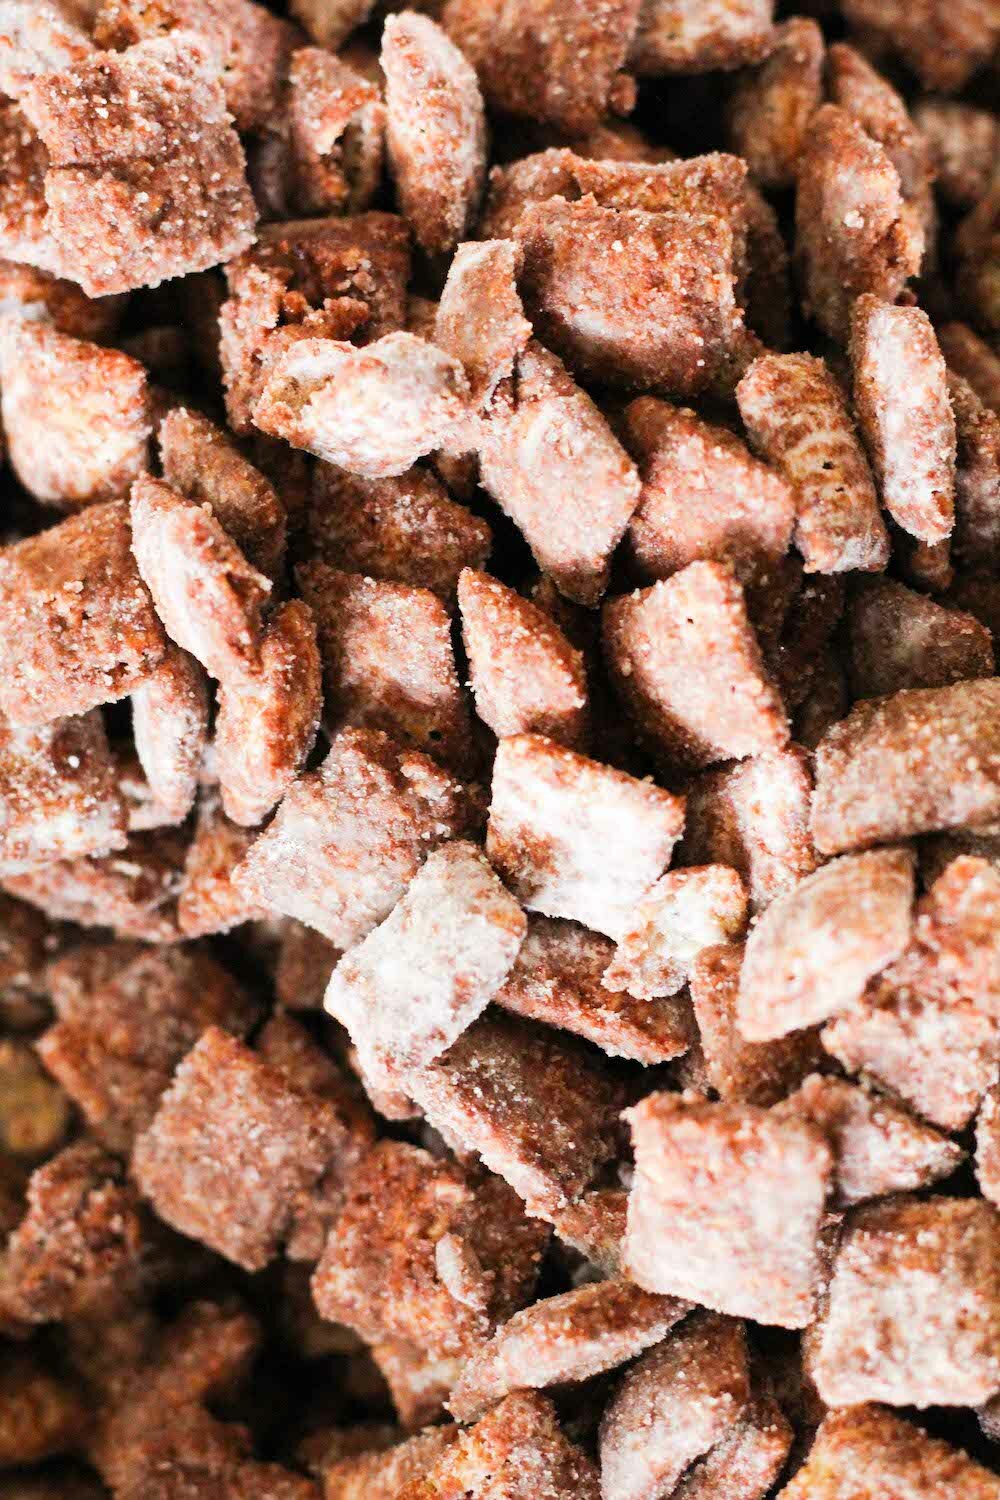
PB+J SMOOTHIE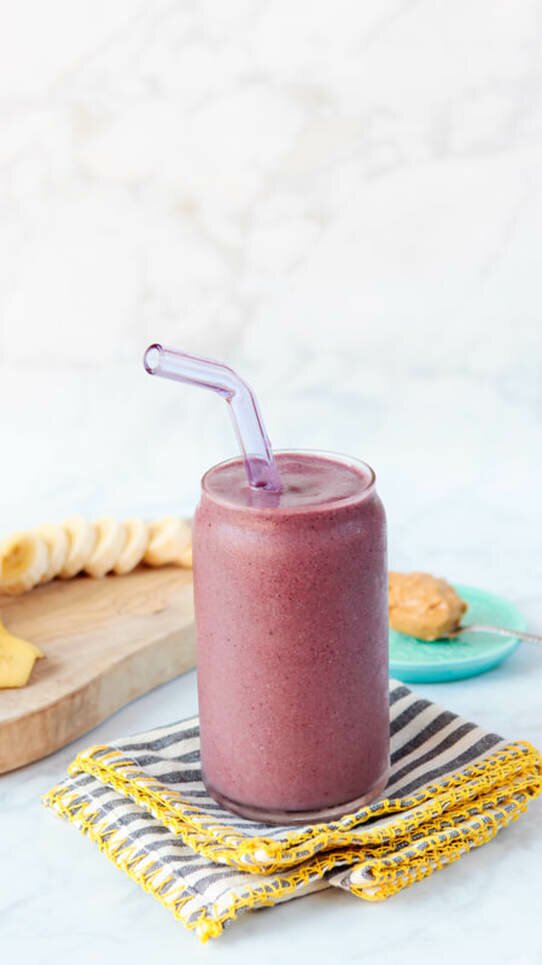
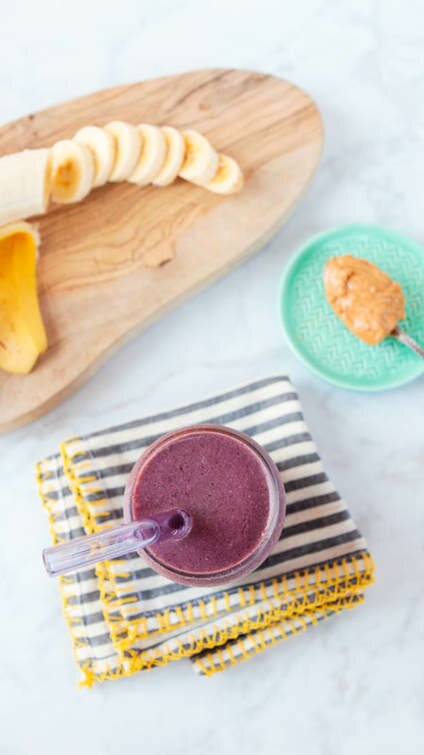
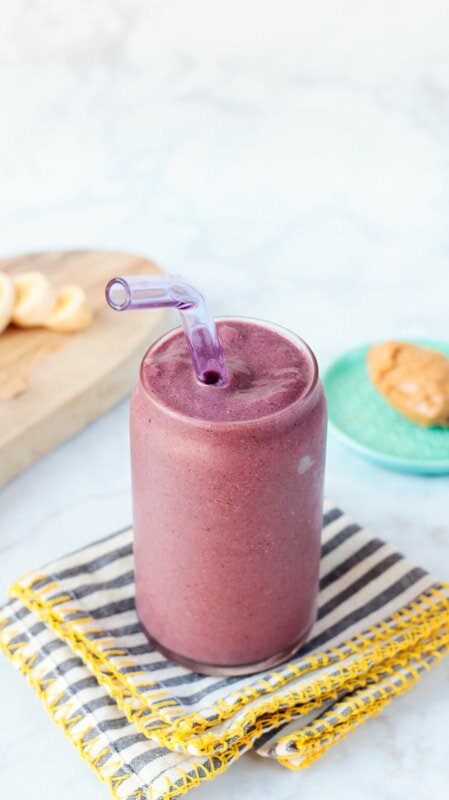
Good morning friends! I'm a serious sucker for smoothies, and a well-known regular at the Whole Foods juice bar. I even recreated one of my favorite smoothies from them - the Green + Glowing - and posted it here because I needed to stop spending $8 a day on a smoothie I could make myself. Well we're back! Kind of. This isn't a smoothie I found at Whole Foods, but I'm sure they've got one like it. I wouldn't know, because until recently I refused to have nut butter in a smoothie. I don't know why! Actually - I hate the chocolate and fruit combination, and I think I just assumed that since chocolate and peanut go so WELL together, that peanut butter and fruit would also be awful. Except deep down in my brain I knew that couldn't be true - because otherwise I wouldn't have eaten a PB+J nearly everyday from ages 4-8!
One morning recently I went to whip up my normal morning smoothie and realized I was out of two of the main ingredients - frozen mango and frozen pineapple. I emptied the bags the day before and had totally forgotten to replace them. Whoops! Luckily, I had seen frozen strawberries and blueberries in the freezer, so I grabbed them instead. I kept the smoothie base the same but after whipping it all together it was just missing something. It was too light and needed some thickness. I almost threw in some coconut in and then thought - welllll, I do have this mostly empty jar of peanut butter...should I try it? I'm so glad I did! It gave the smoothie more thickness, protein, and a ton of great flavor! This might be my new go-to morning fuel. It's packed with protein - seriously, kids will love it. Let's blend, babes!
INGREDIENTS
1 1/2 cups coconut water or unsweetened almond milk 1 frozen banana 1 cup frozen strawberries 1/2 cup frozen blueberries 1-2 cups fresh spinach 1 tablespoon peanut butter 1 tablespoon ground flax 1 tablespoon psyllium husk 1-3 teaspoons MCT coconut oil (optional - just what I add into mine for some healthy fats) DIRECTIONS Toss it all in a high-speed blender (we use a Vitamix) and blend until it is smoooooooth. Then pour it in a large glass and enjoy! NOTES Serves 2. Sub in what you need or what you’ve got to suit your preferences. Fresh fruit works great, but you may need to add some ice to get it nice and creamy. If you use coconut water, the smoothie will be a bit lighter, whereas using almond milk will result in a thicker, creamier smoothie. I like them both, but I actually prefer it with coconut water! 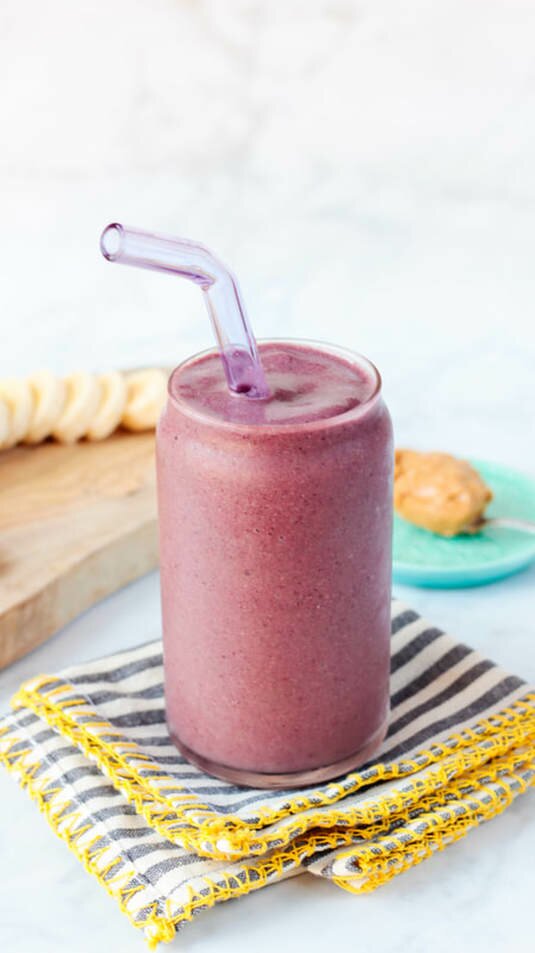
PB + J Energy Bites
These PB + J Energy Balls are the bee's knees my friends! I made them by accident the other day while trying to make a healthy, satisfying, sweetish treat while cleaning out my cabinets. I didn't want to get the blender or food processor involved because they're a pain to clean, so these little cuties are stuck together using my favorite sticky ingredient: peanut butter! And because they're packed with PB, chia and flax they're packed with protein and healthy omega-3 fatty acids, too. Which makes these perfect for bringing along on a hike, picnic at the beach, or on your next road trip. Because we used freeze-dried strawberries here instead of fresh strawberries they last longer out of the fridge and are a little less messy that they would be normally. I passed some along to my sports trainer friend who LOVED them and said he'd love them as an after workout boost. Best of all? They're a 1-bowl recipe and take just minutes to make, so you'll be snacking in no time. So let's eat!
INGREDIENTS
1 cup oats 2/3 cup freeze dried strawberries, roughly chopped 1/3 cup ground flax seed 1/3 cup chia seeds 1/2 cup peanut butter 1/3 cup maple syrup or agave nectar 1 teaspoon vanilla extract DIRECTIONS In a medium bowl combine the oats, strawberries, flax and chia. Add in the peanut butter, maple syrup and vanilla extract and stir until thoroughly mixed. Use a spoon or cookie scoop to roll the mixture into 1" balls. Store in an airtight container and keep refrigerated for up to 1 week. Enjoy! NOTES Makes 16-20 1" balls. Peanut Butter Chocolate Chunk Banana Bread
Summer is here and our CSA boxes have been packed with tons of fresh fruit! We love getting locally grown goodies sent to our door each week, but sometimes we don't make it through the whole box before things start to get a little...brown. Like our bananas! I like bananas just as much as the next girl, but they're not my favorite, and sometimes they get a little too brown before we have a chance to gobble 'em up. Turning mushy, overripe bananas into banana bread is probably my real favorite way to enjoy my bananas, so I never really mind letting them get to that point. And in this combo- mashed with peanut butter + sweet chocolate chunks? ITS AMAZING. And basically a few sprinkles of coconut bacon short of an Elvis sandwich! We've been noshing this loaf all week, but my favorite way is to stick a piece in the warm oven for a few minutes to let the chocolate get a little melty then slather a little butter on it and mmmm...you get it. It's foolproof- and even works well with gluten-free substitutes. Let's eat!
INGREDIENTS:
2-3 bananas, mashed (about 1 1/2 cups) 1/3 cup oil 1/4 cup sugar 1/4 cup peanut butter 3/4 cup non-dairy milk 1 teaspoon vanilla 1 teaspoon vinegar 2 cups whole wheat flour (we have also used a GF flour blend here, but used about 1 3/4 cup) 1/2 teaspoon baking soda 1/2 teaspoon baking powder 1/2 teaspoon salt 3/4 cup chocolate chunks (or chips!) DIRECTIONS: Preheat oven to 350 degrees. In a large bowl, mash your bananas. Set them aside. In a large mixing bowl or in an electric mixer whisk together the oil, sugar, milk, peanut butter, vanilla, and vinegar. Let sit for 3-5 minutes, while you grab a third bowl and combine the flour, baking soda & powder, and salt. Once the wet ingredients are ready, slowly add in the dry ingredients and stir to combine. Once the two are completely combined and a batter has formed, add the mashed bananas. Stir again. Finally, add in the chocolate chunks and mix once to combine. Pour into a greased, lined or non-stick loaf pan. [We used a non-stick pan with a little parchment paper, for easy removal.] Bake for 45-60 minutes, depending on your oven. Bread is finished when a toothpick comes clean. Remove from the oven and let cool at least 30 minutes before enjoying a piece. Cover and save up to a week, or freeze indefinitely! 
Vegan Fluffernutter Sandwich!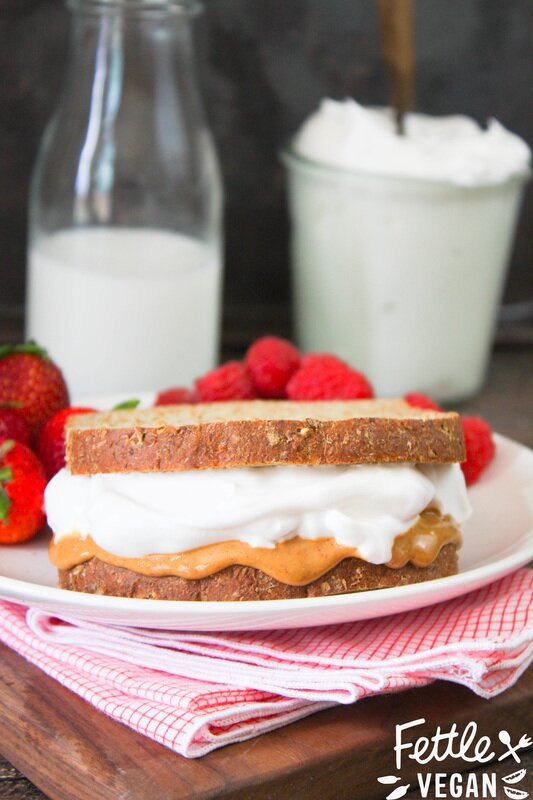
I grew up in a tiny town in Southern Maine. My mom usually packed our lunches for us and did a great job- but we always wanted Dad to do the packing. When Dad packed lunches, my little sister, Jade, and I would always get a fat fluffernutter sandwich on whole wheat bread, sliced into 4 triangles and wrapped in aluminum foil. We'd open up the gooey, tin foil wrapped sandwich at lunch and bury our faces into the marshmallow-y goodness. Now, if you've gotten this far and you're still like "WHAT THE HELL IS FLUFFERNUTTER?" then you obviously didn't grow up on the East Coast. A fluffernutter is a combo of peanut butter and marshmallow fluff, slathered into sandwich form. I remember eating these CONSTANTLY (I wasn't much into jam) as a kiddo, and haven't had one in YEARS. Especially since, as a vegan, marshmallow fluff (while it DOES exist) can be hard to find and expensive to buy. Luckily, the world of vegan food experiments in now a pretty wide world.
If you've been living under a rock, you may not have noticed the trend sweeping the vegan community, but it's all about bean juice and it's called aquafaba. Aquafaba is the term used to describe the thick liquid you usually pour down the sink when draining a can of beans (any kind of beans- black, garbanzo, navy beans- will work). Some brilliant genius realized you could whip the liquid (similar in protein build) just like egg whites and get similar results in things like meringues, pavlovas, and marshmallows. Only now, they're VEGAN versions! When we first heard of this idea, we immediately drained a can of beans and got to work. We loved how similar the texture of the 'fluff' was, though it was slightly less sticky than what I remember (and thus easier to wipe off your face afterwards), but that's probably due to the lack of corn syrup in this recipe. Aquafaba is a crazy, fun thing to experiment with, and I have found myself thinking of ways to add it to EVERYTHING. It just adds a light, whipped quality that I think would be AMAZING in baked goods. Before that though, whip up this easy, basic fluff recipe, make yourself a fluffernutter sandwich, and put Blossom on Netflix for a total afternoon revival of my East Coast childhood. Let's EAT! 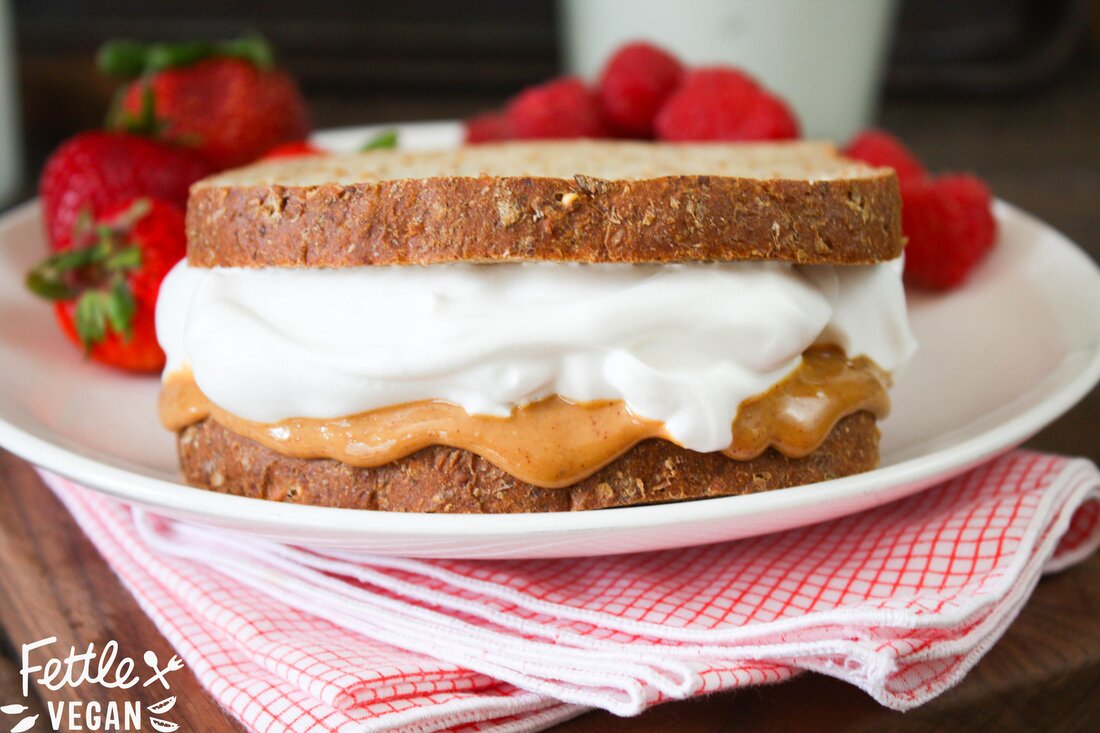
INGREDIENTS:
1/2 cup aquafaba liquid (about 1 - 15 oz. can beans, drained) 1 teaspoon vanilla 1/2 cup organic, granulated sugar 1/8 teaspoon xantham gum 1/8 teaspoon cream of tartar peanut butter (about 1/4 cup per sandwich) sliced wheat (or white) bread, 2 slices per sandwich DIRECTIONS: 1. Drain aquafaba from one can of beans into a small bowl. Refrigerate unused beans. 2. Strain aquafaba liquid through a piece of cheesecloth or fine sieve to remove any beans pieces or skin. 3. Pour aquafaba into an electric mixing bowl, and begin to whisk at a medium to high speed. 4. As aquafaba whips, slowly add vanilla, granulated sugar, and finally xantham gum + cream of tartar. Whip mixture 10-15 minutes, until stiff peaks form. The mixture should be thick enough that if you remove the whisk attachment and wave it around the air a bit, the 'fluff' should't go anywhere- kind of like the blizzard trick at Dairy Queen. 5. Assmeble your sandwich by spreading 1 slice thickly with peanut butter and the other slice with a generous serving of fluff. Slap the two slices together and munch away! Makes enough for 2-4 sandwiches, though there is so much that can be done with aquafaba, the leftovers might be great as a meringue topping or mixed into baked goods. Leftovers can be refrigerated in an airtight container for up to 3 days, but may need to be re-whipped before consumption. NOTES: - About 3 tablespoons of aquafaba= 1 'egg white' - Any bean liquid should work, but we used canned white bean and chickpea liquid over here. -Experiment! This new trend has lots of possibilities and is super fun to work with. Just don't get frustrated! -You can find more info on aquafaba hits + misses in this AMAZING Facebook group OR at aquafaba.com. 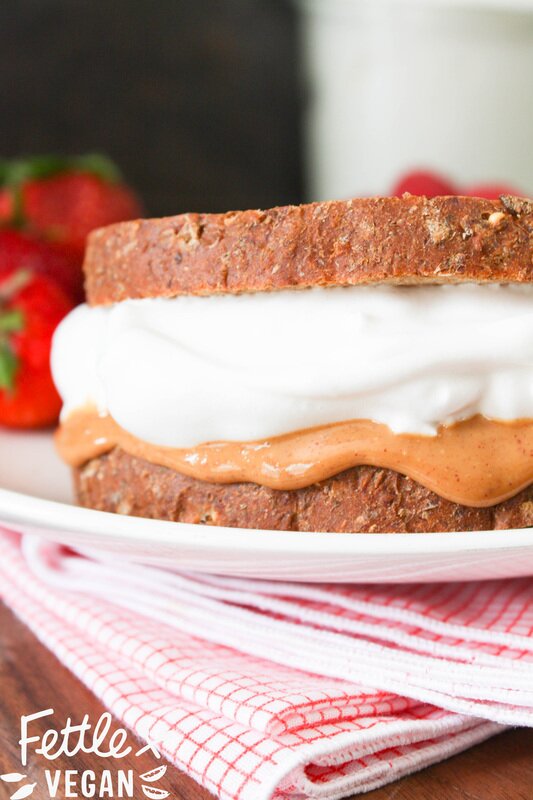
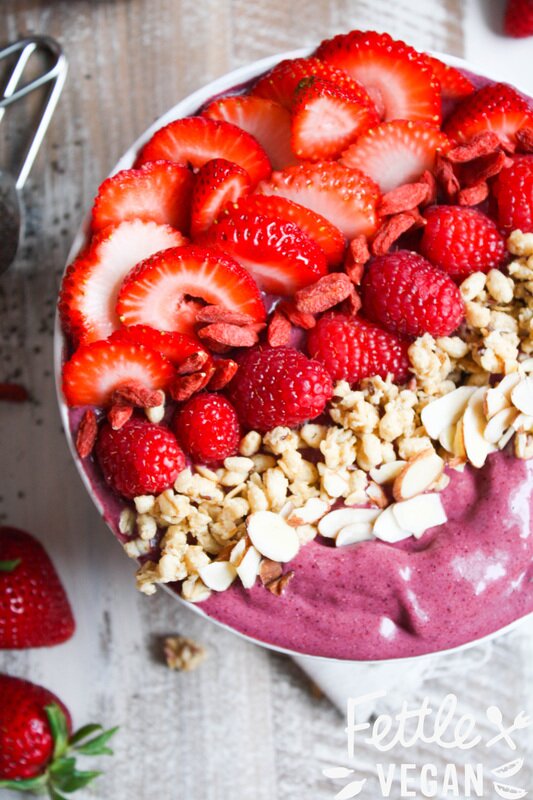
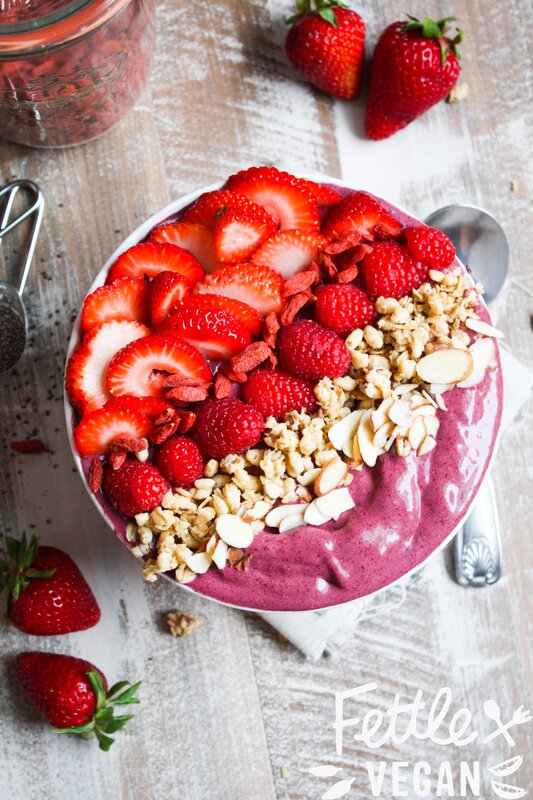
Peanut Butter + Berry Acai Bowl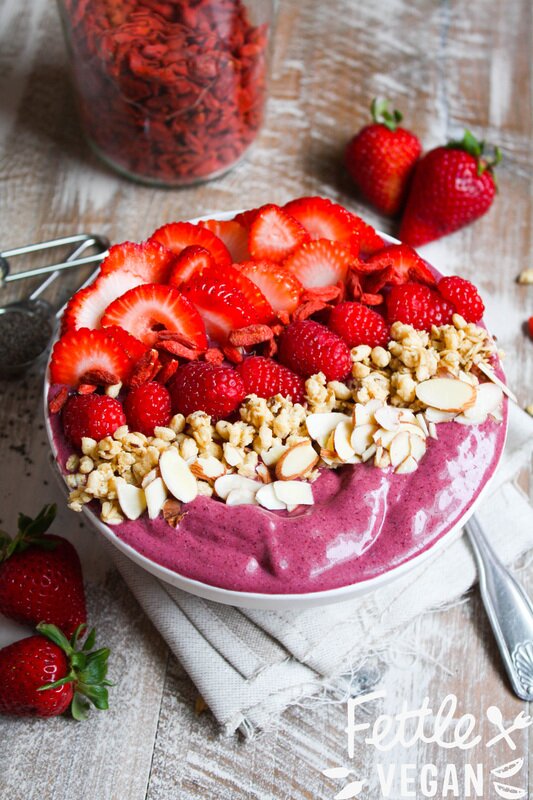
The weather has given us a very early summer growing season here in Southern California, and I've been on a real fruit kick. There's just something magical and so right about eating ripe, juicy fruit when the weather is warm! Whipped into smoothies, pressed into juice, sliced on top of my oatmeal- I'll eat it all, friends. And sometimes though, you realize that something you've been buying all along can be made in your own kitchen more cheaply and easily than running to the juice bar to get it! Combine my love for fresh summer fruit with my sheer laziness about driving across town to the juice bar, and you get this sweet gem. This is a copycat recipe I came up with of Nekter's PB Bowl, a little more balanced and without the added agave. It is way cheaper to make at home (like WAY cheaper), and allows you some portion control if wanted and a freezer to keep it in if you have leftovers. And the best part? It tastes like a peanut butter and jelly sandwich- but you know, in spoon form! I like to top it with lots of extra berries, granola, nuts, and chia seeds, but we'll offer some other fun ideas below. And really, these bowls are super easy to tweak to your preferences, so have fun experimenting with different flavors. I also really like throwing in some pineapple, peach, or mango to sweeten it up a bit. Whichever way you do it, it's bound to be delicious. Let's eat!
INGREDIENTS
1 acai smoothie pack (we use 100g Sambazon packs + can find them in most grocery store freezer sections) 8 ounces coconut water OR dairy-free milk 1 cup fresh or frozen strawberries 1 cup fresh or frozen mixed berries (OR you can sub 1 banana for 1/2 cup of berries here if you like!) 2 tablespoons peanut butter (or any other nut butter) fresh fruit + granola, for topping optional add-in's: (about 1-2 tablespoons each) ground flax chia seeds hemp seeds protein powder goji berries maca lucuma nuts coconut cacao nibs agave DIRECTIONS Blend up all your ingredients in a high speed blender until thick and well combined. Scoop mixture into a bowl and top with fresh fruit, granola, and any other delicious toppings you'd like! Enjoy immediately and freeze leftovers. Makes 1 large smoothie bowl.
|
tagsAll  RSS Feed RSS Feed
|