Green + Glowing Copycat Smoothie
I'm gonna go ahead and be honest - this recipe is a total RIP OFF! Even the name. But at least I'm being honest about it, right?! Ever since I've started ordering this smoothie at my local Whole Foods juice bar, I knew I could recreate it at home for much cheaper. So I totally creeped on the juice bar girl and chatted her up a bit to confirm a few ingredients and I've finally nailed it at home. If you've been watching my instagram stories, you probably already knew this. I've been working out a lot lately and loving rehydrating after a super sweat sesh with a big, nutrient-packed green smoothie. And this smoothie is the ultimate in green smoothies. It's not at all bitter, full of good-for-you ingredients and nutrients, great for digestion and WAY freaking cheaper to make at home than it is to order it at WF. Seriously - you can get all of the basic ingredients in this smoothie for the price of a large one at the juice bar. Go figure! Plus, no waiting in line AND you get to drink everything in the blender, not just what fits in the cup. It couldn't be easier to whip up, and it's a smoothie that everyone will love. It's fruity without tasting too 'green' - the spinach flavor totally fades - and all you're left with is the reminder from the bright green hue just how many greens you're squeezing in. This smoothie's so good, I bet it'll make into your regular rotation too. Cheers, babes!
INGREDIENTS
1 1/2 cups coconut water or unsweetened almond milk 1 frozen banana 1-2 cups fresh spinach 1 tablespoon ground flax 1 tablespoon psyllium husk 1 cup frozen mango 1/2 cup frozen pineapple 1-3 teaspoons MCT coconut oil (optional - just what I add into mine for some healthy fats) 1-2 tablespoons shredded coconut (optional - for more coconut flavor) DIRECTIONS Toss it all in a high-speed blender (we use a Vitamix) and blend until it is smoooooooth. Then pour it in a large glass and enjoy! NOTES Serves 2. Sub in what you need or what you’ve got to suit your preferences. If you use coconut water, the smoothie will be a bit lighter, whereas using almond milk will result in a thicker, creamier smoothie. I like them both, but I actually prefer it with coconut water!
4 Comments
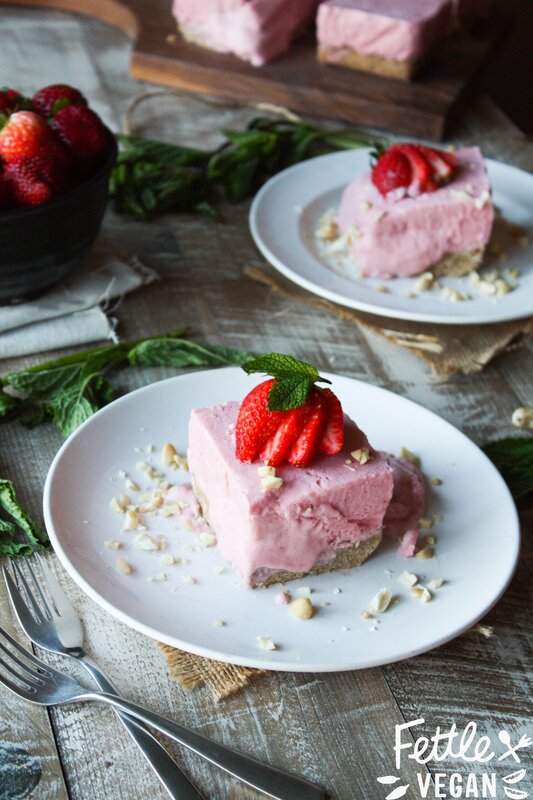
Strawberry Cheesecake Squares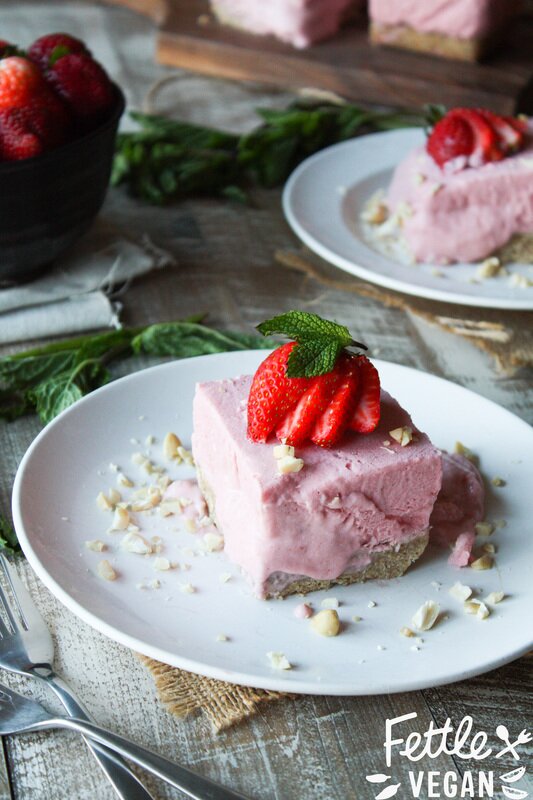
It's the hottest time of the year just about everywhere right now, and Southern California is no exception. In fact, most Angelinos will tell you that the past month has included some weird very june-gloom-esque weather. Lots of cloudy, humid mornings leading to sunny, hot afternoons. Basically, every afternoon becomes an excuse for me to run to the grocery store and pick up a pint of DF Mavens Mint Chip (my latest obsession) Ice Cream and then come home and eat it all, justifying that without it, I would be a puddle! The problem? I still kind of puddle out around 3 pm when the heat reaches its peak, but I've also eaten 600 calories worth of ice cream and my daily allotment of sugar. Whoops! This week I'm giving up the ice cream and packed the freezer with these sweet, low sugar Strawberry Cheesecake Squares. They're just the right amount of sweet on top of a chewy date-oat-nut crust, and make the perfect afternoon cool-down treat or late-night snack. They're packed full of good fats from the nuts and coconut milk, and are a nice break from a traditional round cheesecake. Easier to serve + share! Plus, when it's as hot as it has been here lately, you only want to have to pull out a piece at a time because, you know, MELTING. As you can see as proof above (well, and below), things got a bit melty under photography lights in the hot hot afternoon, but it still tastes amazing. If its that hot, keep them in the freezer until ready to serve. Otherwise, you can soften them a bit in the fridge, but since coconut milk/cream is so melty, the cooler the better for these babies. Let's eat!

INGREDIENTS:
Crust 1½ cups cashews 1½ cups oats 1 cup pitted dates 6 tablespoons melted coconut oil Cheesecake 4 heaping cups strawberries, green tops removed 1 - 14 oz. can coconut cream OR 2 cans coconut milk, refrigerated overnight + liquid drained 1 teaspoon vanilla ½ cup melted coconut oil 2-4 tablespoons maple syrup OR agave nectar DIRECTIONS: Crust Soak cashews in warm water for at least one hour. Blend all ingredients together in a food processor or high speed blender. Grease or line a 9x9 inch glass baking dish. Press date & nut mixture into the bottom of the baking dish. Refrigerate or freeze to set coconut oil, about one hour. Cheesecake Blend strawberries, coconut cream, vanilla, coconut oil and maple syrup in a high speed blender until completely combined. Remove crust-filled baking dish from the fridge and fill evenly with the cheesecake mixture. Cover + place in the freezer or fridge to set for at least 3 hours or overnight. When ready, remove from the fridge, cut with a large knife into 12 even squares, and plate. Sprinkle with crushed cashews, fresh strawberries, and a bit of coconut whipped cream, if you like. Since coconut cream can get melty in the heat (like in some of the photos above!), this dessert is best left in the fridge or freezer until you are ready to eat it. It lasts indefinitely covered in the freezer, and makes 12 medium-sized or 15 small cheesecake squares. Enjoy! 
Strawberry Rhubarb + Rosemary Galette
I love all things strawberry rhubarb. Pie, scones, smoothies...you name it, I'll eat it! I've always loved the sweet + tart combo, and every spring I go into a baking frenzy, eating as much of the stuff as I can get my hands on. Last year we experimented with Strawberry Rhubarb Crumble Bars and the year before that it was Strawberry Rhubarb Pie with a teff flour crust. This year, its a rustic galette filled with flavor and topped with sweet coconut whipped cream. The rosemary compliments the sweet strawberries and the sharp, fruity flavor of the rhubarb so well. It's my new favorite flavor combo! It's the perfect fancy dessert for sharing at gatherings, but is easy and yummy enough that you'll want to save it all for yourself. There's very little added sugar in this recipe, and it would be super easy all of it if you're looking for a sugar-free option. Grab your favorite cast iron pan and let's get bak(ed)ing!
INGREDIENTS
2 1/4 cup all-purpose flour (you could try subbing AP GF flour here too-but I haven't tried it.) 1 tablespoon sugar 1 teaspoon salt 1/2 cup cold vegan butter 1/3-1/2 cup ice cold water 2 cups fresh strawberries, halved 2 cups rhubarb stalks, thinly sliced (remove ALL leaves- they are poisonous) 2 tablespoons lemon juice 2 tablespoons maple syrup 1 teaspoon ground chia (OR 2 tablespoons corn starch) 3-4 sprigs of fresh rosemary vegan butter or coconut oil, for brushing 1 can full fat coconut milk, refrigerated overnight 2-4 tablespoons maple syrup (or sweetener of choice) 1-2 teaspoons vanilla DIRECTIONS In a large mixing bowl, whisk together flour, sugar, and salt. Take cold butter straight from the fridge, cut it into 1 inch cubes, them promptly add it to the flour mixture. Using a fork or dough blender with blades, cut the butter into the flour until mixture is crumbly and sticks together when you squeeze it. Pour in 1/3 cup ice cold water (a little more, if you need it), then use your hands to knead the mixture together until a sticky dough forms. It's okay if there are still some crumbs- it'll make for a nice, flaky crust. Place dough onto a large piece of plastic wrap or parchment paper and stick in the fridge while you prep the berries + cream. In a large mixing bowl, mix together strawberries, rhubarb, lemon juice, maple syrup and ground chia seeds or corn starch. Set aside. On a large, lightly floured surface, roll out your chilled dough to about 1/4 inch thickness, making sure it's large and round enough to generously fit over your pan. (We used a 9-inch cast-iron skillet. You could also use a glass or tin pie pan, or do it on a baking sheet- though cooking times will vary.) Place dough over pan, lightly pressing dough into the base of the pan and letting the edges of the dough hang over the sides. Use a fork to poke hols around the base of the crust to prevent bubbling. Fill with the fruit mixture, spreading evenly. Bring the excess dough toward the center of the galette, folding over itself where it overlaps. Extra dough should cover about 1-3 inches or so of the fruit. It certainly doesn't need to look perfect, it's actually a little prettier when its rustic and hand-made looking! Top galette with 3-4 sprigs of fresh rosemary, then brush top of galette lightly with melted butter or oil. Bake at 325 degrees for about 45 minutes, until crust is golden brown and fruit is beginning to bubble. While the galette cooks, gently open the can of refrigerated coconut milk and use a spoon to remove the thick white layer of coconut from the top half of the can, leaving the clearish liquid left at the bottom. Put the thick white cream into a mixing bowl with the maple syrup and vanilla. Mix with hand beaters until mixture is smooth, creamy, and whipped up. Refrigerate until the galette is finished. (Leftovers can be refrigerated for several days, re-fluffing with beaters as necessary.) When the galette is finished, remove from the oven and let cool completely, then top with a garnish of coconut whipped cream and sprig of fresh rosemary. Leftovers can be refrigerated up to a week. Enjoy!
Matcha, Cherimoya + Strawberry Ice Cream
Ice cream season has arrived! At least, it has if you live in Southern California like us. The weather here lately has been verging on August temps and I am ba da ba ba baaa NOT loving' it. But this ice cream, packed with summery flavors, provides absolute relief from the miserable heat. A bowl of Matcha, Cherimoya + Strawberry ice cream topped with fresh strawberries? OH HELL YES. This whips up to be super creamy- so if you're not a hard serve kinda gal let it soften up a bit before eating and it's just like old school soft serve.
I'm already a huge matcha fan, and started incorporaring it into more than just my lattes with this Matcha Green Tea Scone recipe about a month ago. Since then, I want it in everything- including my ice cream. Its gives the best earthy, sweet flavor and pairs so well with the cherimoya. The cherimoya is a totally new discovery to us. A friend kept telling us it tasted- on its own- like frozen yogurt, so we picked some up from the farmers market last week to try it for ourselves. When soft and ripe, the 'custard apple' really does have a light, sweet, almost frozen yogurt like taste...but I just couldn't stomach the soft, stringy, milky white texture. So, we blended it up! Since its not super sweet, we tossed in some fresh strawberries to sweeten the deal, plus a splash of maple syrup. Omit the maple syrup for a sugar-free option, or feel free to sub in whatever sweetener you prefer in its place. The vanilla helps balance the earthy flavors with the sweet, and the whole bit comes out a lovely shade of green. This recipe is high in potassium, vitamins C + B6, and antioxidants plus a whole lot of good fats & fiber, so have two servings if you like- I won't tell.
INGREDIENTS
1 - 15 oz. can coconut cream (OR 2 - 15 oz. cans coconut milk, 'water' drained) 1 tablespoon matcha powder 1 cup cherimoya, seeded and skinned 1 cup fresh strawberries 2 tablespoons maple syrup 1 vanilla bean, scraped (OR 2 teaspoons vanilla extract) DIRECTIONS Wash + rinse the cherimoya well. Use a spoon to scoop the meat from the middle and remove the large black seeds- they're poisonous! Wash and hull strawberries, and cut vanilla bean in half and scrape insides into small bowl. In a food processor or high speed blender combine all ingredients until creamy, then pour into a loaf pan or deep bowl, and freeze at least 8 hours- until hard enough to scoop. Use an ice cream scoop to scoop out hearty portions into a bowl and enjoy!
Kimchi & Coconut Bacon Grilled Cheese
I love fermented foods. Kombucha, sauerkraut, kimchi- you get the gist. My most common grilled cheese to munch is with a bit of thousand island, grilled onions, and sauerkraut, kind of like a tempeh reuben without the tempeh. Something about the way those savory, salty favors mingle makes my mouth water and I can't get enough. In order to fulfill my latest craving but mix it up a bit, I came up with this humdinger. The sour, salty, crunchiness will leave you satisfied and is a fun way to add more probiotic foods to your lunch! They help with digestion, and I know many of us with food allergies suffer from tummy troubles- sometimes explained, sometimes not. Increasing the amount of fermented foods you eat can help your gut's pH and good bacteria increase, and can help you ingest food better. Anyway, try this one- I think you're gonna love it...and your tummy will too!
INGREDIENTS:
2 slices of crusty bread (we prefer sourdough) about 1/4 cup vegan cheese about 1/4 cup coconut bacon kimchi (your amount will vary based on preference) vegan butter or coconut oil, for frying DIRECTIONS: Heat a medium skillet over medium heat until warm. While heating, spread both slices of bread with your favorite vegan cheese (or top with slices. We used Blode kuh Sriracha Cheddar.) Sprinkle with coconut bacon, then assemble sandwich by placing the other slice of bread on top of the first. Spread both outer sides of bread with a thin layer of vegan butter or coconut oil, then place on the heated skillet. Fry until bread becomes golden and crispy, then flip and toast the other side. When sandwich is finished, remove from skillet and open it up. Layer kimchi inside, sprinkle with a bit more coconut bacon, and replace bread. Slice into two melty, crunchy halves and eat immediately. Enjoy!
Mango Rosemary Sorbet
Mango & Rosemary. Oh yeah. You betcha. I dreamed up this flavor combo while explaining how something about mangoes always taste PINEY to me. I know a lot of people agree with me, but (surprise!) some people just don't get it. I suppose the riper a mango is, the less piney in flavor, but it always has a hint of it to my tastebuds.
Combine that subtle hint of pine with the aromatic and earthy flavor of rosemary, and you've got a new favorite flavor combo. The sweetness of the mango and added maple syrup balance out any residual 'woodsy' taste, and the orange juice adds just a snap of citrus to round the flavors out. I'm a big fan of this recipe, and can't wait to make it again to share, because lets be honest- between recipe testing, photographing, and posting: I ate almost the whole batch myself. This is the perfect recipe for using up the last of the seasonal mangoes, and a great way to use some fresh rosemary before you put it and dry it for winter. (Unless you live in So Cal like us- then it's sort of a year round friend.) Let's eat!
INGREDIENTS:
1- 15 oz can coconut milk 1 whole mango (about 1 cup), skinned, pitted and cubed 2 tablespoons fresh rosemary, chopped 2 tablespoons maple syrup or agave nectar 2 tablespoons freshly squeezed orange juice DIRECTIONS: In a high-speed blender or food processor, combine coconut milk, mango, rosemary, maple syrup, and orange juice and blend until combined. Pour into a freezer-safe dish, and cover. Freeze for at least 3 hours, but overnight if possible. Remove from freezer about 10 minutes prior to serving to allow sorbet to soften for scooping. Serve with a sprig of fresh rosemary and a cookie. Any kind will do. Will stay fresh in the freezer, well covered, indefinitely. Enjoy!
Strawberry Basil Ice Cream
I know, I know, I've been complaining about the heat for weeks now. But the struggle is REAL. And our tiny home is gettin' real toasty from about noon to 7 pm lately. Ick. We're whipping up cool treats to beat the heat exhaustion and avoid trips the movie theatre just to pay $24 for air conditioning. Our basil plants have been freaked out by the weather too, so they're in flowering mode and we're trying to eat up what what we can before this round of growth wraps up. Basil is great in bruschetta and we certainly don't have a shortage of tomatoes, but ice cream tastes better than lukewarm bruschetta. Trust me.
Plus, ice cream in fun flavors is FUN. I know, I said it twice. But seriously- this flavor will change how what you think about plain ol' strawberry ice cream. (But if you still love the original, we've got a recipe for that too.) Adding basil livens it up and makes it refreshing. Plus, you'll look like a regular Martha Stewart the next time you serve this to your friends. Seriously. And if you grow your own basil, you can brag about that too. 'Cause you rock. Now, let's all SCREAM for (dairy-free, vegan, gluten-free & raw)ICE CREAM!
INGREDIENTS:
2 cans coconut cream 1 lb. strawberries, rinsed and hulled 1 loosely packed cup of fresh basil 1/4 cup agave nectar 1 teaspoon vanilla DIRECTIONS: Combine all ingredients in a high-speed blender or food processor until completely combined and pour into a freezer-safe container. We used a loaf pan. Let mixture freeze 4-8 hours or overnight, and remove from freezer 10 minutes before serving to soften. Scoop into bowls, cones, or your mouth. Enjoy!
Strawberry Lemon Crisp
Strawberry season is in full-swing! At the grocery store, the farmers market, and maybe in your own backyard, these perfect little fruits are popping up everywhere. This time last year we were hanging out on an organic farm, picking tiny organic strawberries by the bushel; those were the best strawberries I've EVER had. I miss them. And while California strawberries may not be as sweet, they sure are prevalent! We decided to do something with all the strawberries we've been hoarding and toss together this deliciously simple crisp. With the addition of some raspberries and fresh lemon, it screams summer and begs to be eaten. Keep it gluten-free if that's your thing, or use what you have on hand. Either way, prepare to eat 3 servings single-handedly. It'll happen. Let's eat!
Ingredients:
Crisp Topping: 1 cup oats (certified GF, if desired) 1/2 cup gluten-free (or whole wheat) flour 1/4 cup shredded coconut 1/4 cup organic sugar, maple syrup, or agave nectar 1/2 teaspoon cinnamon 1/4 teaspoon salt 4-6 tablespoons melted coconut oil Strawberry Lemon Filling: 3 cups freshly hulled strawberries, halved 2 cups fresh raspberries (or use 2 more cup of strawberries- your preference!) 2 tablespoons lemon juice 1 1/2 tablespoons lemon zest 1 tablespoon cornstarch 1 teaspoon vanilla 1/2 teaspoon ground ginger (optional) Directions: Crisp Topping: Combine all ingredients except coconut oil together in a medium sized bowl, stirring to combine. Slowly add in the coconut oil, mixing until oats begin to clump and resemble coarse crumbs. Strawberry Lemon Filling: Place all berries in a large mixing bowl. Sprinkle in lemon juice, lemon zest, cornstarch, vanilla, and ginger (if using). Toss to evenly coat berries, then pour berry mixture into a greased 8x8 glass baking dish. Top with crisp topping and bake at 375 degrees for 45 minutes, until mixture is bubbling and crisp is golden in color. Let cool before serving, and save any extras in the fridge for several days. Makes 6-8 servings. Enjoy!
Coconut Bacon & Chocolate Chip Pancakes
Yep. Yesterday, this happened. We couldn't decide what to have for breakfast and we were out of the usual- beans and rice and potato breakfast bowls, covered in cumin and avocado. So we got creative; and by we, I mean Alex. Sometimes he pushes food boundaries justttt far enough, into deliciousness. I always underestimate his food imagination. This time though, it led us straight to rich, smoky, chocolatey pancakes- and that was before we added maple syrup to the equation. As they were cooking, we were drooling. Perfectly golden pancakes with melty chocolate and sprinkled with salty coconut bacon? Yeah, okay, Alex won this one. Maybe I'll start trusting his food cravings more often.
We always keep a jar of coconut bacon handy. Its one of the most popular recipes on our site, and we use it on everything- sandwiches, salads, ice cream, and now pancakes. We're hooked! Its the perfect substitute for anything 'bacon'-y, saves real baby piglets AND is totally cholesterol free- what's not to love? Plus, if you make a whole batch of coconut bacon and use only enough for this recipe, you can save your un-used coconut bacon in an airtight container indefinitely in the fridge or pantry. If it gets a bit soft overtime, simply bake it for a few minutes in the oven to re-crisp it, and GO! Now, let's eat!
Ingredients:
1 1/4 cup gluten-free all purpose flour OR whole wheat flour 2 tablespoons organic sugar 2 teaspoons baking powder 1/2 teaspoon salt 1/4 teaspoon xantham gum (only if using GF flour) 1 1/4 cup water 1 tablespoon melted coconut oil 1/4 cup chocolate chips OR chopped bar chocolate 1/4- 1/2 cup coconut bacon Instructions: First, if necessary, prepare a batch (or 1/2 batch) of coconut bacon. (You can buy it online, but you save TONS of money making it yourself and you'll have leftovers!). Set aside. In a large mixing bowl combine the flour, sugar, baking powder, salt and xantham, if using. Stir together, then use the spoon or whisk to form a well in the center of the dry ingredients, pushing the flour mixture to the outsides of the bowl. Pour in the water and oil and whisk together completely. (If batter seems a bit thin, add a little flour. If batter seems a bit thick, add a little more water.) Once batter is ready, mix in chocolate chips. Heat a greased skillet over medium. Pour 1/4 cups of batter onto the skillet, and sprinkle with coconut bacon. Gently pour a little bit more batter (about a tablespoon) over the coconut bacon layer, and let cook until bubbles form and edged begin to crisp. Flip pancakes once, allowing the bottom side to cook until golden before removing from the skillet and serving. Makes about 6 medium sized pancakes. Serve with maple syrup (the real stuff!) and a little vegan butter, and enjoy!
Coconut Cookie Butter Bars
We're finally getting settled into our new place in Long Beach, and totally loving it. We have both a Trader Joe's and a Jamba Juice within walking distance (melt my heart!), and have gotten back to our daily runs, which is great for both my rear end and Maddie's. Alex and I have been dating almost 5 years (holy cow!) and this is our first place we've lived just the two of us. And seriously, we're loving it. I finally don't feel guilty about setting up a food shoot on the counter and not picking it up for hours, or for filling the fridge with vegan goodies and crowding out my roommates food stores. This is gonna be a great move for us. And to celebrate our first new recipe in our new kitchen, I got a little splurgy. This sweet treat is a celebration of independence and deliciousness, of new beginnings and late night snacking- and man, it is good. But I won't lie, its a dessert you may want to eat in moderation. Its rich, fudgy, and filled with crunchy, sweet cookie butter...perfect for celebrating, and even better when shared with your significant other.
Before we go any further, a couple quick notes:
1) We used Trader Joe's brand crunchy speculoos cookie butter, which is NOT gluten-free. In our recipe, we offer both a GF and regular flour mixture as options, but to keep this recipe totally gluten-free, try making your own cookie butter from Foodie Fiasco's tried and true recipe. 2) This recipe is a little time consuming, with all the refrigeration. To make it easier on yourself, cook the base the night before, and prep the rest in the morning when the cake has had all night to set. 3) This is a seriously decadent dessert. We cut our bars into about 12 large squares, but each time we eat one, Alex and I end up splitting it, so feel free to cut these into much smaller-even bite sized- pieces. Ingredients: Sugar Cookie Layer: 2 1/2 cups whole wheat flour OR gluten-free all purpose flour 1/2 teaspoon xantham gum (only if using GF flour) 1 teaspoon baking powder 1/2 teaspoon salt 2 cups organic sugar (we used coconut sugar, which is why our batter is slightly browner than usual) 1 cup coconut oil or vegan butter 2 teaspoons vanilla extract 2 mashed, ripe bananas (medium sized) 1/2 cup shredded coconut Cookie Butter Layer: 1/2 cup coconut oil or vegan butter 1 cup cookie butter Chocolate Layer: 1/2 cup coconut oil or vegan butter 1 cup chocolate chips or chopped bar chocolate
Directions:
Sugar Cookie Layer: Preheat oven to 350 degrees. In a medium sized mixing bowl, combine flour, xantham (if using), baking powder and salt. Set aside. In a stand mixer, beat together sugar and coconut oil (or butter) until whipped, about 1 full minute on high speed. Add in vanilla and bananas, and continue to mix until combined. Add in dry ingredients and mix again, until a batter forms. Toss in shredded coconut and mix one last time to distribute it throughout the batter. Pour batter into a greased or lined 8x8 glass baking dish (for thinner bars, feel free to use a 9x13 inch pan), and bake for 30 minutes, or until an inserted toothpick comes clean. When finished, let cool on the counter for at least an hour (but up to overnight), or in the fridge for at least 30 minutes to set. While cooling, make cookie butter mixture. Cookie Butter Layer: In a small saucepan, combine the coconut oil or vegan butter and cookie butter over low heat. Stir frequently, until mixture melts together, then promptly remove from heat and let cool and thicken. Once thickened to the consistency of slightly thinned cookie butter, pour/ spread mixture over cooled cookie base. Immediately store in the fridge or freezer, to set cookie butter layer, for about 30 minutes. While setting, begin chocolate layer. Chocolate Layer: In a small saucepan, combine chocolate and coconut oil or vegan butter over low heat, stirring frequently until mixture melts together. Remove from heat and pour chocolate mixture over chilled cookie butter layer, immediately placing bars back into the fridge or freezer for about 30 more minutes to set completely. Once the entire cake has set, remove from fridge or freezer, and cut. If frozen, allow cake to warm slightly to room temperature so the chocolate doesn't crack. Cut into 12 (or more) squares, and serve. Saves well in a covered container in the fridge for about a week, or in the freezer indefinitely. Enjoy!
<
|
tagsAll  RSS Feed RSS Feed
|