Loaded Vegan Nacho Fries
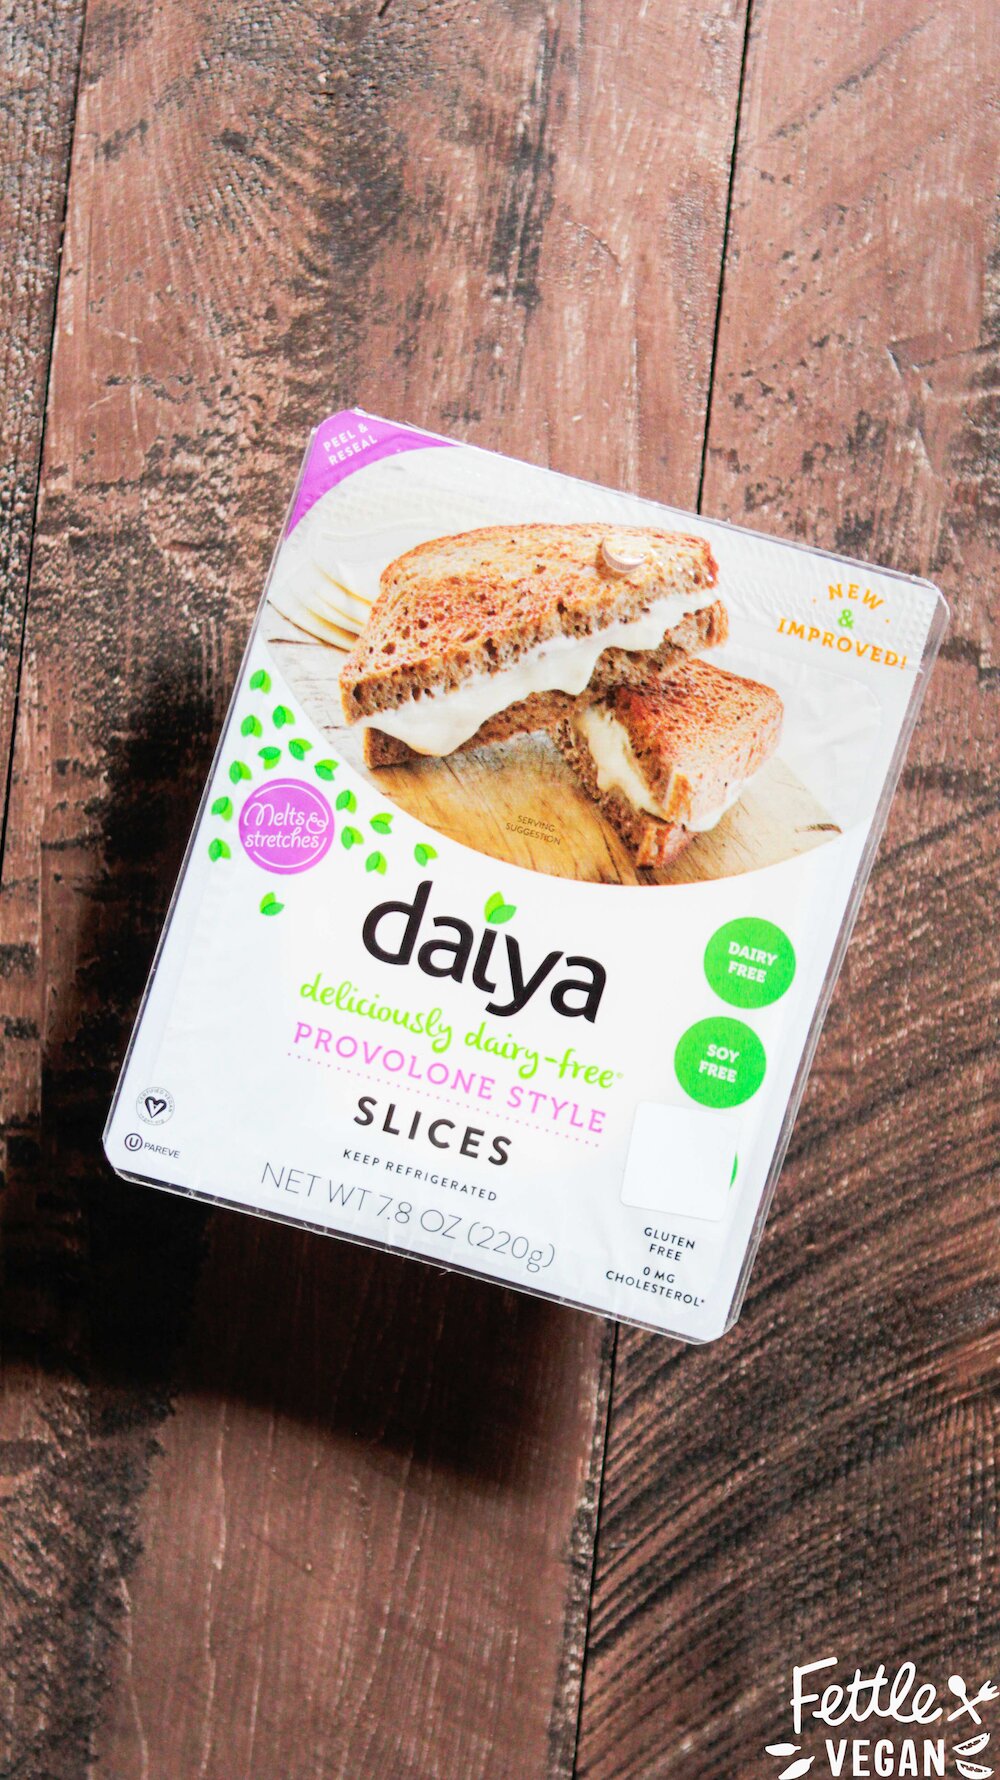
Hi friends! We love great plant-based cheeses over here and one of our favorite brands, Daiya Foods, is launching a bunch of new, improved, and DELICIOUS products TODAY, March 10th, at Expo West! Expo is the biggest food show of the year and only the best products make an expo launch - so you KNOW they're gonna be great. How else can you trust that they're better than ever? Because (lucky me!) I got to taste-test all the new styles and flavors and I can promise you - they are SO good! They're still churning out delicious, dairy-free, soy-free, gluten-free plant-based alternatives, but are introducing a few new products this weekend as well - both the improved Daiya Shreds Cutting Board Collection and Cheeze Slices in several flavors. A noticeable improvement from the original version, Daiya is officially stepping up the plant-based cheese game with their new shreds and slices! The new cheeses are made with coconut oil but have the same incredible melt, stretch and taste as dairy-based cheese and can be enjoyed hot or cold. Plus, the cheeses do not contain any titanium dioxide OR carrageenan and are a great source of calcium!
I love that Daiya Foods is passionate about keeping their products plant-based for everyone - whether they’re dairy-intolerant, allergic, vegan, or simply living a healthy lifestyle. As someone with a lot of allergies and dietary restrictions, eating Daiya is a delightfully mindless indulgence. It's comfort food with a conscience! And it's available nearly everywhere these days! In over 22,000 grocery stores across the US and Canada, including Whole Foods, Kroger, Safeway and Publix. Going to Expo West tomorrow? Or not and wondering what all the fuss is about? Check out our 2015 + 2016 blog posts to find out why EVERYONE in the vegan/ blogging/ health field will be there!
INGREDIENTS
1 lb. frozen or fresh-cut french fries 1/4 cup enchilada sauce 1/2 cup Daiya Pepperjack Shreds - Cutting Board Collection 1 cup cooked black beans 1 medium tomato, chopped 1/2 medium red onion, finely chopped 1 jalapeno, thinly sliced 1/2 avocado, halved + thinly sliced cilantro, finely chopped lime wedges, for garnish DIRECTIONS Bake the fries on a baking sheet according to directions or at about 350 degrees for about 40 minutes, flipping halfway through. When finished, move the cooked fries to an oven-safe pan or container (this will be where you assemble your nachos) and set the oven to 'broil' or to at least 450 degrees. Drizzle the enchilada sauce over the fries evenly, then top with the Daiya Pepperjack Shreds. Place the dish in the oven until the cheese is melty, about 3-6 minutes depending on the temperature. Remove the dish from the oven and top the nacho fries evenly with the cooked black beans, chopped tomato and onion, jalapeño, avocado, cilantro + lime and enjoy immediately! NOTES You could also sub in Daiya Shreds - Cutting Board Collection in Cheddar, if you prefer. We loved the extra kick of spicy that the pepper jack gave here! Serves 2-4, depending on your appetites.
Keep an eye out for these updated packages on the shelves from Daiya soon! (And if you'll be at Expo today, come visit me at the Ozery Booth in Hall E before heading upstairs to Hall D to try Daiya's samples 😊) The Daiya Slices are the perfect addition to your favorite sandwiches. They are round in shape for convenience, and come in an updated, re-sealable package. Available in four crave-worthy flavors, including Cheddar Style, Swiss Style, Provolone Style, and the newest flavor - American Style. The new Daiya Shreds – Cutting Board Collection are perfect on pizza, cheesy pastas, your favorite Mexican dish (like our Nacho Fries above!), or in a simple grilled cheese sandwich. With a more dairy-like flavor and texture compared to Daiya Original Shreds, the Cutting Board Collection features the same amazing melt and stretch in Cheddar Style, Mozzarella Style and Pepperjack Style. You can find more on the new - and all of - Daiya Food's products here. See you all at Expo this weekend!
0 Comments
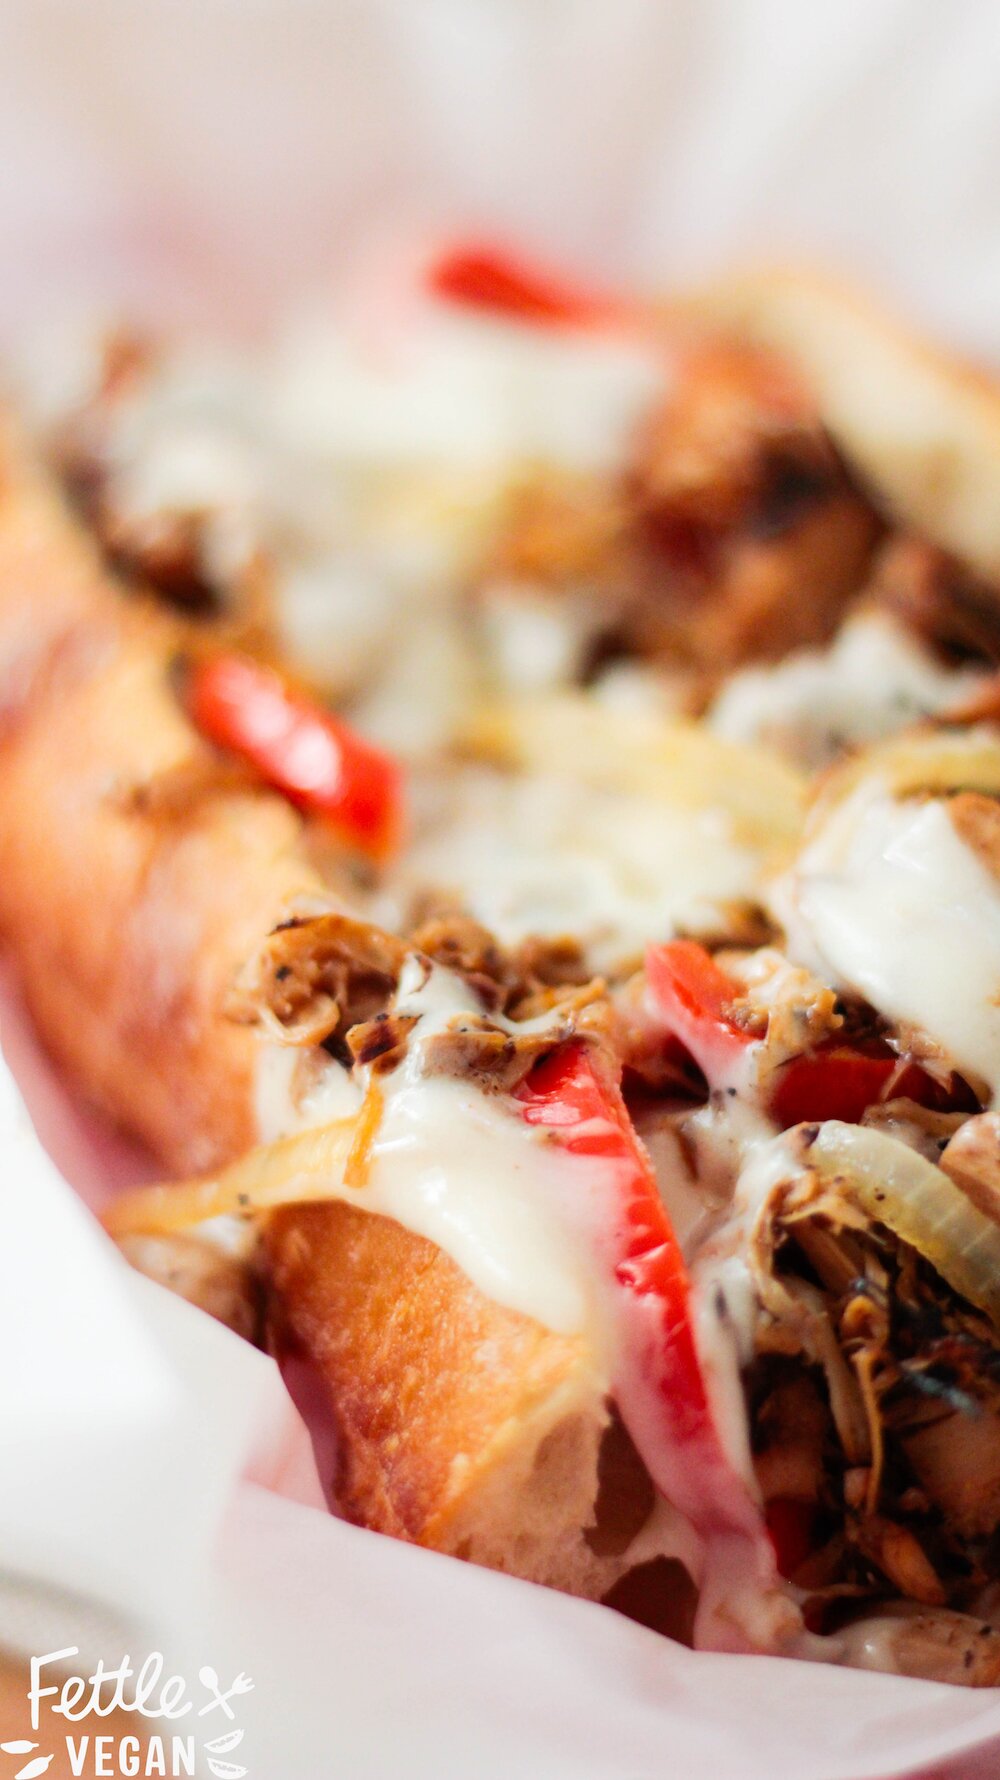
Jackfruit Philly Cheesesteaks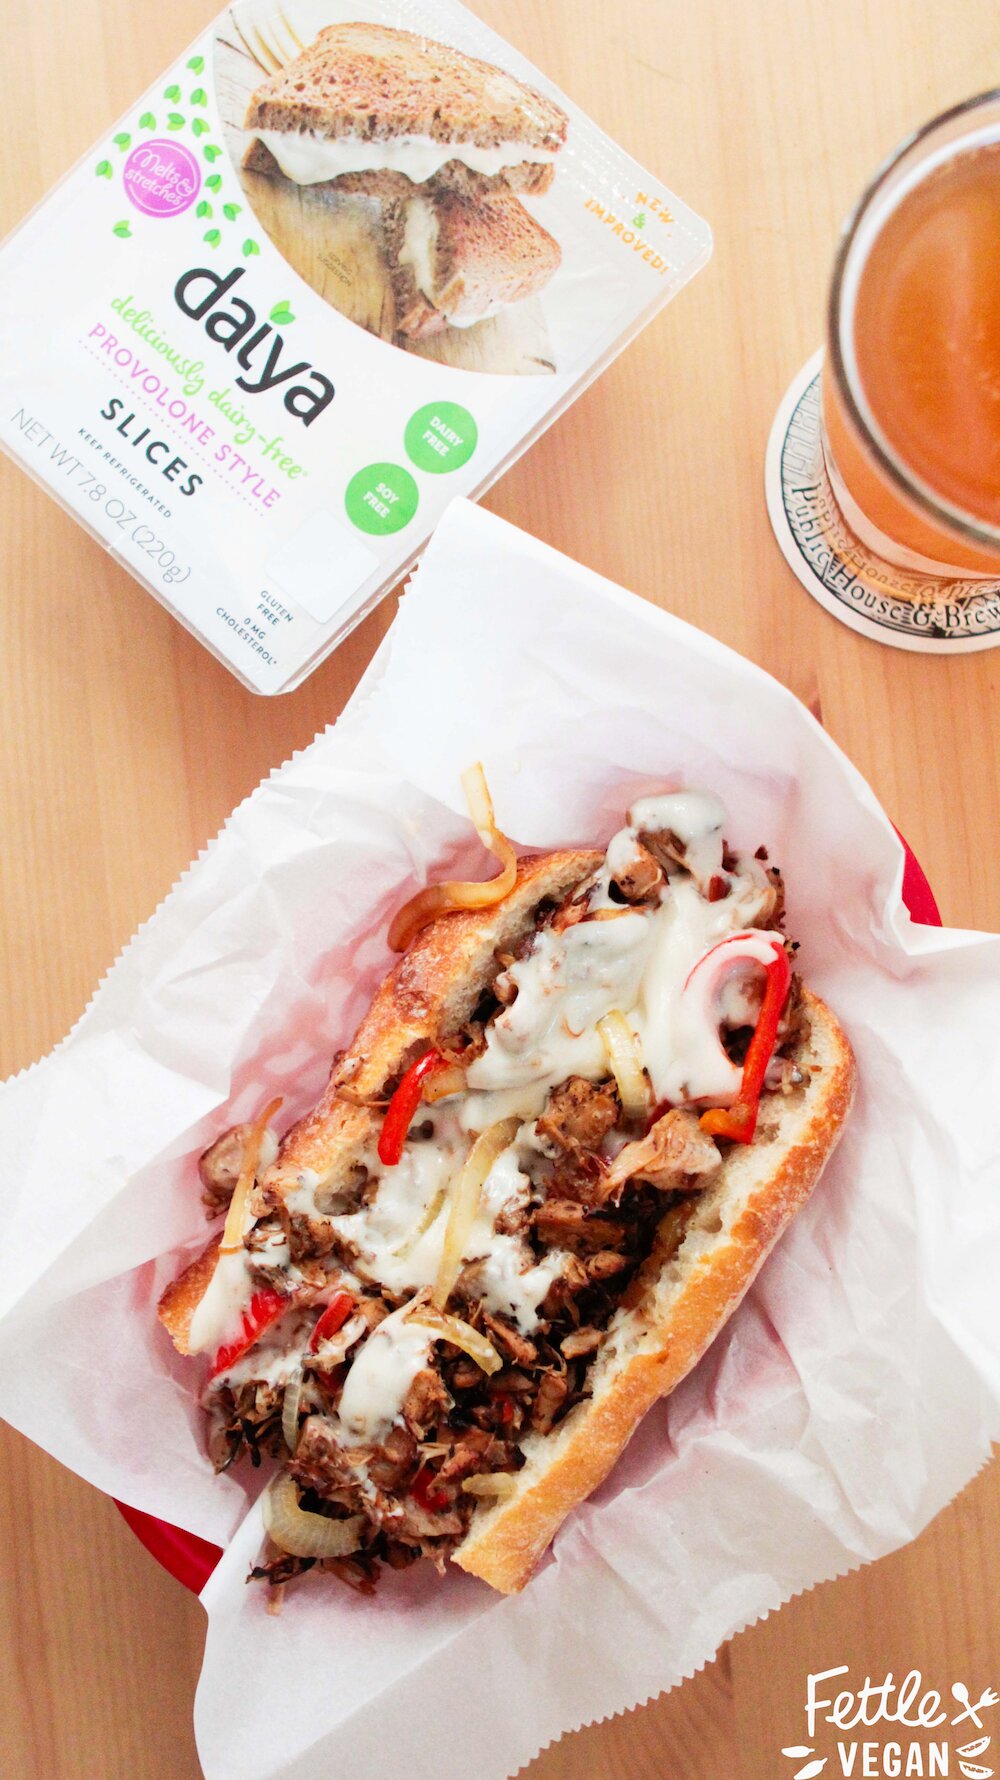
When I first met Alex there wasn't a Philly Cheesteak he wouldn't eat for lunch. He LOVED them! He was a sucker for the 'traditional' - although clearly it's debatable what the traditional version is exactly. He's always considered the melted provolone slices, not the cheeze whiz sauce, the original version - and the chef in me wants to hope he's right. So when he told me he'd sort of been craving that familiar old sandwich, we knew we could make a vegan version that was just as friggin' good. And I think we nailed it on this one. The secret? The cheesier-than-ever Daiya provolone slices! They're the perfect sub for the ooey-gooey, melty cheese that makes the original so memorable. The slices melt and stretch just like real cheese, but are a delicious, plant-based alternative for anyone looking to eat better, whether they’re dairy-intolerant, allergic, vegan, or simply living a healthy lifestyle.
The jackfruit makes the perfect substitute for a shaved steak, and was super like the original once we got a little char on the jackfruit. Our best tip is to cook in cast iron if you can - you'll get nice, crispy edges on the jackfruit. Once you get the jackfruit cooked up you toss in the grilled veggies and cheese, and voila! You've got yourself a super yummy, way healthier Jackfruit Philly Cheesesteak Sub! These sandwiches are so yummy served up fresh, but can be easily wrapped in paper and taken along on a picnic. Either way, do yourself a favor and cook these up for yourself. The recipe makes enough for two, so you can make one for someone you really like or have leftovers for day two. Oh, and people usually ask - we find our jackfruit at local Asian markets, but you can usually find it, though overpriced, at Whole Foods as well. Enjoy! 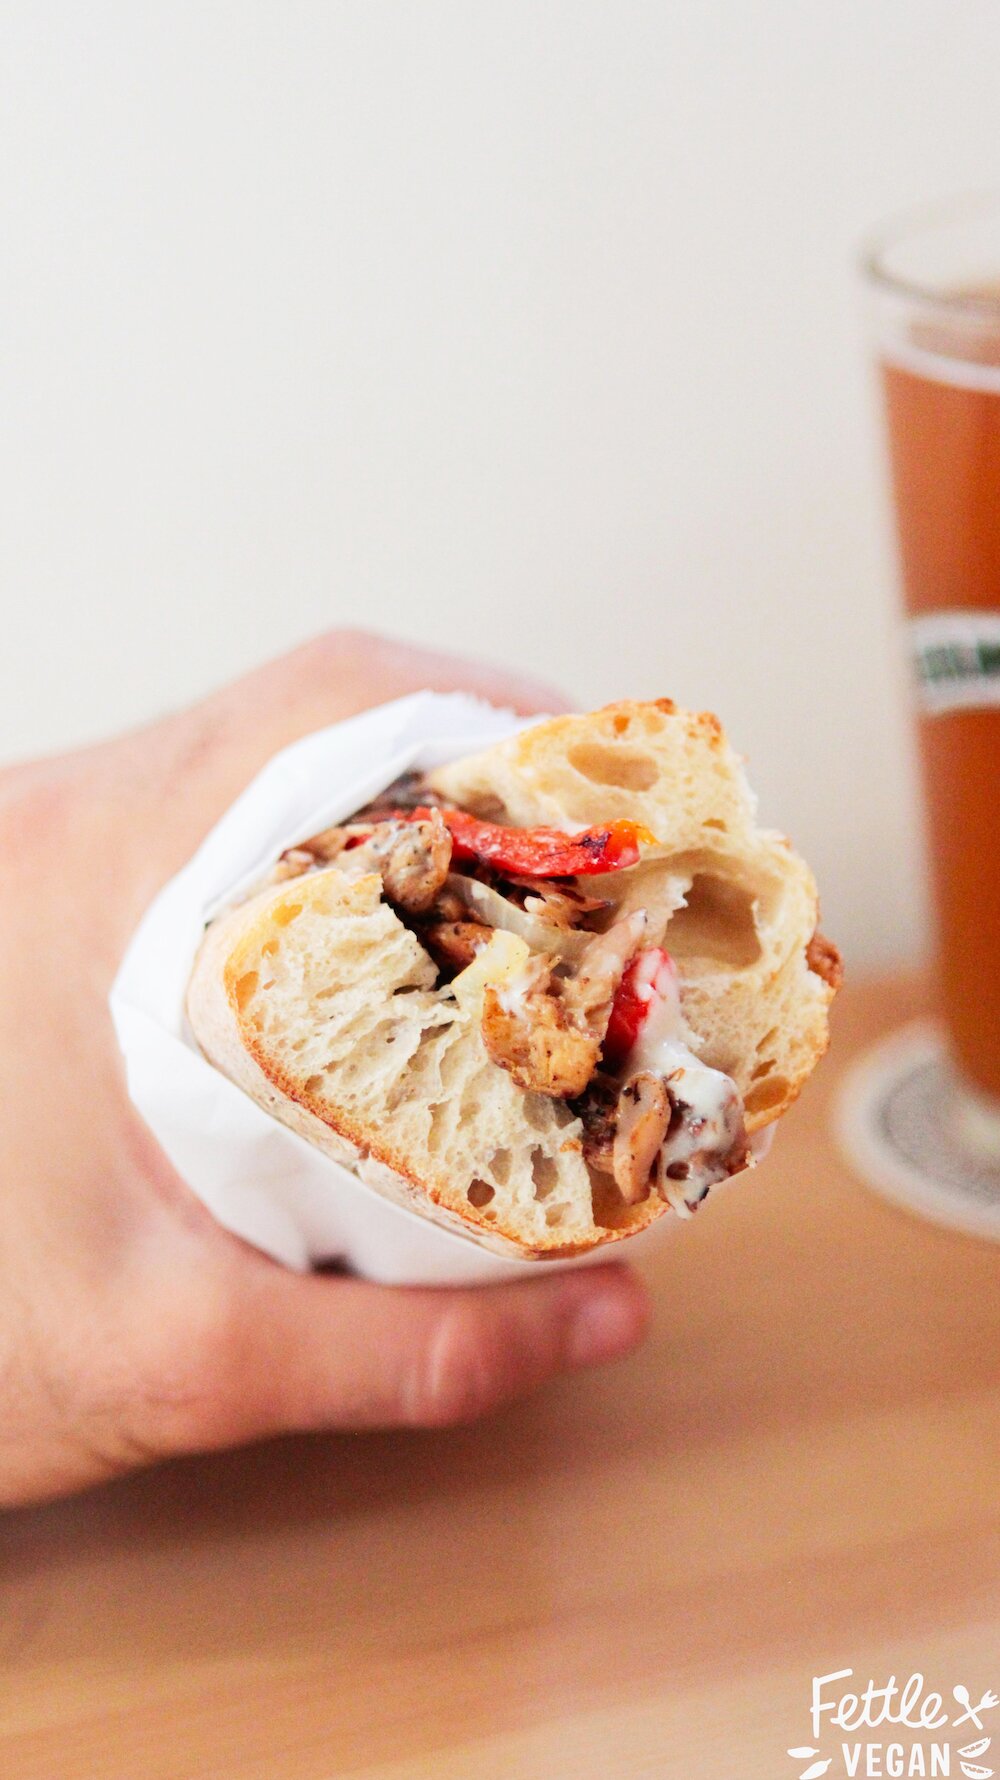
INGREDIENTS
Daiya vegan provolone cheese slices 1 loaf Italian bread or 2 large sub rolls, sliced 1 teaspoon coconut oil 1 medium yellow onion, thinly sliced 1 red bell pepper, thinly sliced 1 teaspoon coconut oil 2 - 20 oz. cans jackfruit, drained and shredded 1/2 cup water 1 large clove of garlic, minced 1 teaspoon liquid smoke 1 teaspoon maple syrup 1 tablespoon white cooking wine 1/2 teaspoon smoked paprika 1/2 teaspoon onion powder 1/2 teaspoon soy sauce salt + pepper to taste DIRECTIONS Place the Daiya slices and sub rolls to the side, you'll need them after the filling is prepared. Heat coconut oil in a medium-sized pan over medium heat. Sauté the thinly sliced onions and peppers until softened, about 8-10 minutes. Remove from heat and set aside. Begin heating the next bit of oil in a large skillet over medium heat. As it heats up, pour in the shredded jackfruit, water, minced garlic, liquid smoke, and maple syrup. Sauté until the liquid reduces to about half, then add the white cooking wine, smoked paprika, onion powder, soy sauce, salt and pepper. Stir to combine, and continue to cook over medium heat until the liquid has completely reduced and the jackfruit is beginning to brown. Throw the onions and peppers into the pan with the jackfruit and toss to combine. Line the mixture into a straight line across the middle of the pan. Place Daiya provolone slices onto the mixture (we used 2 per sandwich), then cover the pan with a lid for about 30 seconds to a minute, or until the cheese has become melty on top of the jackfruit mixture. Use a spatula to scoop the mixture onto your sub rolls and enjoy! NOTES Leftover filling will last in the fridge, covered, for a few days. Traditional cheesesteaks are served on soft bread, but all we could really find was a french baguette. While soft sub rolls are my recommendation, use what you can find. 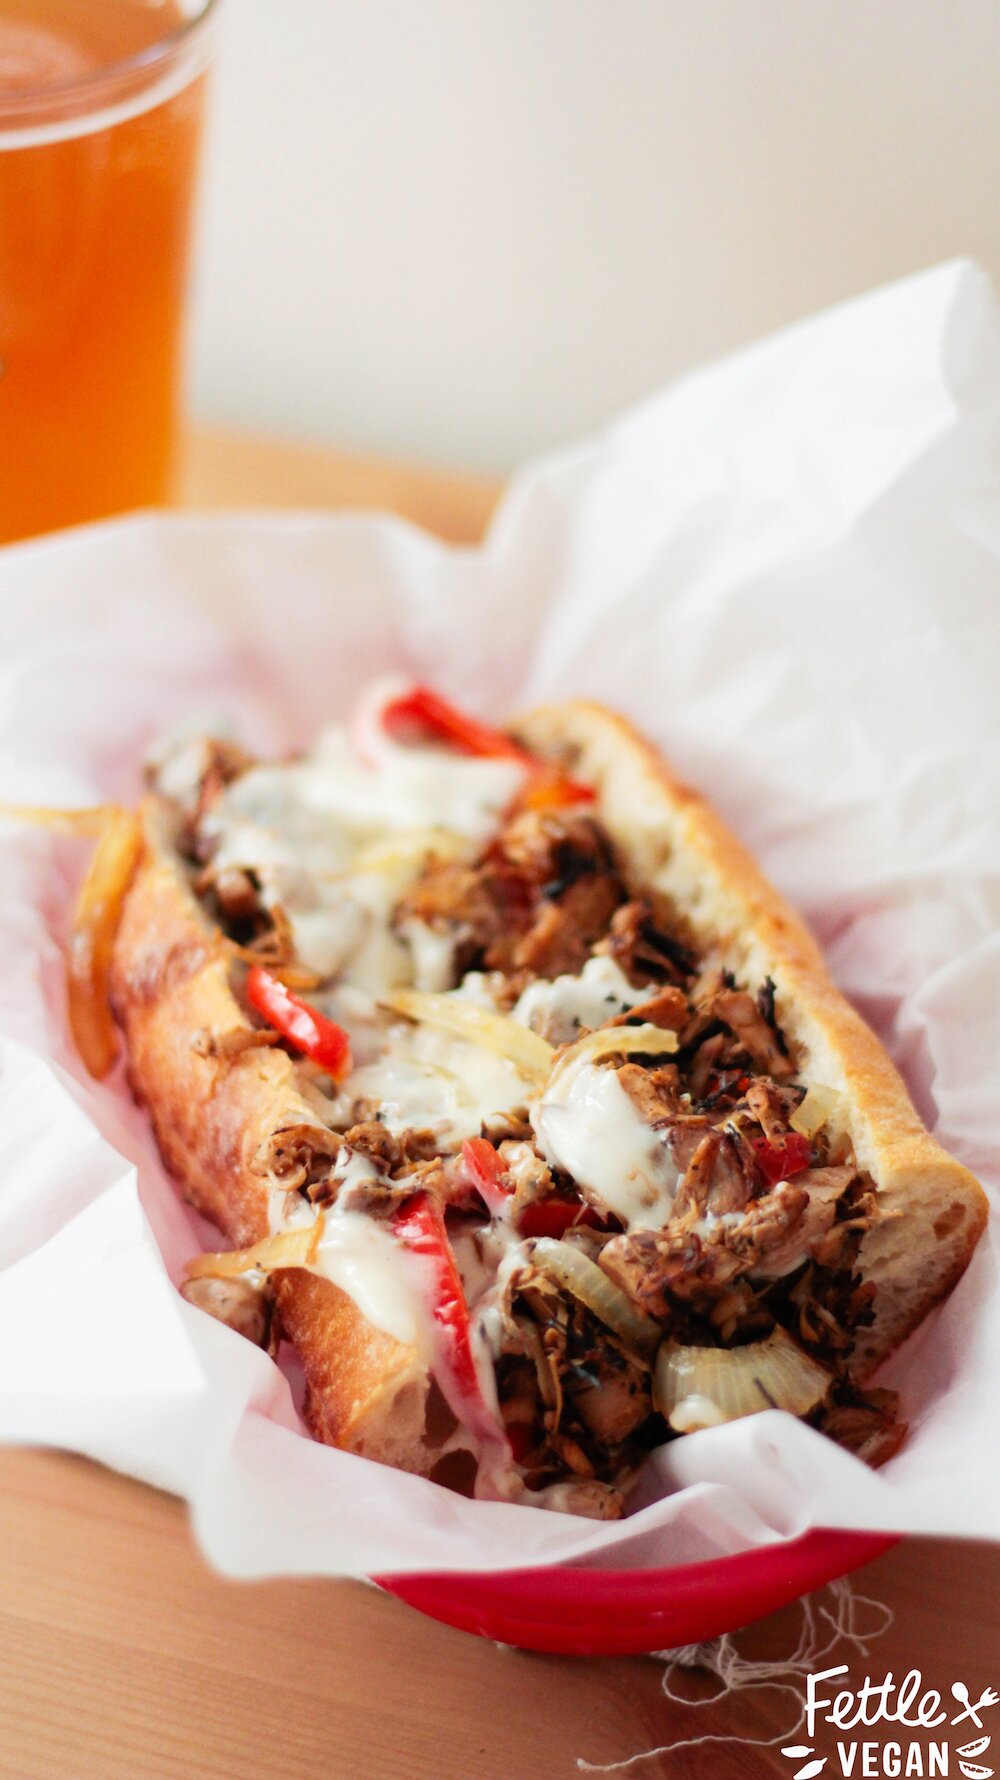
Buffalo Cauliflower Grinders
There's a new Whole Foods that was recently built near my house, and I love it. I try not to go too often, but with on-tap kombucha and a killer hot bar, how's a girl supposed to say no?! The store also serves up an incredible, vegan Buffalo Cauliflower Sandwich that I based this recipe off of. Okay, I totally stole the idea. I'm Sorry Whole Foods! Mostly because I can't afford to buy $9 sandwiches every damn day, but also because it's a super easy, super yummy sandwich combo. So maybe it's more like #srynotsry. The hardest thing to find - and maybe the most important part of any good sandwich - is good chewy bread, which I eventually found in the form of ciabatta rolls. You could also use demi-baguettes, or just slap the ingredients between two slices of thick, chewy bread. It's all gonna taste delicious, because buffalo cauliflower is maybe the best sandwich filling ever. It may the best thing ever, if we're being honest. It's spicy, it's tangy, it's so gooooood. So without further ado, I suggest you get to scrollin' and get to preppin' because these scrumptious sandwiches aren't going to make themselves!
INGREDIENTS
1 teaspoon coconut oil 4 heaping cups cauliflower (about 1 large head cauliflower), chopped into bite-sized florets 1 cup hot sauce (we used Frank's Red Hot) 2 cups broccoli slaw (store bought OR just shredded broccoli, carrots + red cabbage) 1 tablespoon olive oil 1 tablespoon lemon juice pinch of salt 4 demi baguettes or ciabatta rolls 1/2 cup vegan chive cream cheese (we used Kite Hill) green leaf lettuce, enough for 4 sandwiches DIRECTIONS Heat the coconut oil in a frying pan over medium heat. Chop the cauliflower florets and toss them in a pan with hot sauce. Cook them together over medium heat, tossing to coat, for about 12-15 minutes or until softened. While the cauliflower cooks, pour the broccoli slaw mixture into a mixing bowl with the olive oil, lemon juice and pinch of salt. Toss to coat everything evenly and set aside. Slice the ciabatta rolls or baguettes and smear about 2 tablespoons of cream cheese onto one side. Wash and dry the lettuce and set it aside. When the cauliflower is done and cools slightly, scoop it onto the rolls and top with the slaw, leaf lettuce, and other half of the bun. Serve immediately or wrap in paper and take 'em along on a picnic lunch. Either way, enjoy! NOTES Serves 4. Leftover cauliflower stays good in the fridge for up to a week. Homemade Vegan Cheez-It Crackers
As a kid I was known as the girl who could eat a whole box of cheez-its in an afternoon. Okay, maybe thats not what people said about me to my face, but I'm pretty sure people thought I was weird and I know for sure that one friend's mom always made sure they had at least one full box before I came over. I just loved them. I was a big cheese kid, but was lactose intolerant, so to compensate and avoid a tummy ache I would just gorge on weird cheesy flavored foods whenever I could get my tiny hands on them. My parents certainly didn't condone it, they just had no idea. And I still got tummy aches, because really who needs to eat an entire box of cheez-its? These days, I 'm a lot better about portion sizes. The originals weren't healthy or good for you and were packed with chemicals - but they were delicious! I decided it was about time I recreated my favorite childhood treat, but knew I needed them to be totally vegan and WAY healthier. And they turned out SO GOOD! They're crispy, crunchy, cheezy, salty, savory and super snackable. Plus, there are only 9 ingredients - and you probably have them all on hand right now. These are the kind of snack you don't at all have to feel guilty about snacking on, even if you do go a bit overboard. Perfect for taking along for lunch or snack at work and bringing on camping or road trips - so let's get snackin'!
INGREDIENTS
3/4 cup all purpose flour 1/4 cup cornmeal 2 tablespoons nutritional yeast 1 teaspoon salt 1/2 teaspoon garlic powder 1/4 teaspoon baking powder 1/8 teaspoon turmeric 5 tablespoons vegan butter 3-4 tablespoons cold water DIRECTIONS Preheat the oven to 350º and line a baking sheet with parchment paper. Add the flour, cornmeal, nutritional yeast, salt, garlic powder, baking powder and turmeric to a food processor and process to thoroughly combine. Add the vegan butter and pulse until crumbly. Add the cold water, a tablespoon at a time, until the dough comes together. Remove the dough from the food processor and form it into a disk. Place the disk onto a lightly floured surface. Lightly dust the top with flour and use a rolling pin to roll it to about 1/8th inch thick. Use a pizza cutter or knife to cut the dough into equal-sized square crackers. Spread the crackers onto the prepared baking sheet. Bake them for 14-18 minutes or until crispy and golden brown. Makes 60-80 crackers. Save leftovers in an airtight container or bag on the counter up to a week. Golden Beet Salad with Balsamic + Cashew Ricotta
Beets are definitely one of the most underrated root vegetables. Most people think they don't (or KNOW they don't) like them, and most restaurants won't put a dish on the menu that nobody will order. It's a sad cycle, and beets usually get the short end of the stick. But unlike their earthier, more bitter, urine-dying red beet cousin, the golden beet is a sweet veggie that tastes great whether you pickle, bake, brine, roast or juice it. It has a mellow flavor (and color) that pairs really well with tangy, acidic flavors like balsamic vinegar and richer textures like crunchy walnuts and creamy cashew ricotta - which is why we paired them together! Plus, yellow beets are packed with good-for-you vitamins and minerals like fiber, iron, potassium and folic acid. If you haven't tried golden beets, or have just been waiting for the right recipe to test them out in, make this salad. It comes together super easily and tastes great, plus it somehow totally looks and sounds like a dish you'd only find at a fancy restaurant. Let's eat!
INGREDIENTS
1/2 cup walnuts, chopped 1 cup raw cashews, soaked in warm water 2 tablespoons water 1/4 teaspoon salt 4 medium golden beets 4 cups arugula balsamic vinegar, as needed for serving DIRECTIONS Preheat the oven to 350º. Spread the chopped walnut onto a lined baking sheet. Bake for 8-10 minutes, stirring once. When finished, set aside to cool. Soak the raw cashews in warm water for at least 30 minutes. Drain the nuts and pour them into a food processor. Pour in the water and salt and pulse until a fluffy, chunky texture is achieved (similar to ricotta cheese). Set aside. Trim the ends of the beets, then place them into a medium-sized pot of water. Bring to a boil, then lower heat and cook over medium heat until fork tender, about 20-30 minutes. Drain the water and let cool slightly before using your fingers to slide the skins off. Toss the skins in the compost or trash and thinly slice the cooked beets. Spread the arugula between two large plates and top with the toasted walnuts, a couple tablespoons of the cashew ricotta, sliced golden beets and a drizzle of balsamic vinegar. Serve immediately! (Or, just prep it and take it for lunch to work all week!) NOTES Serves 2. Leftovers last up to a week in the fridge. Party-Sized Jackfruit Nachos!
Whether you're into football or not, you probably know that the Super Bowl is this weekend. I've never been much of a football fan myself, but I'm always down for a party centered around eating! We're going to have some friends over the day before for a little get together and these nachos will absolutely be making an appearance. They're deceptively simple to make, big enough to share with a crowd, and so good your guests might not even believe you made them yourself! We start by smothering toasted tortilla chips with our spicy seasoned jackfruit, then pour on our homemade queso cheese and all the toppings you can imagine - plus we added guac!
This is a dish you won't want to share - it is THAT good! Which is also why we supersized it, so maybe it'd make it juuuuust a little easier to share? No matter what team you're rooting for, you'll be glad you made these nachos to munch on...and so will your guests!
INGREDIENTS
1 large bag of tortilla chips 1- 15 ounce can black beans, drained 2- 20 ounce cans of jackfruit (in brine), prepared and cooked to our Jack Asada recipe instructions 1-2 cups homemade queso cheese (or sub whatever dairy-free cheese you prefer), warmed 1/2 cup red onion, chopped small 1/2 cup black olives, sliced 1/4 cup fresh cilantro, chopped the BEST guacamole, for serving limes, for garnish DIRECTIONS Preheat the oven to 375 degrees. Line a baking sheet with parchment paper (or aluminum foil). Spread the tortilla chips evenly over the baking sheet and scatter the drained black beans over the top. Layer the seasoned, cooked jackfruit evenly over the top, then place the baking sheet in the oven for 10 minutes heat the chips, beans and jackfruit together. When finished, pull the baking sheet from the oven and immediately top with the queso cheese, chopped red onion, black olives, cilantro and guacamole. Serve immediately! NOTES Save time by preparing the jackfruit and queso a day ahead, then just reheat as necessary! If you use a different cheese (daiya, for example) we would recommend adding the cheese layer BEFORE baking so it melts while in the oven. Add whatever other toppings you like! Some suggestions? Cabbage, salsa, hot sauce, green onions, jalapeños, tomatoes! 
Savory Stuffed Mushrooms
Until a few years ago at a holiday party, I thought I hated stuffed mushrooms. I'd never actually tried them before that but I wasn't a huge fan of mushrooms and it seemed to me like no matter what you stuffed them with, they could't possibly taste that great. I was very, very wrong. The older I get, the more I like mushrooms - they're still not my favorite on their own, but the earthy, rich, almost meaty flavor they lend to dishes is both impressive and delicious, as far as I'm concerned.
Anyway, a friend brought some stuffed mushrooms to that holiday party a few years ago, I tried them, and before I knew it I was popping button mushrooms in my mouth like they were going out of style. I was hooked! But that was over two years ago, and this is the first time I've made a stuffed mushroom recipe since that is just so out of this world I had to share it with you guys. I know there are tons of recipes for this dish online, but I promise this one is really good. And pretty easy, too! It's packed with flavor, the filling has great texture, and the homemade parmesan cheese on top adds some fanciness and helps keep the filling moist. The whole things comes together in your mouth like WOAH. This is a recipe worthy of sharing at your next Holiday party - it's a serious crowd-pleaser! Let's get cookin'.
INGREDIENTS
Stuffed Mushrooms: 24 ounces cremini mushrooms, stems removed 2 tablespoons coconut oil 4 cloves garlic, minced 2 shallots, chopped 4 cups fresh spinach 1 cup wild rice, cooked 1/2 cup roasted red peppers, chopped 1/2 cup walnuts, finely chopped 1/2 cup bread crumbs 1/2 cup fresh parsley, chopped 1 tablespoon + 2 teaspoons balsamic vinegar 1 teaspoon salt 1/2 teaspoon pepper fresh chopped parsley, for garnish Parmesan Cheeze: 1 cup cashews 1/4 cup nutritional yeast 3/4 teaspoon salt 1/4 teaspoon garlic powder DIRECTIONS Preheat oven to 375 degrees. Gently wash the mushrooms and remove the stems. Place them cap down onto a lined baking sheet and set aside. In a large cast iron pan, melt the coconut oil over medium heat. Sauté the garlic and shallots until soft and fragrant, about 5 minutes. Add the spinach, stirring continuously until it has wilted. Remove the pan from heat and pour the cooked veggies into a large mixing bowl. Stir in the wild rice, roasted red peppers, walnuts, bread crumbs, parsley, balsamic vinegar, salt and pepper. Toss the mixture together and set it aside to cool for a few minutes. While the mixture cools, you can prepare the parmesan cheeze by placing all of the ingredients into a food processor and pulsing until the mixture becomes a fine meal. Save some (about 1/4-1/2 cup) to sprinkle over the mushrooms and save the rest in an airtight container in the fridge up to 2 weeks. When the mixture has cooled enough to handle, use a spoon, ice cream scoop, or your fingers to scoop the mixture into the cap of each mushroom. The amount you use will vary depending on the size of the mushroom cap. Once all the caps are filled, sprinkle the reserved parmesan cheeze over the top. Bake the stuffed mushrooms for 20-25 minutes, until tender. Remove from the oven, let cool slightly, and serve immediately! NOTES It was hard to come up with just how many people this serves since it really depends on how big the shrooms are, how many people are around, and how many each person eats BUT this recipe gave me 1 packed baking sheet full of stuffed mushrooms. Leftovers can be saved in the fridge up to 3 days. They are best reheated in a microwave or in an oven at about 350 degrees for 10-15 minutes, though they may get slightly softer after reheating.
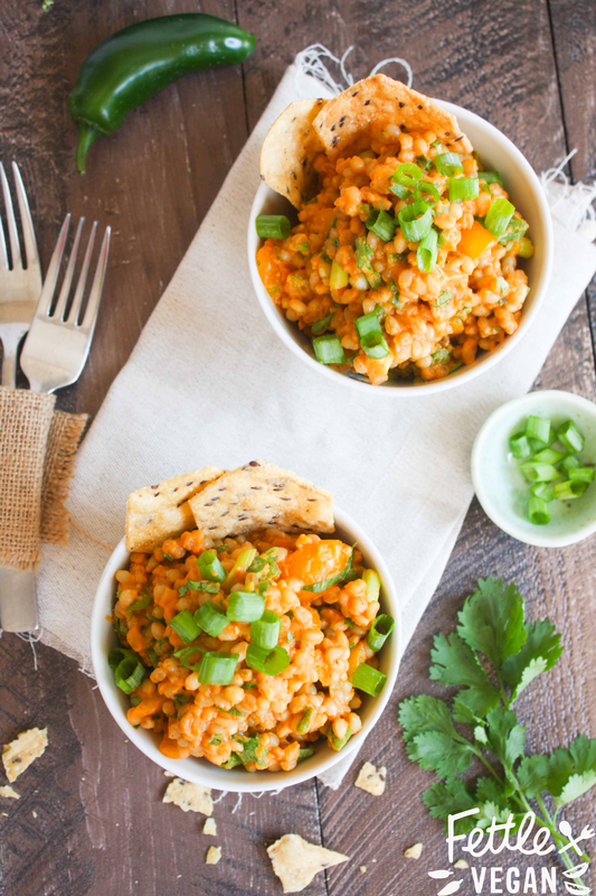
Mexican Wheat Berry Salad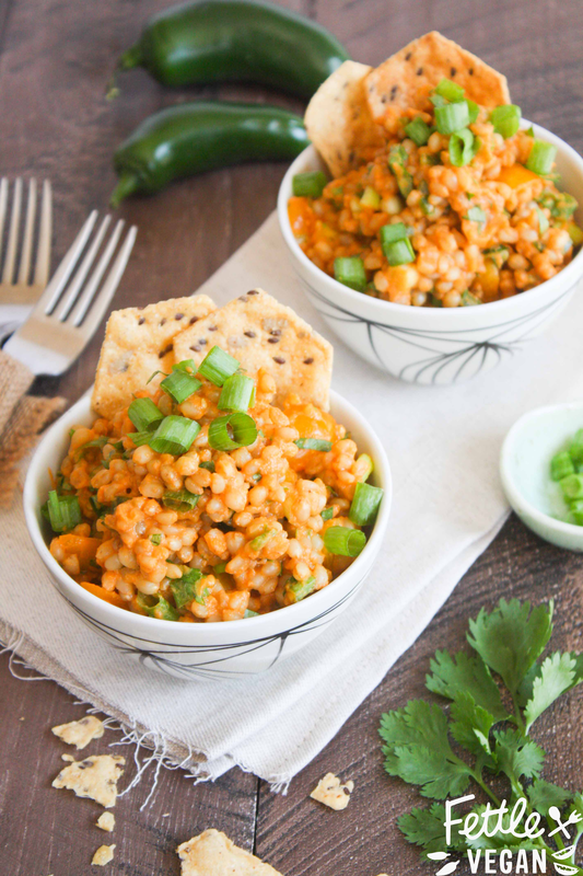
Sometimes you want something a little spicy, sometimes you don't. If you don't, thats okay. If you do, this dish is for you! We used our flavor-packed, low-fat Cauliflower Queso Cheeze recipe to coat one of our favorite and underused pantry staples, wheat berries, and added plenty of fresh veggies and cilantro to kick it up to party-worthy appetizer level! We fell in love with wheat berries a few years ago at a friends wedding where they served a lovely vegetarian salad (that I literally picked the cheese out of) and have been incorporating them into our diets more and more ever since. Wheat berries are the entire kernel of wheat, including the bran, germ, and endosperm. This means that they are the purest, whole, unprocessed form of wheat. When ground, they make whole wheat flour! Wheat berries are high in fiber and rich in vitamins B1 and B3, plus magnesium, phosphorous, copper, manganese and selenium. And since they're so hearty and full of fiber, a 1/2 cup serving of cooked wheat berries does a great job of filling you up and keeping you fuller, longer. We love this salad as an appetizer or side dish alongside our Jackfruit Asada Street Tacos. Its a crowd pleaser and requires very minimal work on your part, plus is easily made ahead for parties. Let's eat!

INGREDIENTS:
3/4 cup hard wheat berries 3 cups water 1/2 cup Queso Cheeze 1-2 tablespoons jalapéno, chopped 1/2 cup tomatoes, diced (we used yellow tomatoes from the garden!) 1/2 cup green onion, sliced 2-3 tablespoons chopped cilantro juice of 1 lime chips for scooping (optional) DIRECTIONS: In a medium sized pot, boil wheat berries in water for about an hour, until the berries become soft enough to eat. Drain the water, and set the wheat berries aside to cool. If you haven't prepped the queso cheese, go ahead and do that. If you have, move on to the next step. Prep jalapeños, tomatoes, green onion, and cilantro. When wheat berries have cooled, mix in queso cheeze, jalapeños, tomatoes, green onion (save a little for garnish, if you like), chopped cilantro, and the juice squeezed from 1 lime. Mix with a wooden spoon to combine, garnish with remaining green onion, and serve with chips! Makes about 2 cups, serves 4. This dish will save well in the fridge for up to a week. Enjoy!
Follow my blog with Bloglovin
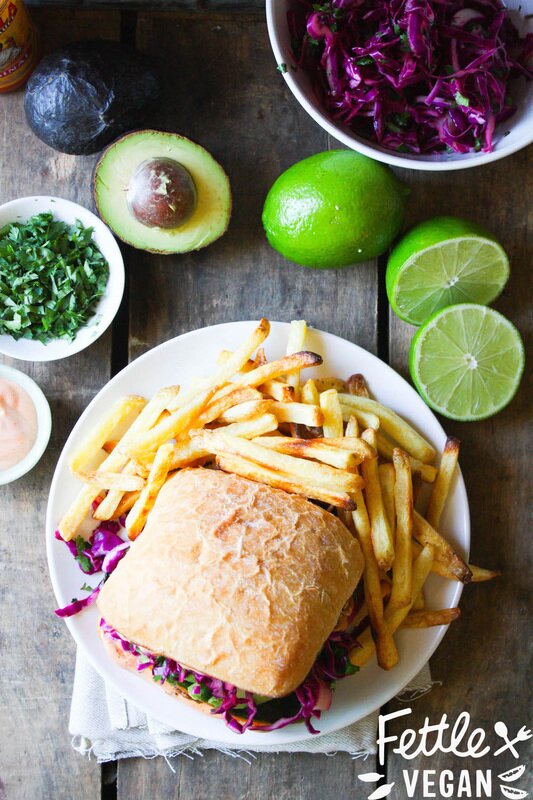
Field Roast Fiesta Burger!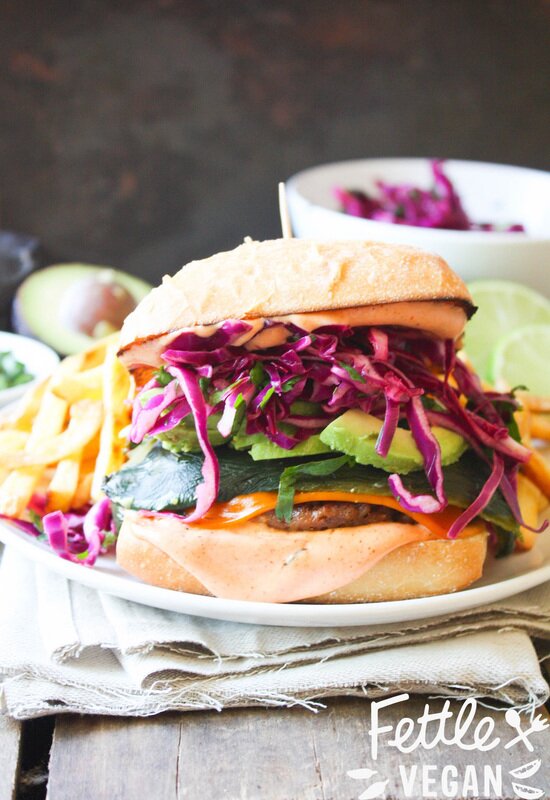
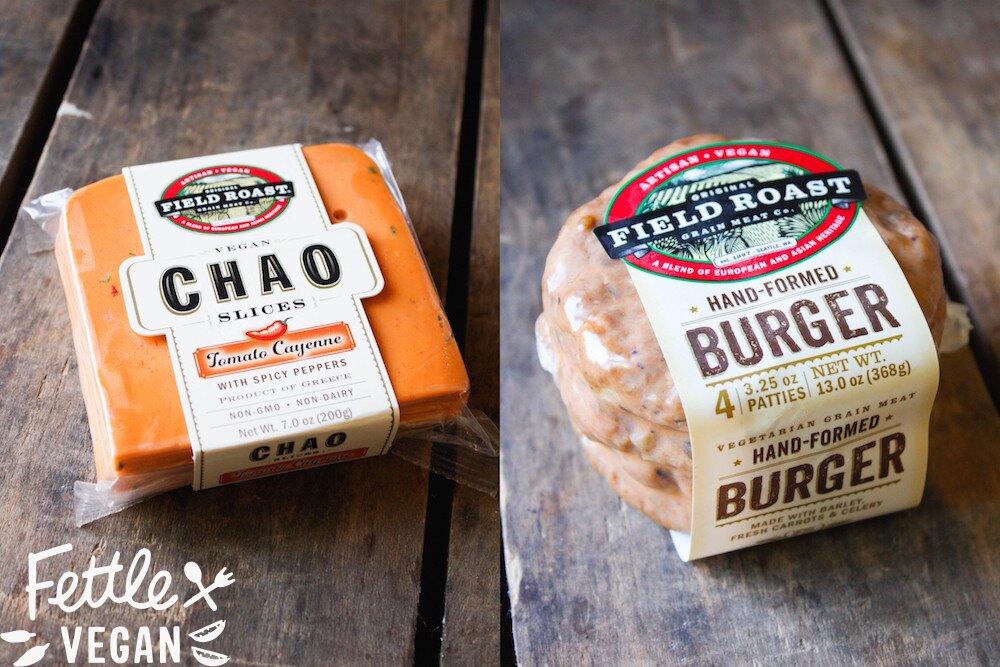
We've been fans of Field Roast for a few years now and have always loved incorporating their flavorful grain-based sausages in jambalaya, soups, and on their own in a bun and slathered in mustard and onions. At Expo West this year, we FINALLY tried the long-awaited and AMAZING Chao cheeses in all three flavors - tomato cayenne, creamy original, and coconut herb. They're super realistic in flavor + texture to what I remember munching on a kid and they are the perfect filling for an ooey-gooey grilled cheese. Alex is big on finding the PERFECT veggie burger- and as far as texture and flavor goes, Field Roast's Hand-Formed is his first choice. Is it the most realistic looking burger to a meat patty we've seen yet- especially pre-cooked. You could convince any meat eater that whats in the plastic is a turkey burger for sure...if you trash the label, of course. The burger base is a blend of whole barley, carrots, garlic, onions, and celery- and of course, a secret blend of spices! They're high in protein and non-GMO, and are hand-made in small batches, by hand, in Seattle.
When we were sent a few extra samples after the Expo, we decided to create (what we're calling) a Fiesta Burger smothered in Firecracker Sauce, Roasted Poblano Peppers, and Cilantro Lime Cabbage Slaw...and its fucking delicious. So, let's just pretend we're celebrating Cinco de Mayo three weeks early, grab a margarita, and get cooking. Olé! 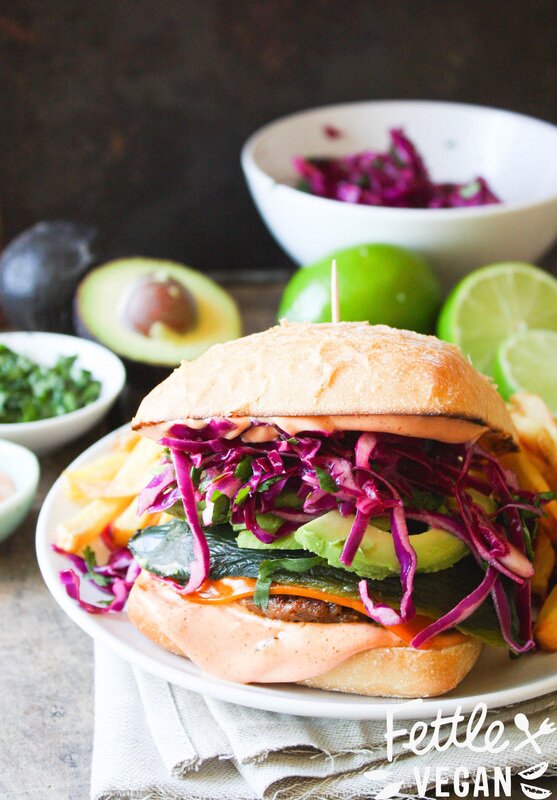
INGREDIENTS
2 Field Roast Hand-Formed Burgers 2 slices of Field Roast Chao Tomato Cayenne Cheese 2 focaccia buns, sliced 1 large or 1 medium poblano peppers 2 cups shredded purple cabbage 1/4 cup chopped cilantro 1/4 cup freshly squeezed lime juice 1/2 teaspoon salt 1/2 cup vegan mayo 1-2 tablespoons hot sauce 1/2 teaspoon smoked paprika 1 avocado, pitted and sliced DIRECTIONS Roasted Peppers: Preheat oven to 425 degrees. Roast washed, halved, and seeded peppers on a lined baking sheet for 15-25 minutes, until skin gets bubbly and brown. Remove from oven, let cool, and peel off bubbly skin so you're left with just the meaty part of the pepper. Set aside. Cilantro Lime Cabbage Slaw: In a large mixing bowl toss together cabbage, cilantro, lime juice, and salt. Set aside. Firecracker Sauce: In a small bowl combine mayo, hot sauce, and paprika. Stir well to combine. Fiesta Burger: Heat a teaspoon of oil over medium heat in a large cast-iron pan. Fry Field Roast patties until crisp and browning on one side. Flip burgers, toss on a slice of tomato cayenne cheese, and let burgers cook until equally crisp and browning on the bottom side. While the burgers cook, slather bottom patties with about 2 tablespoons each of the Firecracker Sauce. Top with the cooked burger and melty cheese, then layer on the roasted poblano peppers, Cilantro Lime Cabbage Slaw, and sliced avocado. Spread a bit more Firecracker Sauce on the top bun, add it to the pile, and enjoy! Serves 2. Leftover slaw + firecracker sauce can be refrigerated for up to a week.
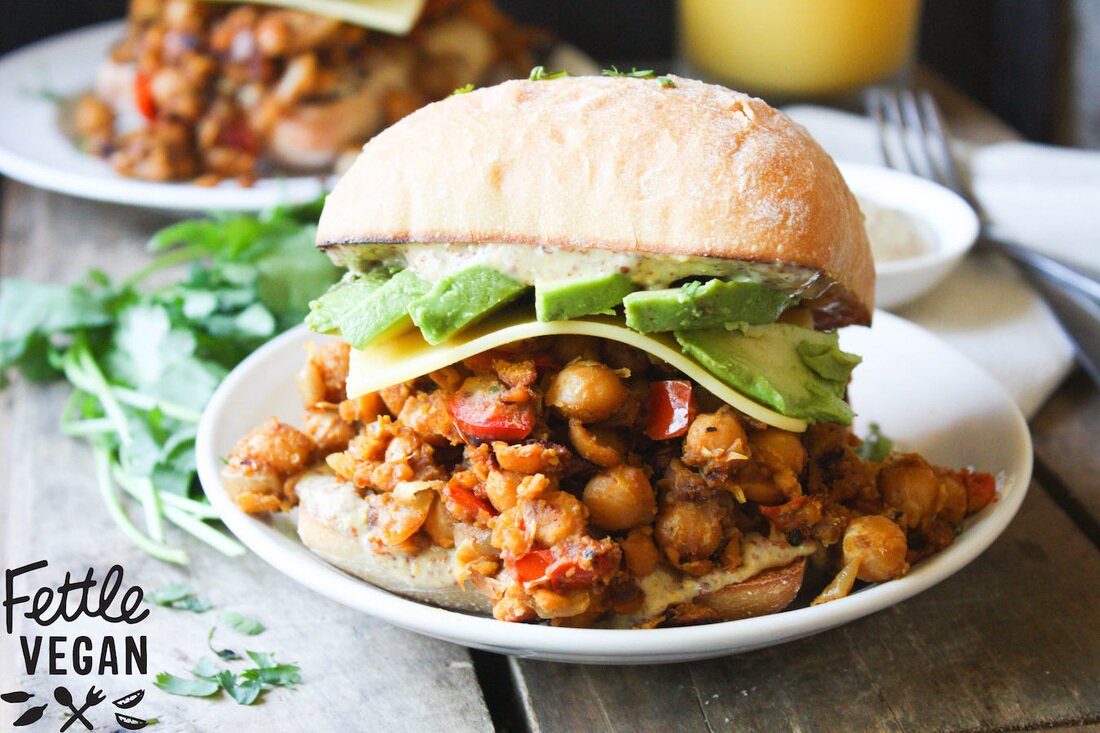
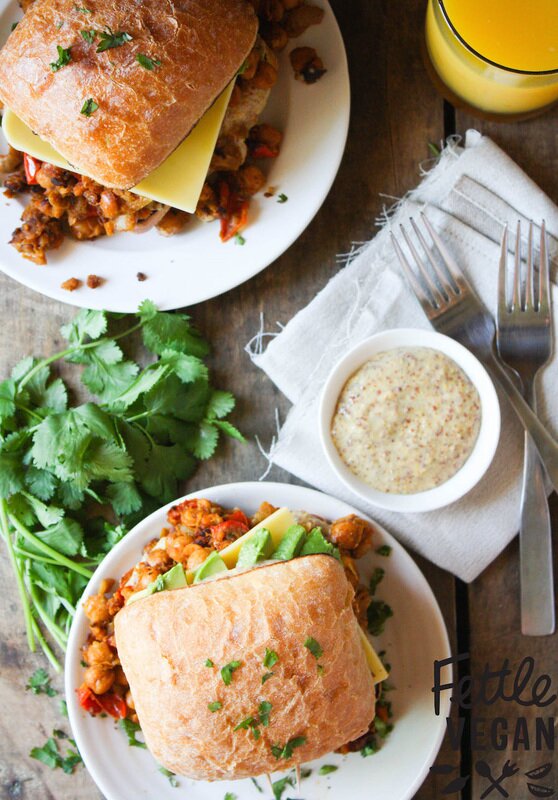
Chickpea Scramble Breakfast Sandwich
We love making protein-packed breakfasts around here. It helps get us through the day without getting sluggish, puts an end to mid-morning snacking, and gets us through our afternoon runs with the pup. One of our favorite ways to do that is to whip up a big batch of spicy chickpea scramble! We toss slightly mashed chickpeas into a large skillet, toss in whatever veggies we have and some of our favorite spices (usually some combo of cumin, chili powder + lots of garlic), and cook it until the whole thing is heated through and the veggies are soft. Its super easy to whip up, reheats well, and last about a week in the fridge! When I'm on top of my shit and food prepping, this is one of my faves. Sometimes though, eating the same breakfast can get boring. You've been there- breakfast rut is the worst! To mix things up we bought focaccia buns, piled 'em high with chickpea scramble, creamy avocado, a slice of Field Roast's new Chao cheese, a smattering of mustard, and a sprinkle of cilantro. PERFECTION! So much flavor and such a nice change from the usual faux meat + faux egg combo. So, let's eat!
INGREDIENTS:
Mexican Chickpea Scramble (about 1/2 cup per sandwich) 2 focaccia buns 2 slices of Field Roast Creamy Original (or your favorite sliced vegan) cheese 2 tablespoons spicy mustard 1 avocado, pitted and thinly sliced DIRECTIONS: Make up your chickpea scramble (the day before, if you like!) and heat it over medium heat until it is heated through. In a toaster or on a griddle, lightly toast the inner sides of the focaccia buns. Spread the inside of the bottom and top of the buns with 1-2 teaspoon of mustard each. Layer hot scramble onto the bottom bun, then top with a layer of sliced vegan cheese and sliced avocado. Serve and enjoy! Makes 2 breakfast sandwiches. Scramble can be refrigerated 4-5 days in the fridge and reheated.
<
|
tagsAll  RSS Feed RSS Feed
|